Major Transformation | How To Fade Balding Hair & Apply Hair Fibers
- Posted on 25 September, 2020
- Pixie
- By Anonymous
Clipper & Trimmer Hair Kit: https://amzn.to/3R9R6PS
Clipper Kit: https://amzn.to/3j3Z68a
GoFybr 25% off code: G2020
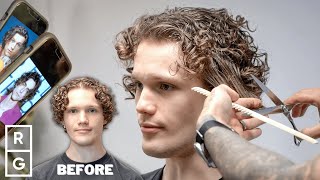
Give the best haircut for those with thinning hair, and add hair fibers to fill out the top!
Step 1: No guards (opened)
Step 2: #3 (closed)
Step 3: #2 (closed)
Step 4: #1 (opened)
Step 5: #1 (closed)
Step 6: Shape up
Step 7: Apply GoFybr hair fibers
SUBSCRIBE FOR MORE TIPS!
Welcome to tips for clips today, i will be demonstrating how to use go fiber to make it look like you have a fuller head of hair. If your hair is thinning and i'll walk you through a quick, step-by-step video on how to give a low fade. This is a quick look at the finished product and you can tell a drastic difference. First step, take all the clips and guards off and you're going to put it in the long setting the opened position for you beginners. This cuts your hair just a little bit longer than the closed position and we're just gon na go along the sides and the bottom here, making a straight line. I'M showing you here in real time and then i'll fast forward in just a bit. There'S really nothing to this step. If you have a good set of clippers like these, that i'm using right now, it'll take off everything very evenly and you won't have to go over it too many times you see how easily these clippers are taking off the hair right there i'll link these clippers. In the video description below - and you just want to go relatively low depending on how high you go here, that's what determines whether it's a medium fade, a high fade or a low fade, and you just want to make sure that it's all even and that you Leave no patches behind again invest in a set of good clippers and it'll go a long way. You'Ll recoup the value within just a couple of haircuts. As you can see, i go all around with each step that i do, and this is to save time and i drop down in the back a little bit compared to the sides. You see how it goes down in the back, and this is just a matter of preference and how low fades are typically cut next i'll be using a number three which reads: 10 millimeters and i'm putting it in the closed lever position the short position it cuts. A little bit shorter and here i'm going all the way up on the sides until i reach that thinning here, so you want to go along anything, that's even remotely thick on the sides, there's nothing more to it here. You just want to make sure you do not cut the thinning hair on top in this step, you're going to entirely leave the thinning hair. Next is a number two which reads: six millimeters, also in the closed short lever setting, and here i'm gon na go all the way up until where i went with the number three in the previous step. I don't want to go past where i went with the number three, but just up until there. The next step is going to be where the fading really begins. I'Ve put on my number one guard here which reads three millimeters and i am putting it in the long position. The opened position you see here and what i'm going to do is go about an inch or an inch and a half above where that stark line is the initial line that i made. I'M going to go just about an inch or an inch and a half above that with this number one in the long position you're going to see here in this step, you're going to start blending and there's only one more step after this. In order to complete our fade so take your time on this step, you see how, as i go up, i flick out because you always want to be fading and, as you go up, you go away from the hair as always go around on each single step. To save time - and you can tell - i didn't make a perfectly straight line in my first step in this part - so make sure that first step you take your time and make as straight align as you can, but there are always ways to fix any errors. So i'm going to use the lower guards to make sure it's blended perfectly on the side, but you see how the fade is already coming along really nicely here. For the last step of the fade, i'm going to keep the number one clip in and just put it in the short or closed lever setting, and all i'm going to do on this step is knock out. That line that we still see at the bottom. That'S all you have to do for this step. The initial line we created that you still see there all the way at the bottom. You'Re, just gon na go up about half an inch always up and out technique and you're going to try to get rid of that bottom line. One tip here that you'll see me using is, if you're ever wanting to pinpoint a specific part of the fade. That is not blending quite right use the corner of the clipper and target that exact part, so that you don't have to use the full width of the clipper blade and you can see we have a really nice fade here and it wasn't too many steps. A very basic low fade down to about a half. All that's left is to shape up the beard, the sideburns behind the ears, the neck and the shape up really makes a huge difference. It almost seems already like we're adding hair uh by defining the curves on the side and the sideburns, so this is a really important step. I have videos on how to give a perfect shape up and i will walk you through it here as well. You want to make the front hairline straight and on the sides you go straight down, as you see i'm doing, and you want to curve the sideburns as smoothly into the beard, as you can again taking your time on this step, you try to leave everything looking As natural as possible, you don't want to push back the hairline or push back the sideburns even along the sides. Here you see i'm going straight down along where the beard naturally curves behind the ears you're, going to use the t edge, the side of the trimmer and along the back, just make a perfectly straight line on both sides. You see here taking my sweet time making sure i have a well-defined line and i'll show you how to round out the back on the other side, i'm going to do the same thing you just want to make a straight line and around the ears you're using The edge of the trimmers once you have a straight line on both sides, you're going to start pretty low and go horizontally. You can choose here to round out your corners or to keep them straight and square here i chose to round them out and you see i went relatively low. You don't want to go too high, just go straight horizontally until you reach the vertical lines that you made on both sides. This will ensure that you don't make a crooked or strange looking line on the back here, i'm just going where the beard naturally meets the corner there. You don't want to go too high to the chin, but you also want to make sure you clean the neck and you can see what a difference the shape up is making now for the haircut and i'm just touching up the top of the mustache and now For the magic go fiber, hair fibers chose the black color to match his hair. Look at the difference. This is going to make it's pretty much going to make it look like he has a full head of hair on top and it's going to look very natural. So here i'm tapping on the back bottom of the tube, and it comes out in this very light powder and i like to sort of pat it down just a little bit to make sure they stick well. And, of course, you don't want to wash it out or anything like that after putting it in, but it stays for the full day, it'll even stay overnight uh you might have some hair fibers on your pillow a little bit, but by and large this product stays In really well so now i'm applying it liberally and you can see already what a difference it makes. I'M smoothing it out making sure it's in the exact positions that i want it in. The key here is to make it look as natural as possible without adding it in places that would look a little awkward if you added some fibers, for example, sometimes people put fibers uh too far down the hairline and make a fake hairline, and you don't want To do that and i'm just going to touch up a little bit more here. You still see there's some bald spots on the back and that's going to fill in those gaps. You can tell filling in the top. There really pulled the entire haircut together and all that i'm gon na do now is shape up the front which i like to do after adding the go fiber fibers and it adds another dimension to the fullness on top and here's a look at what we started With almost hard to believe what a drastic change it's been and after the fade and adding go, fiber here is the finished product. I hope you enjoyed this video for more videos, like this, be sure to subscribe, like comment and share i've linked to the product i've used in this video in the video description. I'Ve also linked it in the comments here are some of my other videos. Thank you for all the support for this channel and i will see you at the next video


Comments
Tips for Clips - Haircutting: Clipper & Trimmer Hair Kit: https://amzn.to/3R9R6PS Clippers: https://amzn.to/3j3Z68a Trimmers: https://amzn.to/3xum5wY
SexyArmyTeam: Awesome video! I done your last few haircuts. Doing this one soon!
D.I.Y. Hair Cuts: That's an amazing transformation!
Adria Fiona: This is a perfect tutorial for beginners… i cut my ex husbands hair for over 10 years but that was 10 years ago…. Lol…. So my current man now wants me to cut his hair…. Tonight is the first time…. I watched this video about 30 times…. Lol… thank you! ❤️
sixstringstak: Dang man wish you were in my neighborhood The fading was on point. Gonna give it a try. ty
Miguel Angel Martinez: Its interesting! The clippers always is in vertical position, i change the position in horizontal on the side of head,
Robert Buecker: that is a great haircut man!
Antonina White: What type of clippers do you use for the beard?
m p: You should try the pump applicator it's amazing..
Maria Muniz: Thanks so much! Tired of giving the mom cut.
Isaac Romero: Seasoned Bald Fade
Craig Gallagher: Nice work.
Nammis: So hair fibers are better for short hair than long hair?
Hanz Kafka: It takes someone to do it for you, you cannot get these results doing it yourself.
Nammis: Where can one regularly buy a good clipper. I live in Norway and I habr not found a good clipper anywhere. Is it at the hairdressers or in a special store that sells other electronic appliances like radios tv etc?
Nammis: Do you use any special spray to keep ot fastened down?
Ben Bakker: Let's hope its not windy outside
Dayum boy Dayum: Would be good to see this in the sun
EdgeTradingFX : made him look 10 years younger
Joshua Aguilar: Ima just go bald but thanks lol
Adria Fiona: Wish me luck! Oh…. And your client does look very handsome!
Stefanie C: What a nice solution. He looks very handsome.
Marjan Marjan: Wow
LiMi4IT: What about the link for the fibers?
Arturo S.L.: His hairline is just way too bad imo. From the front you can easily tell he's bald
ALIM OP CLUB: After a bath that powder will be removed and it will look like same
Angela mini kitchen🥘: Where does this hair building gofybr we can buy in butwal???
David Grant: What if it rains
Todd Hefer: Get a hair system it would look great! God Bless in Jesus Christ Name Amen.
Eldhose Cheriyan: It's only for One day
Rohit Tivetia: This is me.....but I don't use it.
Edgar The Eagle: I wonder if you live in a humid and Hot area like Miami.....will your sweat will melt down the material and embarrassed the rest of your day?....or if you by tipical reflexes carese your hair....will that stain your hand and sleeves?....anybody experience this?
DeezN: the fibers are nice but what happens after you get that hookup and she finds out your bald ?
M Digital Marketing Solution: Try Gorilla Grow Hair oil before trying propecia
Vu Huynh: Bro where you cut at I’m balding at 27 lmao and need your work
skateforbaker1999: You used hair fibers doesnt count
Pertplus: Great haircut to pronounce the balding. Just shave it off !
Bronek: He Has a good doner area for hair transplant
UnformedBog9059: Jesus Loves You
ah med: Omfg
H Mit: Just shave that fuzzy hair off, grow a thick beard and be a real man!