Can I Pull Off A Pixie Cut? - Short Haircuts For Curly Hair
i’m sure we’ve all wondered, “can i pull off a pixie cut?” chopping off the long hair can be frightening! in this video i’ll answer ALL your questions about short haircuts for curly hair. by the end of this video, you’ll know whether chopping off your long curly hair will be for you.
before we get started though, we just wanted to tell you that we do a MONTHLY FREE PRODUCT GIVEAWAY. each month our system randomly draws for a winner (no purchase necessary). you can enter to win at www.nvenn.com/giveaway .
in this video, veronica is going to show you the PROPER TECHNIQUES to turn LONG curly hair into a short haircut for curly hair; the pixie cut ♀️.
if you’re contemplating chopping off your long curly hair, you might be thinking 'can i pull off a pixie cut?' - YES, YOU CAN! and we are going to show you how!
veronica’s model today is natasha ❤ she’s modelled for us twice already! she has done a curly haircut with layers. - https://www.youtube.com/watch?v=oHWokH...
as well as a haircut that someone could wear curly and straight. - https://www.youtube.com/watch?v=pJ0bUk...
you should definitely give those videos a watch if you have clients with thick, curly hair - like natasha.
natasha is back in our chair today and is CHOPPING OFF HER LONG CURLY HAIR to transform it into a beautiful short curly haircut.
veronica is going to fill you in on the BEST TECHNIQUES and tricks to mold those WILD CURLS into the perfect pixie cut♀️! one of the techniques she’s going to show you is how to remove BULK (weight in her hair) while maintaining a LUSH, CURLY LOOK.
HIGHLIGHTS:
00:05 what's the PLAN?
01:53 take a look at this SECTIONING
02:12 where to start
02:52 cutting your GUIDE
03:01 protip #1
03:25 continue graduating the MIDSECTION
04:21 the best technique for SHORT curly haircuts
04:45 protip #2 for a perfect finish
05:03 cleaning up her edges
05:41 chopping of the TOP
06:45 keeping the cut EVEN
07:00 OVERDIRECTING to preserve the length
07:48 BLENDING the top into the side and back
09:17 getting the blend just right
09:53 fine tuning for a picture-perfect finish
10:12 a unique technique to get rid of extra weight in the hair
11:26 nvenn 'replenish' restoration oil - nvenn.com/replenish
11:49 nvenn 'curl' a fabulous curl activator - nvenn.com/curl
12:24 'nvenn texture' weightless molding paste - nvenn.com/texture
12:40 SETTING the curls
13:05 why curly hair needs to dry NATURALLY
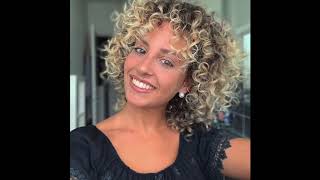
13:43 the FINAL LOOK
14:22 amazing products with clean, natural ingredients - nvenn.com
14:50 enter to win a FREE SPLIT END TRIO - nvenn.com/giveaway
find a client to try out this transformation yourself! leave us a comment below and let us know what you think
-----------------------------------------------
a message from 'the sisters' :
secondly, if you CAN'T WAIT to win and you want to try out our natural high-performance hair care products, you can get yourself your own at www.nvenn.com/shop" our products are easy to stock and easy to sell.
we are makeover specialists; we call ourselves beauty strategists actually. we come up with beauty strategies on how to get our clients to their dream hairstyle.
we know what clients LOVE and what keeps them coming back to you AND we also know what client's BIGGEST hair complaints are and what their complaints are about their stylists.
on our channel, we want to SHARE WITH YOU all of our industry hair tips! all we want to do is help to grow the hair community and HELP YOU to grow a BIGGER SALON CHAIR BUSINESS
WE WILL SHARE :
-hair cutting and coloring techniques
-live hair demos
-tips on how to educate your clients
-make over hair transformations
-tips on how to grow a BIGGER SALON CHAIR BUSINESS
watch all of the hair magic happen by subscribing to our channel! make sure to CLICK THE on so that you are notified whenever our weekly videos go LIVE!
we also have a sister channel about make up and holistic beauty (@dollareyelashclub) and i (jessica) have a personal vlog about LIVING A LIFE THROUGH INTENTIONAL DESIGN AND CREATION.
BOTH OF THESE CHANNELS are linked under our featured channels so make sure to follow those ones too!
if you want killer VEGAN CRUELTY FREE LASHES that are HIGH QUALITY and AFFORDABLE (for as low as $1️⃣ that SHIP RIGHT TO YOUR DOOR) go to www.dollareyelashclub.com to place your order♀️.
we aim to change the world through hair and beauty. join us! TOGETHER we can MAKE A BIGGER DIFFERENCE #carebeyondhair #changingtheworldthroughhairandbeauty #inventyourworld #nvennhairbeauty
--------------------
shop products : https://www.nvenn.com/shop
shop $1 lashes: www.dollareyelashclub.com
youtube/ instagram @DollarEyelashClub
jessica's vlog: https://www.youtube.com/channel/UCDbE...
if you share that same belief, JOIN our community of #beautyactivists in our movement to #carebeyondhair . IT'S MORE THAN JUST HAIR! go out there and #changetheworldthroughhairandbeauty .
Hey beauty activists welcome to this week's video, so today i'm going to show you guys how to do a short curly haircut, i'm going to be doing it on natasha and you've. Seen her before i've done, curly haircut with layers, i've shown you a haircut of how you can wear curly and straight so, where natasha's at right now is that she is getting tired of having the long hair, and so she wants to go short again. So we've done it before she looks fantastic in it. I think she looks like halle, berry, she's, so beautiful um, and so what i'm gon na do is i'll. Show you step by step, how we take her long haircut into this short, beautiful, nice tapered uh haircut. Almost like a pixie style with a longer fringe i'll show you guys, step by step. How we do that before that, though, a bit of housekeeping make sure you guys are subscribing to the channel, we are putting out new videos every single week. Our goal is to teach you something to master your craft master, your business and just master your life in general. So we really want to be here to support you guys here at neven, hair and beauty. We believe that you can go out and change the world through hair and beauty, so that is what we want. You guys to go out and do okay, so also go check out our website. We have our products at neven.com. They are beautiful, amazing, natural premium, haircare products that are going to make your hair look and feel amazing. Okay, we also have our sister channel at dollareyelashclub.com check them out as well. We got vegan hand-tied lashes for as low as a dollar a pair all right guys. Let'S get started, we have natasha's hair, all sectioned out, as you can see, we have the back split into half down the middle and a section in the bottom nape and then on the very top. We have it sectioned out into a horseshoe now to cut we're going to start in the center back. In the nape section, we are going to be taking a section right down the center, we'll be pulling the hair straight out from the head and holding our hands. Perpendicular to the scalp we're going to be point cutting into the hair to create a softer edge. This is going to be removing a majority of the bulk so that later we can come back in and perfect it we are going to work in the center. All the way out to the outside on one side of the head and then come back to the center and work towards the outside. On the other side, we are using our previously cut section as a guide so that we can create a uniform length across the nape, make sure to continuously wet down the hair, to make sure that the hair is evenly saturated all the way across the strand. This is going to ensure that you can have even tension in the hair so that you can pull the hair out evenly while cutting now we're going to work into the mid sections, we're going to start on the left side of the head. First, we will be starting at the back of the section and working our way forward, we're going to take sections of the hair and pull it straight out from the head and we're going to be putting layers into the haircut. So we're going to be holding the hair straight out and cutting the hair matching up the bottom length of the layer to the nape section length on the bottom, with the bulk of the weight and length taken off now, i'm able to go in and refine the Haircut, i'm going to use a scissor over comb technique. The reason why i'm going to choose a scissor over comb technique is because i'm really visually able to see how the curls are sitting. So i'm able to go through and customize the haircut according to the length that i want to have and how i want to see the curls as i'm doing the scissor over comb technique. I am also making sure to periodically re-place the curls how they should be sitting. This is important so that we can see how the curls are actually sitting and how they'll sit when the hair is styled. I am cutting in a taper around the edges of the haircut, so that is going to be a shorter effect growing longer as it goes up. This allows for the hair to sit tighter around the bottom of the haircut and then blend into more curls as it reaches the top of the hair i'm going to be going through now around the perimeter and just cleaning up the edges. So this is going to be along the edge of the haircut along the face, as well as the ears. Now we're going to be working through the top horseshoe section of the head and we're going to be cutting the top now to blend in with the sides and the back we're going to start at the back of the section and work our way forward. We'Re going to take our first section and pull it straight up from the head, we're going to be using our previously cut section from the section below as a guide. So we know how long to cut the hair. I'M going to be point cutting again into the hair softly to add more texture into the haircut as we work forward in the section we're going to be over directing our new section into the previously cut section slightly over directing it back like this is going to Give us a gradual increase in length from the back to the front. You want to make sure to cross check the haircut periodically throughout the haircut on each side. This is going to ensure that your haircut is even - and you want to do this throughout the haircut. So that, if you have something that needs to be fixed, you can do so while you're doing it without having to go back and re-cut the entire hair cut again once the crown is all cut in the back and we're working towards now. The front part of the haircut, what we're going to do is we are going to increase the over direction backwards so that we can really preserve as much length as possible so that we can have a lot of long curls falling forward. So we're going to take each section now and we are going to over direct it all the way back to the length at the very back of the haircut. This is going to allow us to preserve a lot of length around the front so that we can later customize the curls exactly how we want it to sit. We now have the top length all cut. What we need to do is now blend the top of the haircut into the sides and the bottom so we're now going to be working along the corners of the top, which is the parietal ridge of the head. So this is going to be the outer edge of our horseshoe section, we're going to be taking sections from the corner of the hair so along the parietal ridge and we're going to be pulling it straight out. We'Re going to see a corner there, which is where the top length meets the side lengths, and so we are going to cut out that corner and what that's going to do. It'S going to blend the top of the hair to the sides and the back any corners that we see in the haircut are going to create weight and disconnection. So when we blend out those corners and we take those corners off, it allows us to have a seamless blend around the haircut to balance the back and the sides to the top again make sure that you're keeping the hair very wet so that we can have Even saturation so that we can have even tension throughout the haircut as we're cutting working on the other side, we're going to be doing the same thing, taking diagonal sections and blending in the top to the side so taking out any corners that we see in the Haircut now we want to finalize how the front of the haircut is going to look, and we want to make sure to blend in the long length that we kept with the rest of the haircut we're going to be taking vertical sections. Now, from the back of the head to the front of the head and we're going to be blending the shorter lengths that we have in the crown with the longer lengths that we have at the very front fringe. So what we're going to be doing is we're going to be pulling the hair straight out and again taking off any corners that we have in between the shorter length in the back and then the longer length in the front. We want to see a seamless transition from back to front now that the haircut's all done, i'm going to do a little bit more fine tuning to complete the haircut i'm going to do scissor over comb along the sides and the back. I just want to ensure that the hair is the length that i want it to be and that everything is sitting nicely. I'M now going to go through the haircut and take out more weight. Natasha has a lot of hair and she does like her hair to feel a lot lighter. So we like to take out a lot of the bulk, but it has to be done properly. So i'm going to be using a technique called root thinning, and this is where we take our texture shears and we take hair out right from the base of the haircut. This is going to allow us to take out weight very evenly in the haircut where we're not just texturizing the ends. While we still have a very thick base, we're going to be evening, the texture all throughout the base and the ends by taking the hair right out from the root, be very, very careful doing this, because you are taking the shears to the root of the haircut. You want to make sure that you're not over texturizing and taking out too much hair and make sure that you have the proper texture shears that you're not taking out chunks of the hair. I'M going to work through the haircut from the back to the front. In the same way, being very clean and tidy using sections, we want to make sure that in this process, we're evenly taking out texture throughout the haircut so that we don't have one side of the haircut that's going to be heavier than the other. I'M going to be putting replenish oil into the hair with curly hair. It needs to have a lot of moisture for it to hold the curl nicely. Replenish is a amazing oil that goes in and fills the cracks and crevices of the hair really overall smooths it moisturizes it and adds luster and shine so really great for any curly hairstyle. I'M now going to be using our curl cream, which is a curl activator. It really brings the curl out and provides moisture and hold. We have mango seed butter in it, which really gives the softness and moisture that the hair needs and then what's great about this product as well. Is that it's buildable so depending if whether you want a softer touch, curl or more of a formed curl with a lot of hold you're able to customize them out and you put in the hair. So this is going to really bring the curl out and give her the hold throughout the day that she needs to keep the curls looking nice last, i'm going to be putting in our niven texture paste. So this is a really great whipped paste. It gives a very very nice natural, hold and natural look to the finish. So i like to mix this in for my curly hair clients, because it gives that little bit of hold to the curl to keep it looking, smooth and well maintained with curls. You don't want to completely dry the hair. You want them to set and dry, naturally from wet to dry. So what we're going to do once the product is popped in i'm now going to be twisting the curls so that we can get a very nice curl shape into them. So the hair can dry like this and then once it's dried, we can shake them out. I'M going to put her under the dryer here for a short period of time, so that we can take out a little bit of the moisture but keep it in its curl formed shape. Once we've taken about 50 percent of the moisture out we're going to now just let the hair air dry because we don't want it to get frizzy, i'm just going to place the curls exactly where i want to see it and from here it's just going to Dry on its own, naturally allowing the hair to dry naturally is going to prevent the hair from swelling and getting very frizzy. So it's going to set very nicely in the curl there. You guys have it. That is how to do the short curly haircut here is a photo of how natasha's hair actually fully dried. We know that when you are styling curly hair, you don't want to take out all the moisture on its own because it's going to get frizzy. So we do want to have an element of natural drying with the curl, so i got natasha to send me a photo of how her curls look so that you guys can actually see how it looks fully styled. If you guys have any questions about that. Leave. A comment below i'm going to answer them for you and if you guys have any other questions or videos that you guys want to see, let us know we love to hear from you guys so make sure to show us some love guys hit the like button. Hit subscribe, we're putting out new videos every single week, don't forget, go check out our products at neven.com. Buy them, try them you'll, love them in your hair. Your hair is going to be softer shinier. Your colors are going to look amazing and the best. Yet. Is that it is a natural line, the base of the entire line is organic sea kelp extract, so your hair is going to be nourished from the inside out um, that's going to be at neven.com. If you guys want to win free products, go to neven.com, backslash giveaway. We give away free products every single month so enter to win and you can win free products other than that guys. We love you stay tuned for the next video and we'll see you guys. Next week, bye you

Comments
Rachael Moyer: I love this tutorial!! Thank you so much! I've been wanting to learn a curly pixie haircut and your tutorial is the best so far!
Rebecca: I have been waiting for a video like this for years. Thank you! I really like the way it looks at 7:32. Could you give me some tips on keeping lots of length in the front but short everywhere else? I usually don't love that style with straight hair but curls might be able to pull it off
Audrey G.: Any kind of thinning procedure on coarse curly hair will ultimately lead to frizz. Once those thinned roots grow an inch or so, they will be at the top, causing trouble!
Jigna Patel: I need this for my hair!! My hair is similar to that of your client. Whenever I try to get this they dismiss my wants with, you need a bob.
John Coats: Thank you for posting another video about curly hair. I used a video you posted a while back as a guide to give my wife a culry pixie cut (https://www.youtube.com/watch?v=CCFUdX67Vqw&t=39s) (She also has very thick and curly hair) and she loves it. Thanks again for the videos.
Jo Hoare: Wow talented hair stylist who can actually cut curly hair
Ladosha Wright: Outstanding education! I admire you ❤️✌️
Dante Velasquez: It looks so chic. Maybe now she will stop straightening it and keep it natural. Such beautiful hair.
Sol Valenzona: Nice soft curl it comes out naturally
Cristina Filipe: What I asked was how to cut a short hair on thick curly hair but making it STRAIGHT like a normal beautiful real pixie cut, but I can't find it I don't want the curls I want to ERASE the curls out of my hair
Sarah Adams: You are the best. Thank you for posting
Elizabeth A10: Wow! I want the same cut! Any chance u r located in Atlanta? Or know someone who can do this in Atlanta?
hanin moosa: Finally I found a video thx
MinnieBADTV: If she dnt sit still wth she keep movin her head jus say yes y u nodding lol