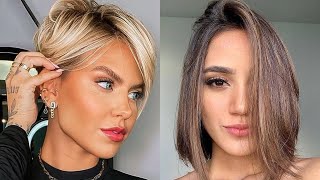
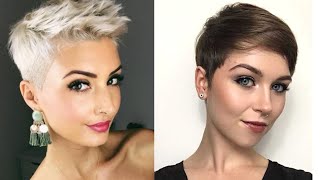
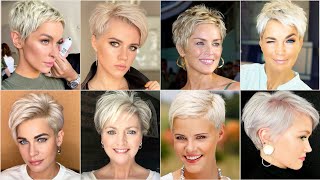
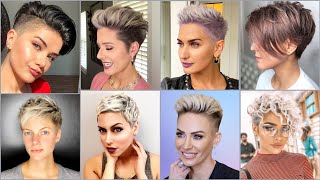
Short Soft Pixie Haircut & Hairstyles For Women | Short Layered Cutting Technique
Short Pixie Cuts | Learn how to cut a Short Layered Haircut tutorial. A pixie cut is a short hairstyle for women for all ages, hair textures, and face shapes.
"I Love Haircut - I Love Hairstylist"
So, let's do something short uh we're gon na be working with our fancy scissors today, we'll also be working with the fancy scissor texturizing scissor prototype that will soon to come out that i'm just kind of playing with while we figure out what to do with it. I'Ve got a doll here that i've kind of already cut something like sort of short on like it's got. It'S got like a little bob on one side and then this longer knot cut side, but we're just going to go ahead and take it all the way down. It'S going to be a pixie with like kind of like a little fringy baby bang. I also realized. I don't have a cutting comb. I only have a rat tail comb, so i'm going to use a rat tail comb to do it so whatever who cares? Let'S do it if you have any questions, put them in like that question, folder thing, and that way i can get to them a lot easier and sort them out without having to scroll through all these uh comments. Oh last thing: i've got um a giveaway that we're doing we're gon na be giving away two different things. You have two different options to win. All you have to do is screenshot a moment of this live stream post it to your story. Tag me tag goldwell and you'll be entered to win either a new pair of fancy scissors. That'S right! Pretty crazy pair of fancy scissors free coming to you uh! You can also win a carousel package that includes so many different products to get you through. That sort of dryness that our hair goes through in the winter like seriously, so many different things from goldwell from the carousel blind, so just screenshot a moment any moment of this live whether it's now or later post it to your story. Tag me tag goldwell and you'll be entered to win so uh we're gon na go ahead and get started here, shelby's over there cooking. What are you cooking today? It'S a secret, it's a secret! So if you want to see what she's cooking you're gon na have to go to her page later and find out, i don't even know probably reese's peanut butter cups. That'S what i just ate, because it's after halloween so first thing that we're going to do um for a pixie is really just you know. We'Re talking about short feminine hair is what i think about. Like short soft hair, like a pixie, you know so um we're gon na think about. Where does the head change shape a bit? So i'm just gon na look on the side, see like press my comb on and where does it start to come off the head? There on the side, and that's where we will take sort of a horseshoe type section here - you can take this higher or lower and it will change certain things. If you take it a little bit higher, the sides will sort of take up more of the weight and you'll have less weight on the top you take it. Lower you'll have more weight on the top that will hang over um. Sometimes, when you take it too high, you run the risk of flattening it out or rounding out the corners. So you have to think about those kind of things and how much weight you have on the top and how much weight you need to save slash. Take out what kind of head shape do you want to make and then we're going to clip that up and away pretty easy stuff. So let's go to our questions before we get in there too deep we'll see what we've got going here. Do you typically use a rat tail comb? What haircut are you doing uh? Do you use a cutting lotion? No, i don't typically use a rat tail comb. I just only have a rat tail comb at the house. I realized i opened up my case and there wasn't a comb in there and i was surprised, but there was a rat tail comb, so you know we're going to go ahead and do it with the razzle home. It'S fine. It can be done, it's not ideal, but you can do it. Um we're going to cut a pixie some semblance of a pixie, really we're going to cut short graduated shape on the side and a layered shape on the top. But it's really gon na be a pixie and do i use a cutting lotion? Sometimes i will use like a detangler in the hair before i go and start cutting, but i don't often use like a specific cutting lotion like oh, i always put you know x in the hair. Before i cut mostly just water is what i what i end up using um and again we're going to cut a pixie, but i don't think there's anything wrong with doing that. Sometimes people really do a good job of cutting lotion. So remember to put your questions in the box: uh we'll go ahead and get started, we're going to start with diagonal back sections. We can tilt this girl away just a little bit we're going to take a diagonal back section like that comb that forward comb. This back just to give us some control we're going to pre uh cut into graduation here so um. We want things to be a little shorter at the bottom, a little longer at the top we're going to cut it 45 degrees, so we're building weight up. So here we go we're going to lift this up, i'm going to i'm not letting it drop all the way to the face, i'm pulling it up and out like this, and then you can see the angle with my fingers once i actually go to cut, is Going to be 45 degrees, so i'm coming out and i'm angling out at 45 degrees. Let'S turn a little. You might see that angle even better, so we're going to lift up and then come out 45. Just like that, and i'm going to use like a little flat position like this, i'm not going to hook my wrist over and cut i'm going to keep my wrist straight. So i don't hurt my wrist. You could also turn your arm like this and cut more classic, but you know either one is totally fine. I'M going to do flat 45 flat position, cutting down trying to keep your fingers really nice and straight as well. Remember when you're cutting with scissors, your fingers are literally determining the line, so you got to make sure that you kind of force them to be extra like straight and clean. So that's our first line first graduated shape and we're going to have a traveling guide here. So we're going to take our next section diagonal back again, just parallel to that first section we have a traveling guide, so we're going to travel with our guide, so we're going to take a little step in the direction of the guide and we're going to basically Pull straight out from where this lives uh hold it at 45 degrees, just over directing slightly to the previous to get a reference for the length we're going to come out to 45 degrees, see that 45 degree angle and then we're going to cut down flat on The side just like that, you might have seen a lot of celebrities wear a cup similar to what we're going to do. I mean you saw jennifer lawrence, where i think a pixie like this um. Oh, my god, i always forget her name, but it's a girl from wall street money, never sleeps, which is a movie no one ever saw, but she also wore this pixie. I cannot remember her name, but it's a pretty popular look. So i think it's one of the most important cuts to learn and be able to do a few variations of, because it'll make sure that you are a capable haircut of the salon. So let's go back to our questions and see what we got going on here. Spanish tutorial, please, i definitely think we can handle that my sister um is married to someone from spain. My i can just say my brother-in-law is from spain and they are both spanish teachers. So i really we actually plan on having them translate all of uh fancy. Hairdressers.Com at least having um spanish subtitles so we're working on that i've got ta really get with her and make that happen, but we are planning on doing that. Let'S see, i think, that's the only new question so we'll move on but yeah. That'S a great! That'S a great um thing to talk about that. We are working on doing so next section diagonal back again little step in the direction that we're we're moving because we have a traveling guide. We got to move with the guide, we're pulling this basically out from where it lives. I'M not letting my fingers drop down flat forward. We want to pull this out and then angle at 45 degrees, so we're we're getting heavier towards the top tighter at the bottom. We'Re building some weight up there, so you can keep your fingers nice and straight i'm working with a flat position there and we're just gon na continue that same line using small sections, so that we can really see our uh previous section see our guide really well. If this new section is too big, then we're going to kind of push the hair around a little bit when we cut it's not going to cut cleanly and we're not going to be able to see our guides, who are not going to work um as accurate. So if you're just joining up the live, remember there is a giveaway happening and all you have to do to enter is screenshot a moment of this live repost it to your story. Tag me tag, goldwell and you'll be entered to win one of two prizes. One person will win a brand new pair of fancy scissors coming straight to you at no cost of course, and then uh. The other person will win a carousel package that you win all sorts of different products from the periscope line, with goldwell they're, going to be great this winter to help keep your hair, nice and moisturized, and you can feed that winter dryness that we all go through. Shelby, i believe, she's cooking, a plastic bag in the kitchen, i'm not you sure, to go. Live she's like you're, going live in the living room which is connected to the kitchen. So it's my fault she's right. So we're really we're getting some beautiful, uh short graduation. Going on here, let's take a look at it kind of close up. So here we go open this up, we're coming in. You can really start to see the buildup of the weight. So we want to see this a little up of weight. There. You see the weight line kind of comes across and then it flattens out a little bit. So it's like you build up the weight and then you flatten it out. Let'S get a little closer. You guys want me to get slightly closer. Can this technique be used with a longer section? I think it could be used with a longer section um. You used to see a haircut uh doing some round. Graduation, like this called the firefly. That was a little bit longer real, wide and kind of bulky like that which was cool um. But i don't think many people ask for it like that anymore and then maybe you saw some 90s kind of like more sort of bully flowy like brushed back graduation. That was a little bit longer version of this. Try it see if you like it, you know you can do anything. You want, i'm pulling the head straight out from the yeah pulling the section straight out from the head slightly over directed to the previous. Just you have a guide from the previous and then um you're, making your fingers a 45 degree angle. So it's not like i'm pulling this down you're right, that's a great thought, i'm pulling it out and then angling my fingers at 45 degrees. Let me turn so. You can see that ankle better she'll be beating a chicken to death in the kitchen. Look at that 45 degrees straight up in the head at 45 degrees, so your knuckles are in on this side out with the fingertips coming down notice, how i use the comb as like a reference and a ruler like every time to kind of make sure i Have the right angle going on so we're going to tilt this away until it's a little funny there, so diagonal backs travel and guide. So just almost like a vertical diagonal back right now, you know if you like, move those diagonals around it'll. Give you slightly different end results as well. So something to think about is that if this diagonal gets closer to horizontal, it's going to build up heavier it's going to change your shape. If it gets closer to vertical, it's probably going to be a little bit flatter and leaner um. You know your finger angle will also determine that, but that's why i i want this to be not too crazy heavy if it gets too heavy. It'S going to look. Oh i'm using a rat tail comb guys because i, if you're just tuning in i'm using a rat tail comb because i didn't have a cutting comb at the house, but i'd already tried it to go live so i'm just we're making it work we'll do it Live um, but you know it's not ideal to cover the right telecom, but clearly it can be done. You know it's fine anyway, we're moving on continue to either rotate your client or take a little step. As you go. Remember guys put your questions like like formally submit the question in the little question function or whatever yeah oh geez, and that way i can get them in a more organized way. So we're taking diagonal backs just like that comb. This back. We have a traveling guide. So i'm picking up this section so i'm like look look. I just pick it right up and then i don't actually go like. Oh, let me get some of the guide there and like section it out, you can do that if you want, but it it's easier. Just to let your comb like pick up some of that previous section for you and now i've got that guide in my fingers and then i'm just looking for that 45 degree angle. It should be very apparent. You should be able to like see your guide really easily there, then i'm going to take a flat position and work down getting heavier at the top tighter at the bottom. I'Ve got a little bit of extra weight at the top there because i lost tension slightly at the top. So if you, if you do lose tension, it's going to make things a little heavier in that spot. If you do too much tension, the hair might jump back and like spring out and stick out with those cowlicks or if the hair has a strong texture. Um, so be careful about that. I literally cut this haircut once uh on someone who had very jumpy texture. It was sticking out everywhere on and i was done with one side, my mentor, this guy named wayne lee who was um a teacher evidel sassoon. He works at a salon in um in beverly hills. Now he told me: let's go ahead and cut the other side, but we're gon na use less tension and it's not going to jump as much, and i actually argued with him a little bit and i was like you know. I think it's just jumping because it's just her texture, this isn't my fault and he's like: let's just try it and how about you shut, have it shut up and um? He was right because we went ahead and cut the other side. I used like actively and presently used less tension on the hair and the hair laid down and um. Like sat a lot better, so i would definitely suggest that tension is going to affect the way the hair moves. After you cut it, it affects the shape the behavior of the hair, all right so just re-wetting that down a little bit again diagonal back comb this out of the way we're lifting up we're going to work from the top down. So we start off with a guide: we're going to come out to 45 degrees, so remove this. This girl make it easier for you to see we're literally just going to come out to 45 degrees. Just like that 45 look for our guides. I'M going to cut to my second knuckle and then i'm going to stop because past the second knuckle. I don't really have great tension. Some people have killer tension all the way through do what you want. If that's the case, i don't really have great tension past. My second knuckle, so i'm definitely trying to make sure that i stop at the second knuckle and and move on from there. Sometimes, though i do just have to absentmindedly cut past it and it's also not a crime, but i will usually go back and check that area. If i do, because i will know that i've been cutting with less tension on that spot, trying to figure out how to cut with a rat tail comb is not an easy task. It'S not a horribly difficult task either, but it's not super easy. So, let's cross check here cross check. We should um basically have this like rounded section, which looks like we've got a little extra weight in the front because we're just following the shape of the head, so it really shouldn't change all that much oh, it looks like we missed something like right there. So let's go back and look at why there it is like i found it right away, little corner at the top. You see this little nub. We'Re gon na connect that in so when we're cross-checking. If we see something that's like oh, this is too um. This is kind of a lot or it's more than just a tiny, tiny little amount. I like to go back and cut it. The original way that i cut the shape, otherwise it might change like the shape. This should be a check, nothing real, crazy, don't take off too much all right. Let'S go to our questions we got anything new here are fancy scissors best used on wet hair fancy scissors are great for wet and dry i'd, say: they're, not technically a dry cutting scissor, so um you know wet cutting is, i guess, is generally the intent, but I use them on dry hair, all the time i'd say, maybe hit the sharpen them a little bit sooner if you are using them on dry, coarse hair, like for every single cut. I'Ve been doing this for, like 13 years gone on 14 years, show us how you're using the scissors. What'S my favorite scissors fancy scissors are my braid of scissors, guys so um again, if you're just tuning in, we have um a giveaway going on that. If you screenshot any moment of this live, and then you post it to your story, tag me tag. Goldwell you'll be entered to win a pair of fancy. Scissors you'll also be entered to win a goldwell carousilk gift package with a boatload of awesome products. So make sure that you screenshot post tag me tag goldwell um, the way that i'm holding a scissor is i'm literally just dropping my fingers like that, and then i'm resting my thumb. How do i show you here? I'M just resting my thumb on the scissor like that, like i'm, not actually sticking the thumb in i'm just resting it on. You see that, but it works just fine to open and close. I don't need to as soon as i i put my finger in the thumb hole it changes like my range of motion is not as good so really it's like. We just want to flatten our fingers out and then rest our thumb, so we flatten out rest. The thumb rest the thumb right there boom and that's how i'm doing this like flat hand position whatever you want to call it. You like there's a guy named ben brown that does underneath he calls that an eastern grip. I don't know why. I call this a flat grip, a flat position because it makes like a flat surface. I'M sure ben does have a good reason, though, but i just don't know it anyway we're moving on. So here we go vertical diagonal backs using a rat tail comb uh, because i do not have a cutting comb, not because i want to be using the rat tail comb. I don't just cut the rail telecom because i want to be different and cool, even though it does make me different from the cool anyway. Diagonal backs 45 degrees, we're just geez we're just carrying this section, all the way down through the back simple, easy, repetitive, that's what hair cutting is a lot of repetitive motion, really, whenever i'm done cutting, i comb the hair back and forth. So i can like look for like what is the movement doing? What does the weight look like i'm like looking at the shape like really, i want to see because i'm cutting around graduation. I want to see this graduated line that flows in like a round shape. You see it's like round in that way, so i want to see that weight line float round through the back of the head and i want to see a graduated look. So i want um this to kind of like come out angled out, and i want it to flow with the shape of the head back. That'S what we're getting, which is good news so anyway, we're going to continue with these diagonal back sections, combing them to the side. You can comb this up and over out of the way and we're going to work at 45 degrees, so use your guides underneath lift this up, pull it out from the head angle, at 45 degrees check for your guides and then connect. You don't want to lift up too high. That'S going to start to layer, it you're still building some weight here, pick up some of your previous guide 45 degrees, with your fingers check for my guides and flat position and we're just cutting down it's a little too thick at the bottom. I'M going to just subdivide that a teeny bit angle see the rat tail. Comb keeps getting me. That'S a fun challenge, though, just to make things like a little more interesting do like funny fun little challenges like that cut a whole haircut with a rat tail comb. That'S like something from sheer genius or something like. Oh, this should really throw a wrench in this guy's game. Yeah yeah did they do that yeah on cheer genius? They used hedge clippers, which is awesome. I could probably do something like i saw one that was a cheer genius that was just like. Oh um cut this haircut dry and that was like well, that's like what we mostly do. A lot now in the salon cut a lot of dry haircuts. So i just think that was a pretty funny one anyway continuing diagonal back still working at 45 degrees, so you can have this head really. However, you want as long as you get the angles right just following what we have underneath: keep your fingers really nice and straight, and then we're just going to connect this in like that to get an even better view of it, i'm using a stand. So it's not as good as when you have someone holding the camera the whole time so 45. You can cut it kind of in more of a classic way like that or you can cut this way. If you're able to do a flat position. I think it's more comfortable this out continue at 45 degrees. It should get tighter down towards the bottom and we're just working off this, like a horseshoe section at the top. So, by the time i get through the occipital area across the other side, we won't have anything left so again, pull this out at 45 degrees. Now we're just basically working on the weight line right there. It seems more comfortable to work in a classic way, but then, by the time i get back here, because i have to like angle my hand like so much i'd rather just do this, and it makes it easy to do i'm not stressing about like. I don't really think there is a right and wrong. You know, so you can do whatever you want. As long as the outcome is what you expected, there was no surprise to you about what happened, so i don't care hold it. However, you want, as long as the shape is right, so there's my guide again. We just have a couple more sections here and we'll be done with our graduation on the side of this pixie which, when i say pixie, it's really just short feminine hair. I mean that's what i mean by that i'd say initially, when i think of a pixie. I think something that's like very short all over, like short on the top as well like, like mia pharaoh or or something like that, where um hermione, when she cut all of her hair off. What is her name again? Oh god, is that a rubber name she's a wizard or are they witches? Are they all wizards? Is it witches? Are they or is that a totally different vibe, which is in wizards what'd? You say, oh blender's, coming on, you guys are in for a treat uh-oh. The dogs are freaking out because shelby is making some kind of secret dish over there. That you want to tell me what it is. So here's the graduation cut, let's um put this one here that fell in so the beginning of the pixie is sort of this. Like more graduated shape, you see how it like follows: the shape of the head round down towards the occipital area. So you get kind of more of this curvy like soft round shape on the side, and that's part of what makes it more feminine is that it's not so square and flat. It'S like a little bit more round. It'S a little bit softer. So you know when i'm cutting something i want to be softer. I usually will use round shapes when i want something to be stronger, i'll use like more square shapes or like more flat shapes. So that's just like a a general way, not necessarily like what you have to do, but you know i think that is a good way to think about it. Now i'm gon na maybe open the face up a little bit here in the front like the perimeter like the outline is also a big part of like what makes something more feminine, i feel like so you've got to like figure out what you want to do With the outline to make it feminine, you know i'm going to ignore this front and i'm right now, i'm just thinking about right here. I think it'd be cool to have a line that like uses the cheekbone kind of as a reference. This doesn't reach it. So that's why i was ignoring that. I'M just thinking about the bottom, so where's, my cheekbone there we can come in and maybe the chic a little bit cut the ear up, too, is what you got to do: slice that ear up. That'S what they want come in. You know it's easy, honestly, it's easier on a doll because it's like the doll doesn't get in the like. It doesn't matter about the ear and everything so and then i want this to be kind of rounded out. I'M trying to do not have to block the camera to do it so here in the front. I want it to be more like rounded to like open the cheekbone up, show the face more. So, let's come in from the top we're just going to work that down to that other line that we cut. You have to kind of blow dry to get roundness there on the side, let's round it in round it and round it in, and then we get more definition through here and we come and nip this up over the ear, nip the ear, a bunch. That'S what you want to do cut that ear off if people were like missed. Mr and mrs potato heads we'd be totally set in a much easier way to do, hair, sometimes easier on the doll. Sometimes it's harder because you can't move the ear out of the way either get in there. You little ear and cut you right off. You little devil. There we go. I think that looks fine yeah. So it's like you want to pick outlines that have purpose. You know it's like it could all be soft and that would be kind of feminine and cool i'm thinking about it like like. I want the cheekbone to be like represented by the outline like, so your eyes are more drawn like right there to the cheekbone. I feel like everything on a doll's when it you know like this is always a little strong looking, but i think that can be fun know. There'S it. Let'S make your eyes sort of look at that a little bit more. You know what i'm saying anyway. I'Ll get off the outline. I know i've been doing the outline for a minute here. But again we if you're just tuning in we've, got some round graduation here we're cutting a pixie, really we're cutting something short and graduated on the side, something layered on the top. So we've got this round graduation, you can see that starts there and it rounds down through the side. Give that nice soft uh round graduated look a couple of scissors and then for the outline. I was kind of like using the cheekbone here as like a reference point for the outline, because i want the outline to be soft and draw your attention to the cheekbone, which i think is a fun way to think about lines. And one links and outlines is like what are you pointing at? What are you trying to? You know draw attention to what are you trying to cover up yeah? You could do any of those things if you have any questions, feel free to put them in that little question section and i will get to them. Maybe it's just too hard to scroll through all the comments, since i've done it like it's not fun. For you to watch me scroll through comments and furrow, my brow trying to read trying to pretend i know how to read all right. Oh god, it's all over her neck. Okay, anyway, outline is done. We'Ll move on from the outline. If you are just tuning in again we're working on something short pixie, we've got a giveaway to win a pair of fancy scissors or to win a carousel goldwell's gift bag with basically the entire carousel blind in there. Maybe a few things not in there, but it's got a lot of product in there. It'S pretty awesome all you got to do screenshot any moment of this live post it to your story. Tag me tag, goldwell and you'll be entered to win. Oh, we have a whole other side, but really because these lives, like you know, we'll see if we get to the other side. I kind of just want to work one side of this and see what we can do just because it's easy to have the angle on the live. That way. When i don't have someone using the camera, it's like we don't have all day. You don't want to watch me, go live all day. Do you don't answer that or answer it, i'm going to clip the other side up now, so it's like basically like we had a horseshoe and we dropped out um, the top of that horseshoe. So now, let's work on the crown in the back to start, i'm gon na separate out the crown kind of combing this all forward. You can see like that's our underneath. This is the length that we have in the crown. It'S basically from just the top of the crown down to behind the ear. Just simple like think about what hair is gon na like sit in the back when they're styling it like? Will it just be in the back, don't be like? Oh, i'm gon na bring it from here and stack it up because then the moment that they style their hair. All this that's cut back. Here. That'S meant to be back here with the you know, angles of the cut ends up on the side. I mean it's like what is the point of that, so just really, when you're thinking about your sectioning think about the shape of the head and think about the movement of the hair. Where is the hair going to sit when they style it simple easy, then we're going to take vertical section through that and we're going to pivot our sections through the crown so boom boom boom boom rotating sections vertical one right down the center to start we're gon Na disconnect a little bit and we're gon na work, soft just um, because we want this to be like movementy and soft. So there's my shortness from the crown i'm going to allow this to be a little longer than the crown i'm going to open my scissor. Just a little bit place it in and then i'm going to close it on the way out close it all the way out, i'm creating these little corner sections and taking that length away and i'm going to work sort of convex here. So i'm going to continue lifting up open my scissor and just nip that length off, because i want it to be something with um some variation to the length. A little edginess you see it's like creates a little edginess. You see it and i'm going to let that fall over, but i want to be like layered, you know for layering now, so there we go now we're going to pivot through so first one vertical slightly diagonal pick up a little bit more hair over directing only To the previous, not to the center coming out looking for my guides, i got to like find this guide, but i got to let it sit somewhere a little bit in front of my fingers. Now it's got to sit like a little higher up, so i don't end up cutting the next one longer. So i can kind of cut around the same length. You know we're lifting up. Oh, don't get any random ones convex. So we're going to follow the shape of the head, so just a little bit round. You know so you're working round. That'S when i say convex, it means like convex is like that round. Convex and then concave is the opposite way: concave caves in convex. I actually said vexes people because they don't understand what it means so remember if you have questions put them in the little question. Folder, let's go to a question here. I live in the united states, um uh. We have any other questions. How often do i sharpen my scissors really just a couple times a year? Can i go over the details around the ear? I think i might have already done that since you put that in, but maybe i'll do it again. If i need to any tips on blending, the sides have a hard time blending sides, especially around the ear um. When you say blending the sides. I guess i need to figure out exactly what you mean by blending. The sides like from the sides to the top or blending the sides in around the ear so someone's just put flicking me off in every color of every color of hand on there. That'S nice um! If, if you put in the blending, the sides question expound upon that for me and i'll try to answer it better for you, so we're continuing to follow this around so we're like here here here we're working around the head, so we don't get too long. We need this to be balanced and round uh through the side so that i'm lifting this up. Looking for my guides, which are like right there behind my finger, i'm going to open my scissor just a teeny bit like that, and then i come in and close all the way out. So i'm coming in close, close close and that is going to create these little corners just so it's kind of like a jagged like messier edge on the layer, but still with purpose. You know it's like still over direction. Matters elevation matters, angle, matters all that. So what that is doing now, if we look uh through there, is it's starting to like have this hang over the graduation in the back, so it hangs in a softer way. It doesn't get too flat in the back like i don't want to connect it and have it be like really flat or have it wedge out. We need it to disconnect, so we can move a little bit more then from there. I wanted to do even more of that kind of movement. You know, so i'm going to literally lift that up keep my fingers a lot lower on the section open, my scissor more so the first one was here now, i'm there. So i can place the inside of the scissor, so the scissors go all the way in and then they cut and they curve out so we're like creating a lot more negative space in there. So this hair can move around a lot more so lift up. First, we cut like this now we're like this we're coming inside the section and we're gon na just whittle that out, just like that. Go inside curve whittle that out so you've got long hairs and shorter hairs. I'Ll do one more! Sometimes, when i'm doing this, i take like fatter sections than i do for the initial cut, because you know it's like it's fine to do that, so you can take a little bit bigger section. I'M just going to do it in two! So hang that over. If there's a cowlick at the crown be very mindful of that, you don't want to cut too short. I need to do you know a little less of this, or do it a little further out and we're going to literally curve and close so you're like going you're, going like close, close, close, close, close, close close, i'm not like ripping it through. I'M actually closing the scissor a bit come in close, close, close, close, close, close, close good do as many as you want, or as little as you want totally up to you. Density plays a role and desired and resolved okay, see this already has like a short like fringe on it. So it's gon na be a little bit creative. We could go ahead and, let's, let's, let's talk about taking this girl down, and this is kind of a fun thing that i've been doing where i like free hand, the layers in on the top, which i think can be pretty fun. So now we're going to take vertical sections here, we're going to work down the shape like that right. So we're not pulling it all the way up, not pulling all the way in the middle we're following the roundness of the head, so easy peasy! That'S there we go so here's the freehand action we're going to use the crown as a guide be very mindful of growth patterns. If a person is jumpy, this will make them jump. So there's the guide from the crown down there i'm going to come in. I'M literally just going to go, cut, cut cut it's just still kind of trying to create some softer, like short to long cuts in there get closer. You can maybe see even better get off me. So there we go we're just like literally cut you have to have good tension, so you can follow it, i'm trying to make it a little longer towards the front, so i can almost like connect it in with this fringe. You see the fringe right there. I'M gon na like round this, so we're still working kind of convex until we get to the fringe and then we're gon na leave it a little longer just to kind of work right into that fringe. Maybe even have some little soft pieces that will fall over. So that was fun right, three-hand layer over the top. Who says you can't do that someone does tell them to shut up. So let me get a little bit of. Let me get some water water all right here. We go we're going to take another vertical section here. Remember i'm working down, so it goes like boom boom boom boom out from where it lives, don't over direct, otherwise you'll get like a little overhang on the side over direct. If you want the overhang, so we can pull this out from where it lives so we're following the shape of the head, get a little crown crown's a guide using a rat tail comb, because i don't have a cutting comb. Okay, if anyone's wondering, then i'm literally just going to freehand cut that in basically convex, so i'm like following it around and then when i get closer to the front, i start to just make it a little bit longer. So i'm gon na start angling out short to long through the front and there's the fringe there, like the bangs, like all american hairdressers, all try to be european. Now we say fringe now we used to say bangs, i always say fringe anyway. That'S looking pretty good. We got a nice flow going there now we're going to keep going vertical section or horizontal. I don't know what to call that anymore. I guess it's horizontal vertical. This way take a section like this come out from where it lives on the head. Only work where you have good tension, you see have a good tension back here, but not up there great tension, bad attention, great bad and then we're gon na cut this in boom boom boom boom, i'm just doing a little freehand layering. So it's a little bit softer a little bit edgier just for fun, just trying again, if you're just tuning in now, we have a giveaway going on. You can win two different fabulous prizes. Uh, one of them is a care silk holiday package that is gon na give you all the products that you're gon na need to get you through this holiday season from goldwell, incredible stuff or we're gon na give you a brand new pair of fancy scissors. All you need to do to enter is screenshot any moment of this live post it to your story. Tag me tag, goldwell and you'll automatically be entered and we'll come back and let you know who won um tomorrow, so that'll be really fun, and that is a great thing. If you don't want to go shopping for any gifts for your family, you could win this carousel gift bag and you could give them all one individual gift. How many family members you have? I don't know, but you could have a lot of family members, because you get a lot of stuff, it's a lot of products and then you can keep the scissors boom. If you win the scissors, i wouldn't give them away, and then we also have texturizing scissors for fancy they're coming out uh this holiday season, so that'll be pretty awesome. Oh, oh, got it all tangled up because i'm still not used to using this kind of a combed cut, so anyway we're going to keep on working down and around, and then i'm going to use my guide there. Boom boom boom boom boom boom, pretty awesome stuff. It'S pretty fun. You come out like the angle is not straight in i'm not going like cut cut cut, i'm angling this way, so it's like short, too long, short to long short to long short, to long short, to long everything with with the purpose, you know, if you cut It blunt it's going to be blunt, so you've got to like work short, too long and just be very present and mindful about what it is. What is it that you are doing people like? Oh, i cut a straight line and it is blunt it's like. Yes, i am sure that it is. I like when i make shelby laugh in the background, is awesome, so look at this pixie look at this sweet little little darling hold on. Let me get this clipped up. Look at this girl and that's like a real pixie. You know like a pixie that is short all the way through is like a real pixie. You can see that it's like, i left the back. It'S like a little heavy. Maybe it's a little too heavy, we'll take a little bit out of the back, but i want it to be like round and full, not um. Someone says you gay what if i was, what does that matter to you these people? It'S 20 20.. Anyway, let's take a little bit out of the back. I think there's a little corner here this one too much on this corner, just gon na whittle it in a little bit little point cut action here, just to break that up, but i do want the crown to be heavier because i wanted to have this round Fullness to it, which again is it's kind of like to me - this is kind of like um like a real pixie. That is something that is short all the way around, like short fringe short bangs, whatever you're going to call them and a little softness to it. It has like a like a 90s kind of a 90s vibe. I like i like that kind of thing, a lot. Let'S use our texturizing scissors, we got a nice little cool, little short pixie that has round graduated shape on the side. You can see the the graduation when you comb it back. It should just come really nice and fold in on itself, but notice that it also has a lot of movement. It'S not like stuck in one place because it has that extra softness, but let's use a texturizing scissor just to break it up even more because we want it to be super duper extra, awesome and soft we're going to comb this forward. I'M just thinking about. I want the movement to kind of be forward on it, huh, oh, the dogs. I want this the movement to be forward, so i'm going to comb it forward and then i'm going to take my texturizing scissor and i'm just going to nibble forward on it. So we're going to cut through this is a 14 tooth, so it looks like scary, because the teeth are big right. This is what we're going to use most likely this design and maybe a little tweaks. This is a prototype design for what we're going to use for our new fancy texturizer, but 14 teeth makes them look a little bit crazier, but uh. Really. It is not that crazy. It'S only going to cut where there's teeth. So all the negative space is where you're leaving weight. It'S like you're, actually leaving a lot more weight with a scissor like this than like, with a 50 50. all right, so we're gon na. Let'S comb the other way now and just like get a visual for the weight. That'S looking pretty nice, pretty soft, pretty cool. Maybe we can like break the fringe up a little bit more, so it has this like kind of square fringe on it right now. We can come in at an angle and just nibble nipple nipple, nipple, nibble angle. It this way and we'll just nibble out just get some num nibbens. So we get some more corners cut into this situation here, i'm thinking about the movement, the whole time. You know it's like what direction i want it to go. That'S why i'm making angles like this. I want the angle to go this way. I want the hair to get like sort of pushed in the direction now. I want this side to kind of do the opposite, so we're going to start coming in the opposite way and just pull some of that weight out all encourage the hair to move how i want it to move. Look at that. Oh my gosh. We got a little baby little curtain fringe, it's like a little mini little guy girl, whatever this is so that's kind of cool and that's a way to just soften and break that fringe up, even more, not too complicated, stuff, pretty fun stuff really and then maybe The sides we can literally just point cut through, i can use the texturizing scissor to go into the hair, i'm kind of following the same direction as the hair, the more horizontal i go, the more blunt of line i'm going to put in so i'm thinking about This being soft still so we're just coming in, and i'm like following the same angle as the hair, maybe slight diagonal to it every once in a while. If you want to take out more just to loosen things up even more, you can do this with a regular scissor. You could go through and tip through with a razor or you can use your texturizing scissors really there's no wrong answers. It'S all what you decide! You want to do, but be careful, don't take too much keep it under control jeez. So i kind of like this being like a little strong right here. To be honest, i don't know why i'm just like feeling like i want like a real strong outline on it right there just for the cheekbone action again. I think that is cool. It'S modern, it's, but it's also sort of timeless. You know like we get this kind of graduated round graduated pixie pixie. I guess you know you can call it a pixie. I get so weird about language, i always say: don't get hung up on language, i'm the one who's hung up on it, i'm always mad. At it about like what people are, are calling certain things kind of bugs me, but yeah see real life, pixie cut, actual pixie with short bangs and that's just free hand cut through the top round graduated on the side. You know pretty cool, i just texturize and scissor it up just to break it up, but you can do that with your regular, regular old scissors too. So that's um! What we're going to do for today, i'm going to leave the other side for another lesson, because dolls are expensive and we don't want to just keep throwing dolls into landfills. I was feeling like weird about that. The other day that i'm, like man, there's a lot of stuff a lot of garbage, so i'm going to try and use them side to side, but i think this is kind of a cool look. Learn. This look practice. It
Comments
Sandra Solaligue-Pérez: ♂️❤ Marvelous cut! I love the techniques you use! Stunning! ❤♂️
gea terstegen: What are you Instagram and Facebook