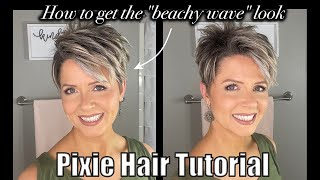
Julianne Hough Pixie Haircut Tutorial
Please enjoy my pixie haircut tutorial of Julianne Hough. This pixie haircut is cute, sexy and fun! You can style it with paste, wax or just leave it product free for a more natural look.
Follow me:
http://www.twitter.com@TheSalonGuy
http://www.facebook.com/thesalonguy
SUBSCRIBE: http://goo.gl/aWSkjE
Mannequin from:
http://www.hairartproducts.com
Email [email protected] to purchase and mention TheSalonGuy sent you!
Music: http://freemusicarchive.org
Vanic X Machineheart - Circles
With 20+ years of experience as a hairstylist and media personality, Stephen Marinaro, a.k.a. TheSalonGuy, focuses on bringing fashion, beauty and entertainment content to millions of people through TV, radio, print and the web. Whether he is offering style advice or chatting with stars on the red carpet, Stephen lives by the values of professionalism, respect, and passion for his work.
Since entering the beauty industry in 1992, Stephen wanted to give back to his community in different ways. After serving the public and protecting our families for six years as a law enforcement officer and Firefighter, Stephen decided to forge ahead with a new career path that combined his first loves: Beauty and Technology. Stephen brought his core family values, respect and an overwhelming sense of dignity with him during his transition. Not only is Stephen a mentor to millions of viewers through television and radio, he is also the founder of salonsearch.com, an innovative online directory for salon clients and professionals.
Stephen's YouTube channel, www.youtube.com/TheSalonGuy, features styling tutorials and event coverage. His channel surpassed the 6.5 million views mark, and averages an astounding 900,000+ hits per month.
Not only has Stephen hosted his own radio show, he has also interviews with an impressive list of celebrities, including Sophia Vergara, Alyssa Milano, Regis Philbin, Steve Buscemi, Terrence Jenkins, Pamela Anderson, Daisy Fuentes, Michelle Rodriguez, Dita Von Teese, Nick Cannon, Frederic Fekkai, Kelly Cutrone, Thomas Jane of the hit HBO series Hung, Twilight's Chaske Spencer, Smash's Megan Hilty, and Jenna Dewan-Tatum, among many others.
Stephen is currently signed to Rightster, one of the #1 news content providers on the web. He was also cast by eHow as an expert, for a 13-episode series on hair and grooming tips. He's chatted with and interviewed cast members of several shows including How Do I Look?, What Not to Wear, The Real Housewives of New Jersey, Real Housewives of New York, Cake Boss, Jersey Shore as well as covering red carpet events and fashion shows that include the Oscars and Mercedes-Benz Fashion Week NYC. Stephen has appeared on Style Networks hit show, Jerseylicious on Season 4 and has worked with other networks such as MTV and BRAVO.
Stephen is also an entrepreneur who helps businesses through consulting, marketing, and media and event production. He has worked with brands and designers such as Dior, L'Oreal, Paul Mitchell, Zang Toi, Rachel Roy, Emiliani, DePasquale, Nike Communications, The Art of Shaving, Beauty Press, Youthful 8, Malan Breton and Ted Gibson.
Whether Stephen is working in front of the camera or behind the scenes, one thing is certain: TheSalonGuy brings a unique blend of creativity, experience and enthusiasm to every project.
Hey guys Steven de salón guy here and I've got a new video for you, guys. I'Ve gotten quite a few requests for this. This is Julianne Hough when she had that real, really adorable cute pixie cut, so I'm ready to go. Let'S get started all right. So what we're gon na do first, we're gon na start off right in the back, we're going to create our baseline. So let's cut this to about right here and I'm going to cut this straight across just like this, and then we're going to do is on bring down a couple more sections and cut the baseline right to a back here. Alright. So now what I'm do is I'm going to work right in through this corner here and I'm going to hold the hair straight out to the head, warm cutting it towards about an inch or so in length. Just like this okay and then what I'm going to do is I'm going to take the next section section by section like here, working throughout the nape and I'm going to continue this pattern. Cutting the hair straight across like this working towards the center and following the same pattern. Now I'm picking up my guide, which is the next section and I'm just going to tilt the head as we work in through the center. Just so everything is balanced and is working exactly how we want the head to be shaped here. So follow the same pattern throughout the whole back here and as we get into about right here, we're going to switch to the other side. The other corner in through here and we're going to continue to follow the same exact things we're going to hold it towards about an inch out from the head. So lift your finger. Lay your finger right against ahead and pull out to where you see visually. It'S about where it's an inch long and then we're going to cut up that way, all right and then again follow the same pattern: pull the hair out and cut and we're working towards the center of the head. So we should meet right, basically right in the middle and then what you do. Is you cross check by holding everything straight out like this and then pulling it just to make sure everything is even so. What we're going to do now is now that we have our guy here, and we know exactly how we're going to work. This we're going to work from here all the way up to the top of the head here, pulling everything straight out to works about an inch in length now as we're working up towards the middle of the head. We'Re going to just simply follow the same exact pattern that we've been doing the whole time, so we're pulling it out to work about an inch now we're going probably fat, maybe an inch and a half and length, but no more than that throughout the entire back. Ok and as you can see, it's forming a nice shape, which is really really a beautiful, modern look, a really great take on the pixie cut which Giuliana is wearing, and it's also great for anybody who wants to wear a nice pixie cut like this. So I'm just going to follow the same pattern going from this Center here to the corner and then back to we get to about right here, alright. So what I'm do now is I'm going to take everything on a diagonal section and I'm just going to cross check just to make sure that everything is working in the same pattern, but also nice and consistent throughout the back here. So what I'm going to do is I'm going to take diagonal sections and I'm going to comb everything straight out like this and I'm just going to cut anything that is longer all right and those longer pieces. Basically, you know, don't worry about that, because you need to cut them to make sure everything. Is we balanced? Well, so just continue throughout the back of the head here and work your way up just to here. We have to still cut this working up in through here, because that's creating a slight line of demarcation, but we haven't removed that weight line yet because we still have to go further up around the head shape this way right. So what we're doing now is we're just kind of coming in and by cross-checking on a different angle than what you cut it. It shows the hair laying differently so it'll. Actually, you know jump out of you more and you'll be able to see those hairs. That might need to be cut alright, so just continue to do this throughout the back. You'Ll be finished when you complete this side and then in through this side, alright guys. So now, what we're doing is we're going to connect the back part into the top part and how we're going to do that? Well, we're going to take a section right in through here and now. What we're going to do is we're going to continue to follow up the head shape, so this this part right here. That is what was creating a slight weight line, but here's a shorter piece. So what we're going to do is we're just simply going to cut around like that and now we're going to hold everything straight up, we're going to let that here drop just like that and then we're going to cut straight up. That way, this way is creating a nice rounded shape, as you can see right through here, and it's eliminating any sort of harsh lines so continue to do this throughout the entire back of the head, pull it pull it straight up, and there you'll see your guide And then continue to overextend to where you are holding everything straight up and you will see what needs to be cut. Okay continue to do that from the center of to this side and the center back to this side. All right just want to show you where we're at into the back here. As you can see, this is what we have going on here. It'S got a beautiful shape to it, and everything is nicely worked up from here. All the way up through the top in through here and all this is layered, but, as you can see, when you put a lot of work into it, you'll get great end. Results so really really be sure to follow all the proper steps to get this book. Now we're actually ready to work on the top and the side all right so now. What I want to do is we're going to work in through the sides and then to the top, but this is going to really help you guys throughout the rest of the haircut, because sometimes you will get lost and not really sure where they need to cut Things and where they need to go. So, if you see in some of the pictures you can kind of tell where the shape is and juliennes a pixie cut here, she's got it to about right here, just below the ear coming straight across alright. So here's where we left off in the corner, so we need to create that line right into here to give us a guide of where we need to be so what I'm doing simply as I'm cutting this straight across and I'm going to cut a line right In through here all right, and that is going to help, keep me organized and aware of the length of where things need to be so that when I layer it, I feel confident that I know that this is the length, and this is what I have to Work in so create this same shape on the other side and then we'll we'll break away from this and then we'll start to work into the top. All right guys. Now we're ready to work into the top, because we now have our guide, which we can connect into the top. So what we're going to do is we're going to kind of create a path for us to work in through, and this is going to keep us organized. So it's basically look at the corner of the ear right here. Alright, so now we're going to hold everything straight across and we're going to pull it straight up like this okay and we're going to cut basically straight up to where it's about I'd, say three inches or so on the top of the head right. Here'S my comb like this, and it's probably about right to about right here. Alright, that's how long we're going to cut this on the top of the head. I'M going to continue this pattern working right down through the middle panel here just to keep us organized you! Don'T want to go too far over to the sides yet we'll get to that, but we're going to comb everything straight up and cut towards the front here. Alright. So, let's start right in the back here and what we're going to do is we're going to pull this straight out and we're going to cut a pattern to where it's cutting this length out through here. But it's also removing the excess weight and also layering it. As well because again, this is a crop kind of pick see right around in through the sides here. So there's our guide right here. This is the root of the way that needs to be removed and we're just simply rounding this out and we're going to continue and extend this all the way to the bottom here and because we've already, you know, thought ahead. We already created our base line in through here, so we know exactly where we are cutting to okay. So, let's do this section by section: push that hair out of the way that you're not using comb it straight out like that, following the head shape and then work our way down in through the sides here right above the ear area and again go all the Way to where you see the length that we cut for and basically what that means is that you're not going to have much hair to cut into the bottom you're, just removing the excess weight and length all right so continue to do this on this side of The head, obviously, and then, when you're done, we're going to continue on the other side of the head. All right don't try to do anything. You know to go beyond this point. Just really stay consistent and organized and that'll really really help you through this haircut. Alright. So I'm gon na do is I'm actually going to come across this alright, like this, I'm going to come in on a diagonal section and I'm just going to remove any excess weight and length that needs to come off. Okay, so just push this out of the way once you're done. Alright, as you can see, there's some hair - that's coming that's kind of sticking out here that need to cut, and this is just again going to contribute to the precision to the accuracy and to how great this looks in through the end, so don't skip out on These these, these really really important factors. Now, here, let's cross-check going horizontally and now what I'm going to do is I'm going to point cut into all this and again. This is just making sure everything is balanced and just really really making sure this has a great shape, and this really really will show in the end results alright, so now working upwards. This way, okay and point cutting like that. Now again, we left the corner right into the front hairline here, just because you want to keep keep the hair in through here and, as you can see, it created a beautiful shape, but we still haven't worked into this bang area. Yet right, but we are going to do that when we're done. But as you can see here, it's got a great shape and we still even having you haven't even done any texturizing raising to it. Yet so don't forget do the same thing on the other side into the corners and work and down into the sides, and then we'll start to really texturize the whole shape and will almost be finished with the hair all right. So what we're going to do is now is now that we're into the front we're going to point cut just like this and we're going to work this in through the corner. Okay on this side right here and then we're going to take this straight down like this and continue to work it on an angle to where this side is going to be left longer. And then you can just comb this down and then just remove that edge. That corner right into there, just like like that, okay, but now what we're doing is we're basically leaving us that it has a nice kind of sweeping angle into here, but also it allows us to have a little bit of hair and length right in through here. Okay, so now that this is done now that the shape is pretty much all done here, we have a lot of work to do as far as texturizing goes all right, so we're going to texturize it. You can wear it on this way as well, but we're going to texturize this and we're really really going to enhance this haircut even more so I'm going to blow-dry this and then go back in and start using some thinning, shears and point cutting through the shape. Alright guys so here's where things going to really start to get fun. So I'm going to pull everything straight out like this with the comb and now I'm going to use my shears and I'm going to point cut into everything like this. Okay - and this is really just going to soften things up and it's going to help, remove any sort of excess weight or any sort of excess length that I want to. Okay, but also I even want to take this up by using scissor over comb, because some areas I want to remove a little more weight. Okay, the best way to do this is to use scissor over comb like this and just hold the comb up. So you can visually see the end result like this okay and you just simply, if you want to make a little bit tighter throughout the bottom here and as you can see already, it's creating a nut. Much nicer kind of softer shape right in through here alright, and then you can go back in and point cut into it like this, just to kind of really break things up right and again, just use the thumb just like this, and this is really going to Create a nice beautiful soft edge and you can do this throughout the whole back of the head. You can do this pretty much anywhere you want to so I'm going to finish up here. This way like this, let's bring this hair down like that and you'll see how this now has a nice nicer kind of flow and a little bit more of a nicer taper to it right in through. Here again, this is still heavy. We still have to go in work through that. That'S fine, but let's continue to work this up scissor over comb right in through the corners like this to really continue to soften this whole thing up all right and if you want to extend it right into the front here, you can just like this and there You come all right, so I like how this is really really taking shape, I'm going to do the same thing on the other side, all right now, both sides are complete here and what we're going to do is going to take our thinning share. Just like this - and this is where we're going to really remove a lot of the excess weight and really shave things up and create some really really great texture. So, even right into the very very front here see what I'm doing, I'm really going in and look removing all that excess weight. So it breaks up that harsh line right in from here all right, so you'll be able just pick it up and all this hair in through here just kind of chop into it with these thinning shears and what that's going to do. As you can see, it's creating a much softer kind of look and softer feel from here. You can even do this on the side, just be careful as always that you don't cut your hand, so you want to cut this as you're lifting away from it. You don't want to cut it and lose a finger. You want to cut as you're pulling your hands away from the hair away from the head like this. Just to keep safe. So just continue to work this in through the front here. Remove that excess weight give this whole look a really really nice shape right into here like this, and this is really going to create a lot of beautiful texture and you're going to want to do this throughout the whole head on both sides. Don'T be afraid of this, you got to really be aggressive with this type of thing, and it will definitely show in the end result. So I'm just going to finish this up here and then we'll almost be done with the haircut and we'll be showing the finished result all right guys. So what I do now is I'm using a little bit of a dry wax. That'S just a little bit like this and the product is called dry wax and I'm just working it through my hands, and I just want to create a little bit of texture through here, nothing too too crazy, but I'm just going to kind of work. My fingers through like this, just to kind of create some separation and also create some nice shine to it, because this wax will create some texture. But you want to be careful that you don't use too too much, because it will get a little bit too heavy for the hair. All right so just really really work this in and use the palm of your hands just to kind of shape it and to really really get the product worked in nicely all right, as you can see, it's really really taking shape and all that hard work you Put in um with the cut all that texture really really is coming through now with this haircut, all right, so don't forget on the other side, you have to do this, obviously on both sides and from here and then we're just going to rake the product through You can push this to the other side, just to get a little bit of added volume in through here. It'S always okay to push the hair away just to get it out of the way, simply because you know just to move it and to be able to see exactly where you're styling all right. So here, as you can see, I'm just really really piecing this through. Here and it's got beautiful texture, beautiful texture to it, and there you go, and even when she was on Ellen not too long ago, whoops she had her hair kind of like this after dancing, which was which was pretty interesting. She had this kind of like pixie haircut. They had a lot of texture to it, which is kind of looked a little bit like this okay. So if you want, you can just kind of sweep this over like this, create a nice soft kind of messy look, and I think the haircut pretty much is complete. Well guys. Thank you. So much for watching here again is the julianne hough inspired pixie cut by thinking about really really awesome, but I really want to thank you all for watching guys, and I see all your comments - everything I don't miss a bit of it. So I just brought 50,000 subscribers thanks to you guys, so don't forget to subscribe, keep the comments coming like the video. I really really appreciate when you like my videos. I see all your comments, all your requests, I apologize. I can't get to them sooner. I'M really really busy, but I'm really cranking out a lot of videos over the next day or two. So thank you so much for watching and I'll see you guys next time for more tutorials with the salon I gon na get out for this. We'Re never gon na try

Comments
Sarah McKeen: Love the way you explained this one and how you showed the way you did the nape in detail. Your videos just get better and better! Thanks again Stephen!
blazeofsolitude: You are super amazing!! You seem so down to earth, and genuinely passionate about hair- which I think contributes to how easy it is to understand your instruction when you explain design and technique concepts. As a student, I whole-heartedly appreciate the time that you take to produce these tutorial videos. As a stylist, I truly respect your willingness to share, and your ability to never cease in wowing and inspiring me. With absolute sincerity- I thank you! ~ T.S.
Unde Derayda: 2020 and this is still such a beautiful classic look. Thank you!
JO DIVAL: I love this!! I wish I had someone like you here in SC to do a pixie for me :-( I always get butchered lol
luluboriqua: I absolutely love your videos. I've been a stylist for two years but haven't had a good apprenticeship. Your videos have helped tremendously. Thank you!
MoreThanUMoreThanMe: You did it!! Thank you so much! I'm going to cut my hair tomorrow and was so scared that the hairdresser wasn't going to get this right. Again. I'm so happy :D
heyhayles7: Nice! :) Very thorough and it's awesome!
Nick Seccombe: Thank you for posting tutorials. Sassoon Academy is a great asset for learning precision. Keep up the hard work!
Mafalda Valente: love love love this haircut! you are great teacher and hairdresser. wish you could do my hair like this too! shame i'm from Portugal :/ keep up the good work and thanks for uploading :)
Ruth Ginarie Roman: I discovered your chanel quite recently and I must say I adore your videos! Your chanel has helped so much, I'm training to be a hairstylist but there's a lot they don't teach at school. You are pretty awesome. Keep it up!
Tessa Sherman: I cut my mom's hair and I have zero training. I work in the health field. She recently asked me to "cut her ears out" and I wasnt sure what to do. Wish Id seen these videos of yours BEFORE attempting that lol! Thank you!
wswing100: Love this haircut! I have a natural wave in my hair mostly on the sides and this drives me nuts and I was wondering if this haircut would work for me. I have grey hair that is thick also and on the sides where the natural wave starts I always have to have it thinned or texturing to tame the bulk on each side. Can you help ?
kimberly coleman: What a great looking pixie cut....I love it!!!
Clara Palomar: Me encanta la técnica. Gracias
Mary McGill: I want to cut my hair like this so badly! Thank goodness I saw this video, so when I get my hair done I can just show the lady this. I would attempt this myself, but last time I tried cutting my hair I practically butchered it.
Oruha87: Hi Steven!, thx for your videos they' re really helpfull i would like to know how how much time do you have to use to make a haircut? Cause i see your haircuts are very elaborated greetings from Cali, Colombia and keep doing more videos :)
claudia arrejin: realmente muy buenos los videos , me ayudan muchisimo!!! gracias!!!! saludos desde argentina!!
Sam Schaap: This will help me so much today! Thank you!
Howto?: Love it!!
Dayo Litmanovich: Excellent!! Like your videos, cause you explain step by step.... Go ahead!
Aldion Genciane: wish I could have this haircut work on me. I love it
moon light: Would you recommend this haircut for a girl with super thick, frizzy hair? It's not exactly straight or curly, it's like wavy-ish. It gets super frizzy when straightened or even after I do braids (in order to get natural-looking curls/waves). The humidity always causes my hair to frizz uncontrollably even after applying Suave Super Sleek anti-frizz cream. I've been contemplating whether I should do this haircut since she has a different hair type than I do. I just think would it be manageable if I cut my hair like this?
Gabrielle Tollerson: Love it! you are so awesome at hair!
Imaginexhs: really loved this one. Thinking about shopping my hair off after this! hah :)
Gladdet Sartip: thank you so much for teaching the awesome haircut!!!
Joan Schwieters: Great job. I'd love to see Melissa Mcbrides from the Walking Deads hair cut and how to style it.
Eric Tu: Could you do frank grillo's hair from The Purge Anarchy? It's amazing how he keeps his hair that way throughout the movie. Thanks, and great work!
Rosa Soria: You are amazing. I just discovered your channel. Keep up the good job
Zainab Adil: great work so professional...thumbs up
Zainab Adil: great work so professional...thumbs up
December Strawser: OMG I want my hair like this
hazel coate: very cool, appreciate the tips :)
robawi diyar: i work as a barber, i never cut like this b4. and this is very nice cut, thx 4 lesson. subscribed :)
Loly Liu: I like this video so so much , thank you for share ❤️
Ella Bayer: If I got this haircut, which products should I use? And should I tell my hair cutter person, "Here. I want this pixie cut. watch this 17 minute long video."
sgc1959: love love love it !! you can't a cut like that around here lol
mnooora123: you are a Pro in hair cutting you make it very easy thing to do !
hazel-jade vasiri: Cool mann! I hope I could pull this off oneday!
Levyatha Lynn: Lovely
Tess: Cute cut!
Marsi Moon: the head has very nice hair and you are the hairdresser of my dreams :)
canal da paty: arrasou," cara de Mas tú ensina muito bém valeu pela postagem.
Gracie: Would love for you to update my long hair. I don't like short hair on myself. Great video though!
AK CEKIC: awesome as always ! gut wie immer
Luz Amaya: really nice!
Feyhan Kocaalp: Çok beğendiğim kısa saç kesimlerinde başarılı bir medya oynatıcınızla bilgilendim,Teşekkürler.
Ieba Anderson: Love the cut and instructions. Hate the music it makes me nervous .
Tea Mhatre: Talented.!!!! Some people Have Great Talents.!!! I Never been To Schools Nor been Trained. I Cut All the Men's Hair in my family for years n they love it
Myra Figueroa: Love the hair cut, hope you could do it on me!! I'll pay anything for a cut like that.
Mary Harter: Like this video. It was the best I have seen. Thank You.
David Kay: Can anyone recommend best way to transition from buzz cut to pixie cut.
ryan.lozano: Hey salon guy ! Can you do a updated Cristiano ronaldo hairstyle plz ! Love your vids keep it up bro
Emily Lehmann: Where do you think would be a good place to get my hair cut like this? What salon do you suggest
Majid Aghashahe: I wish I was one of his student?he is amazing.london uk.
Liz M: My hair is about this length grown out from a shorter pixie. I think I need to get my hair trimmed to make me feel better. I'm about to go insane with the length and style.
Carmel Dey: love the cut, where is the salon guy located, thank you
Rishu M: Its just wowwwwwwwwwwwww... i want this haircut
Aria Montgomery: When you realize that's not a real person...
BunNessa_ Art: I'm trying to figure out which cut is similar to the pixie I want to get would this cut work for and inverted triangle face shape and curly hair
Ryanne Van der Burgh: Could you do the hair style from the blind spot actress jamie alexsandrr
Anna: Can you do a back to school haircut
mesosexysekali: very good job . i love it man wish you were here in indonesia
Susana Mena: what do you do with that heads after you cut his hair?... just wondering... i love your job :)
Wama Jane Reyes: Sir thus this hairstyle work with curly hairs and round faces people?
Anna Leeming: Can,t get this hair cut here :( this is exactly what I want .
Stefanie Newbill: awesome
Meggan Rose: It's a learning experience.Thanks
Donna S: Can a regular person get an appointment for a haircut with you?
Jonathan Guy: Can u do MrBenBrown haircut and/or Alexis Sanchez haircut please it would be great if you could do these for me
Ma Lydia: wow. Looks great
mc .m: you so freak in cool dude.. imma fan..haha
gunka talıbova: thank you please rihanna hair cut video pleaseee ☺️
Jekaterina Tsaikovskaja:
hudas barabas: is this okay if my round head/face? pls answer
Marta Arias: gracias cariños
Myra Figueroa: How can I schedule a session with you? I'll be in NY by the Summer.
Sarab Mahmooud: عاشت ايدك جو
Marsi Moon: i hate what you do at 10:00, in my opinion it spoil all the perfect job you did so far
Lorena Estrella: You should practice with real people
Debbie Burtnett: For the love heaven stop the music!!
Sumithra Mithra: Tqu so much sir
Virginia Hekkens: Help me please, what Pixie haircut good for thinnerhair, in one year i lost feel hair in boven up Tq for answear
Pamela Nelson: Too much talking!!!!
阮小小: Like
Kathy Campbell: Hello