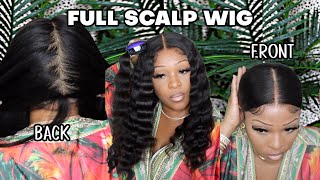
$50 Curly Pixie Cut Wig From Amazon!! Ft. Aligegous Hair | My First With Short Hair... Shooketh
Hey, Loves today we have a tutorial on this $50 pixie cut wig from amazon. This hair is from Aligegous Hair and you guys this is my first time having short hair in my life. I was shooketh because I didn't think it would look good on me. Hopefully, you guys enjoy the tutorial don't forget to like, comment, and subscribe for ya girl.
Product Details:
Aligegous Short Curly Lace Wigs Pixie Cut Lace Front Human Hair Wigs For Black Women Brazilian Virgin Remy Hair Wigs 150% Density Glueless Pre Plucked Curly Frontal Wig With Hand Tied Hairline (1B)
___________________________________________
Follow me on social media Lovelies!!
Insta https://www.instagram.com/moena.battle...
Tiktok https://vm.tiktok.com/ZMdqA3Foa/
SnapMoena15
Business Inquires: [email protected]
------------------------------------------------------------------------------------------------------------------------------
About Me
Age: 22
My City: ATL
College: Emmanuel College
Major: Business Administration
What I do: Track and Field Athlete
Camera: Canon G7x Mark ii
P.O Box 402
Franklin Springs, Ga
30639
I'M a babe i'm a baby. If you want to be a babe too, you would go down there and get that wig. Hey guys! Welcome back to another video. I am money battle if you're new here, thank you for clicking on this video and, if you're returning. Thank you for coming back again to see another video with me. Hey you guys, so i realized i didn't say where the wig was from. This wig is from allegis hair. This is a pixie cut wig in the density 150, and it can be worn clueless. So today we will be doing a pixie cut wig. This is the wig right here. I have went ahead and um kind of plugged it a little bit. Did the baby hairs everything like that, so that it looks natural once you put it on this hair is a very very short you guys. I have never had a short wig or anything so we're gon na see how this come out. I'M actually very excited to try this wig, because i have never had short hair, so um yeah. You guys want to see me in a different light today. I guess i'm going to see myself in a different light today too, but without further ado. Let me get right into the video, i'm not going to do my makeup on camera in this video, i'm going to be showing you guys me installing this wig. This is a amazon wig i'll, be having all the links to this wig in the description box. If you guys want to pick it up for the holidays or if you want to have a new look for the new year stuff like that, then this link i mean then this week is for you and you can get it down in the description box. So without further ado, we can get right into the video, so the first step for us is to put on this wig cap. As you can see this wig cap, it's very stretchy but um it does have a thick um band on it um. The only thing is that i don't really put a wig cap on um. I don't do the ball cap method. Most of the time i just tip my lace, but, as you can see, i have four pigtails. I never really cornrow my hair under any wig. Unless i already have a cornrow style from just wearing the coral style by itself, but other than that, i just usually put my hair in these four braids and then i tuck my hair into the wig cap. Just like this, and then i like to push it down and make sure that my braids are flat under the wig cap and i'm not going to put a wig cap all the way up, i'm going to pull it up for a moment just so i can Like snatch snatch, the hair back behind my hairline and then i'm probably going to go in with got to be got to be to make sure all my hair is laying flat on the side so that it's not coming out of the wig cap. When i put my actual wig on so with that i like to use, actually you can go in, you can go in with the sprays on the use because i'm not using glue i'm using spray, and i am planning to wash my hair um. So this really doesn't matter if i use this and i like to just push my hair back this spray, because i didn't tell you all the story i accidentally cut, i accidentally cut my um hair right here on the side when i was cutting the lace off Of a wig one time - and you guys i was not happy - i was not so yeah i'm about to yeah. That should be good, and i want to put the wig on to see how far back i need to put my wig cap. So it won't be able to see it and then also i'm going to go ahead and tip my lace with the ebbing tinted lace. Aerosol spray - and i did go - get a new color in the one in medium, warm beige. So you guys, i have one thing to say about this: make sure you go make sure you stay at the darker color just because, like the inside of your face gets lighter, but the outside of your face stays darker, which means your forehead is dark, as you Can see here, i end up like going up in color just because my skin tone is changing, as you can see, i'm not as tan as i used to be when, like it was like summertime or something like that, so i'm gon na go ahead and take My lace right, quick i've already showed you guys how i tip my lace in other videos, i'm not going to show that on camera, so i'll be right back when i'm done you guys. So i just want to say one thing about the wig. As you can see here, the wig is really only a lace kind of basically a lace, front, wig and then the rest of the wig, it's just wig. So we really only need to tint the front of the lace, which is perfect, because this is an easy wig. Honestly, i really want to make this wig um. What do you call it? I want to make it glueless eventually. So, after probably after this video, i will make the wig glueless and the way you do that is with a elastic band. You insert an elastic band inside of the wig to make it tighter, but this wig seems like it's already pretty tight um without a lacquer band, so we shall see if i needed elastic band in the first place, all right you guys so our wig is tinted. Now and we can go ahead and put it on and see what we're working with so oh, this is about to be tight. I can already tell i can already tell oh my god yeah. I just don't need this. Don'T you know? What'S the name man because, oh my gosh, oh my god, this thing is squeezing my head. Okay, i think that's a little bit better y'all, it's still kind of squeezing my hair, i'm so scared right now, because i don't know how this is about to look like. So i'm going to be doing a voiceover from this point forward. Just so we can start moving with everything so make sure you guys are paying attention to everything. I'M doing i'm going to zoom in so you can see, and i'm probably going to cut this with my scissors. I would usually cut this well. I could cut it with um some razors, but we'll see we'll see so you guys starting off we're going to be using our wax stick to kind of lay down the hair. So i'm going to go all around my lace and my edges and everywhere just so that i can get into the cracks and crevices and put the wax everywhere. I needed to put it or everywhere where i want the hair to lay flat. So i want that to be flat in the front just so that when i do do my edges, like the other edges, won't be in the way the other hair won't be in the way of my edges. So next i'm going to take my hot comb and i'm going to try to like kind of go through the hair just a little bit. But honestly, i like to use the back of the hot comb to kind of flatten it just because this hair is curly. So it's not going to take the comb at as well as a straight wig. Would so i'm just taking the back of the comb because it's still very hot and you guys right when i was doing this, i messed around and i burnt the tip of my ear like bro. I'M surprised like that. Didn'T leave like a scar or nothing but yeah that jungle hurt it so so bad so be careful. You guys with the hot comb. This hot comb was way hotter than my first hot comb, and i just don't understand why? Maybe because it was brand new, like i literally just got it but um yeah, it was, it was hot, so be careful, but yeah, i'm pretty much going to finish up high combing the hairline, and then we can move on next. You are going to take a pair of scissors. I am using hair cutting shears right now, they're, not the sharpest out of the bunch, but they did the job. So i'm going to cut four sections just to make it easier on myself. If you're a pro pro, then you can do three sections, but i would say use four just because of how this hair line was shaped. So i just went ahead and cut four sections into the hair. I'M going to go ahead and i'm going to take a razor at first but later on, i'm going to use scissors, i'm taking my scissors again because i didn't cut the lid i felt like i didn't cut the lace close enough, so be careful when using a Razor because it's easy to miss the lace up, if you're not like familiar with using razors, to remove the lace and i'm not going to lie, it was tricky for me to do the left side. No, it was tricky for me to do the right side of my head with the opposite hand. So when you guys are cutting the lace, you do not want to cut in a straight line. You want to kind of do like a zigzag type of pattern so that, when you actually lay the lace down it blends in with your skin, which is the important part of getting a lace, tint or bleaching, the knots to the color of your actual skin tone. So make sure you guys do not cut in this straight line. Please do not scrape cutting tree line because you're gon na be out there looking crazy and it's not gon na, be because of me now we can move on to laying our lace down our favorite part, so you can see that lacey mill into the skin. I was a tad bit sad that my lacing completely match my skin tone, just because the lady at the store told me that she thought it was best. I should have went my good and stayed with tan, but it's okay, because we're gon na um. You know add some foundation to the lace to kind of help it blend in, but i'm gon na take my god to my gosh to be spray, and my favorite is the one in the blue and purple bottle. I'Ve been using this more often, it doesn't really leave a residue on your skin as much as the original gossipy. So if you guys are looking for a good spray, i would say: try this or either try the evan sprayed evan lace, spray, or is it wonder something like that, but um yeah? This is what i'm using right now and i like to go over and blow dry the first layer i like to do it like five to ten seconds at a time, and then i go right back in and i spray the second layer and i like to Use my finger just because it's a little bit more precise than just trying to spray it in the spot that you want it and then, after that i will blow dry it again for six to eight seconds and then lay down my lay down my lace before It gets too dry because you want it to be tacky when you apply it. So after i laid down my lace, i decided to go in with this more spray, so i took out some hair just so that it wouldn't be in the way. While i was spraying the spray - and i went in and just kind of patted it down and held the hair down, while i sprayed it just so, i can kind of get it where i want it to go without it being all over the place and the Main reason why i did this is because i felt like i didn't get the spray all the way to the end of the lace, which is like the front part of the lace where you wan na you're gon na see it the most. So i went in with the spray just to make sure it was held down the way i wanted to be, and it pretty much turned out the way i want it. As you can see, my scalp looks a little light here and, like i said, we're gon na go over it with foundation when we're almost done so, while our hair sets i'm going to go in with water and a little conditioner as well as this very nice Detangler brush, i got this from beauty master. I also use this detangling brush on my hair as well, and i'm going in with cream of nature conditioner just to kind of give the curls some type of shape, because i've been brushing through it. When i plugged the hair earlier, so i'm just going to use the combination of water and conditioner together so now we're at the part where you need to decide which side do you want to do apart, and when i mean a part, i mean a no part Because this wig does not contain a part, and that's okay, because for the price, it's still a very nice wig for you to have for this week to be below 50 or right at 50. Having a no part is it isn't the biggest problem? You, like there's, really nothing that you can compare to this wig that i've seen yet so i didn't know part i decided to flip my hair to the right side and then i went ahead and pulled the left side of the hair kind of down like i Did like a half and not really half and half but like over half to the right side, and i really liked the way i went with it and i just kept defining the hair with the water and conditioner taking my contour. Stick that i use for my makeup, i'm taking a brush that i do not use on my face and i'm just going into the lace and kind of just applying that straight onto the area where the hair is parted just to kind of help it blend. Like i'm, not really like scared right now, just because once i do my makeup, everything is going to blend like i know it looks. It looks tanner now, but once i put my contour and everything on my forehead, the hair is going to blend in with my forehead and then later on. Honestly, i'm just going to go back to the store and buy me some more lace, tint spray in the actual tan color, because you guys i was so mad that i had to go through do this again. But as you can see, it's blending in really well with the outside of my face like it should so um yeah, y'all y'all, don't take it um too personally that it's looking like this right now moving on we're going to go right into our baby hairs and I'M going to show you guys how to get the ultimate baby ears, i've seen so many other influences doing this. I was like. Let me go ahead and try this so we're going to go in with our razor and we're going to kind of like just take off a little hair. If you want bigger, more bold baby hairs and make sure you keep them longer, just so you can swoop them down. I really want my baby hairs to look natural. I want the style to look natural like it's in my hair, so i did them smaller, but i twisted the end of the baby hair before i cut them just to make it more simple and it actually works you guys. You should really try this so taking our baby hairs, we're going to kind of just kind of get them out kind of straight. I don't know why i keep on saying kind of but um yeah we're going to get them straight and then we're going to roll them up away from our face and they're going to go on the opposite side. Don'T mind my brother in the background and we're going to flip the hair up over there as well, and then we're going to go in and do the same things literally to our sideburns and i'm going to cut those shorter as well. Just because i don't want those long because at this point they just like grown baby hair like grown adult hairs over there, so i'm going to go in with my got to be spray because it's really light and i'm just going to style my baby hairs. How? I want them, and this is the way you get fluffy looking baby hairs and not those crispy tapered down to your forehead type baby hairs. So i really like this method better. If you don't want to use the actual god to be spray, i would suggest that you use some type of mousse or some type of foaming wrap just so that the baby hairs are light and fluffy looking so all right, y'all all right y'all. So i'm pretty much done with my hair, i'm going to do my makeup and then i'll be right back to show you the finished. Look i want to like i kind of want to do like a no part to the side, just because this wig does not contain a part, but i'm gon na do my makeup and then come back and see what we can do with the wig. We are back and this is pretty much the finished. Look, i'm going to zoom out a little bit for y'all. This is pretty much the finished. Look. I have my clothes on already. I took pictures in the outfit i have on. I don't know that sounds good. I had to leave, i had to leave after recording and then come back to finish the video out because it started getting dark right when i was finishing my makeup but yeah this is the finished. Look. The hair is so so beautiful. Like look at that, and then i had to touch up the lace, my baby hairs are rolling up, but i had to touch up the lace because it was looking a little ashy after i used. I thought even after i used the lace, tint spray, and that's only because the girl at the store told me to get the wrong lace tint. I should have just got um the tan color, just because my forehead is darker than the rest of my face. As usual, so um yeah - that was on me - that mistake was on me for the lace tint, so i ended up using some contour um. I end up using my contour stick to put a little bit on the lace, so it looks a little bit better now but y'all. I love this hair, it's giving me grown on t and i really love it. Hopefully, if you guys love it too, you can go down in the description box and get you your own, because i'm a babe i'm a baby. If you want to be a babe two, you go down there and get that wig and comment down. If you do go, get the wig comment down below to. Let me know that you're getting it also um. If you can't remember make sure you come back and let me know your opinion on the wig and everything but yeah all details will be down in the description box. Hopefully, you guys enjoy this little wig tutorial and everything, and i will see you guys in the next video. I think i will be doing an updated makeup, um routine, for you guys just because my makeup is popping y'all like y'all cannot tell me your girl. Don'T look good when i say gr girl and that's her all right. I'M about to exit y'all i'll, see y'all, see y'all in the next video, don't forget to like comment and subscribe. So you can come back and see me again turn on your post notification bell. So you can get notified every time. I post a new video and we're out of here.

Comments
Brittany Cabrero: Missed your videos haven’t been on here for ever!!!