Easy Bowl Cut Quickweave Using #Boldhold
Thanks for watching hop you enjoyed!
Watch more short styles on my playlist
https://youtube.com/playlist?list=PL0c...
Products used:
BOLD HOLD LACE PRODUCTS
Get them here: https://thehairdiagram.com/collections...
EZ ROOT PEN
https://www.lacemecollection.com
Kiss Cajun spice from my local beauty supply store
CONNECT WITH US:
Instagram: @thehairdiagram @therealashleymariecollection @boldholdlacewigtape
Snapchat: thehairdiagram
Facebook: thehair diagram ///Boldholdlace ///Bold Hold Lace Wig Tape
Twitter: thehairdiagram
Website: https// www.thehairdiagram.com
For business inquires please contact [email protected]
INTERNATIONAL ORDERS FOLLOW ON INSTAGRAM:
@BOLDHOLDCANADA
https://instagram.com/boldholdcanada?i...
@BOLDHOLDEUROPE.
https://instagram.com/boldholdeurope?i...
@BOLDHOLDAFRICA
https://instagram.com/boldholdafrica?i...
SEND US THINGS:
THE HAIR DIAGRAM
56 Hughes road
PO BOX #380
Madison Al 35758
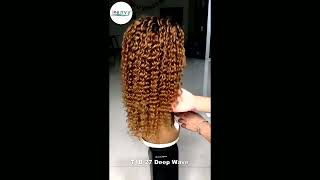
Hey guys welcome back to my channel and today we're gon na get into some short hair, i'm about to show y'all something easy that you can do and something simple and on a budget let's get into it, hello, okay, so we're going to be working with some 27 piece hair from your local beauty supply store. It comes in three different lengths, so this here is a 6 13.. I actually am going to show you what i'm going to do to the actual hair we're going to be working with a 360.. It already comes colored, i actually washed it or wet it so that it would straighten out, because when you get this hair, it's going to have like a natural curl to it and for some people it's hard to work with. So i'm actually going to be showing you on the video exactly what you need to do, because sometimes it's a little it could be a little hard to work with, especially when you're getting the actual glue on there. So it has like this curl. So, to get this curl out of your way, what i did was i wet it. We'Re gon na be working with a three by five closure. This one is a 613. I actually went and colored it on video and i'm going to show you guys how i did that i've already prepped it. I did a color match just to get as close as possible to those actual tracks. It may not be exact, but i got it close and i'm going to show you what i use to get it closed now, when i put this actual closure on i'm going to put it on backwards, so i prepped it. This is the actual proper way to do it. You have the lace on the front, and this rounded part that's the back, but we're going to put this on backwards so that the hair flows forward and you have more actual hair. It'S going to be fuller so that i can place it on my model and she can have a bag a full bag, so by putting it on backwards. That'S going to give you that density towards the front, and i'm going to show y'all how i do this. Alright guys, this is the milky way. 360.. This is the 27 piece i'm going to color match using the cajun spice kiss i'm going to color match this closure so that i can make this unit i'm going to get as close as possible. I'M going to do a test strand, that's very important. You may not get it exact guys, but it's going to get really close, so i'm just testing it here just to see, if i need to add more color, the water is piping, hot, that's very important! Now i'm going to go ahead and i'm going to go ahead and dip the entire piece in there, but i've already protected the actual lace. I already have my gel on there. You can watch me do that in my other hair coloring videos - i'm not going to go totally down in there, because i do want to make the root a little darker and for me a lot of times when i'm doing a lot of my hair coloring. I really prefer to have a darker root. I feel like it looks most natural and you can see there that the color is very very close if you notice here i'm getting really close now i'm going to go ahead and make a root color, i'm still going to use that cajun spice i'm going to Go in with some neor and it is considered jet black i'm going to mix that in and i'm going to apply that to the root. This will give me a darker root, a darker cajun spice color, and i just feel like it looks most natural that way, but it's up to you, you don't have to do this and i'm just applying this with an angled brush so that i can get really Close without getting it on the root now i did protect the lace. If i do get on the roof, it's not going to stain it, but i still like to use an angled brush and you'll. See me do that in a lot of my coloring videos, because i can get really really close now. What i was telling you guys in some of the videos like when i talk about the 27 piece. If you notice it has a little curl pattern and if you're trying to make a unit that curl pattern can get in the way, because it's so tight when you're trying to apply the glue to it. So the best thing you could do is wet it and just let it dry it doesn't take long to dry. So i just prefer to do that. What you want to do is you want to go in. You want to clean up that area. I'M going to take my clippers because when i place this unit on in the back, it's going to be shorter and i don't want her real hair to show all right guys. So i'm going to take my saran wrap and i'm going to actually wrap her head because i don't like to actually do my quick weaves where i'm gluing it to the person's head, and i know they make product that protect it or whatever. But i personally don't like it, because i want to be able to take this unit off and wear it again or the person that i'm making it for may want to wear it a couple times like you can get a lot of usage out of it. If you do it into a wig, i just personally like it better that way, also depending on how short i'm going to do it depends on what type of cap i use alright. So when you get this 27 piece box, it's gon na come with a actual stocking cap. You can use the stocking cap that comes with it to do the unit. Sometimes i use a mesh cap. This will last longer it's not going to last forever because we are using glue, but this cap right here is a little stronger. However, i do feel like the shorter you're going to make a wig. I feel like the stocking cap lays better all right. So i have this: cap pulled all the way down when it's on this plastic. It can slide. So what i'm going to do guys is i'm going to line out her actual hairline on top of this cap. So it don't move and i'll dry this with the dryer, because it'll roll up - and i don't want it to move. I guess that would be the difference in somebody like gluing it to the person's actual head. You won't have to worry about it moving but, like i said, i don't want to glue it to her head and i'll just dry it all right. So these tracks come in different lengths. This is the shortest length uh. For me, i like to put at least one or two of the longest lint in the back. That way, i have something to work with. I just prefer that so i'll do like two tracks. In the back of the medium, so i go a little longer. I don't necessarily use the shorter one. I use my spritz that's going to help dry the glue fast now i'll go to my shorter ones, because i want from here to here to be a little short and then i'll go to my longer pieces. I don't put them close together, because i don't want it to be bulky. I want it to look as natural as possible. We don't want it to look wiggy. I think that's the one thing a lot of people like feel about when it comes to using the 27 piece hair. They feel like it's gon na look wiggy, but you have to you can't put the tracks too close together and you don't have to use this hairspray each time, i'm spreading it out in enough of the area where it'll be enough on there. I can do at least two tracks, okay, so on these sides, what i was speaking of i'm going to go on top just in this area and add some short pieces, because i want to be able to customize this actual area for the sideburn not going to Have them long, so i'm using a medium piece over here on the sides and i'll do it on both sides until i'm until i have it to my desired density or as thick as you want it to be all right. So what i want to do is i kind of want to mark this off. You could do this before or you could do it after it doesn't matter, but i just want to show you guys like really quick, because i'm getting closer to my stopping point. So i'm going to take this closure and i'm going to cut this lace off because i don't need it. What i want to do with this actual closure is i'm going to put it on backwards and when i mean backwards i'll be backwards? My beautiful model turned to the front, so this was where the lace was. I cut that off, i'm not going to lay it this way. I molded it. I put the part in the back so that i have more hair or density towards the front. So i'm going to mark this off, so i know where to stop you're gon na center. It i'm just gon na mark it. You don't have to do this if you know where you're going. This is just like for a beginner that, may you know if you're trying this for the first time. That way, you know you can't go wrong, so pretty much where i marked it off everything on the outside. I can go ahead and finish filling that in with my tracks, i'm using the longer length here and i'm filling everything else in all right guys. So now i'm going to go ahead and take my glue and i'm going to glue the outside. This is just a quick one too: it's not something. If you want to do it permanent, you can do it on the sewing machine. I actually teach you how to make these shorter wigs on the sewing machine on my website at www.thehairdiagram.com, so you can go to my website. I have some extensive training on there on using the sewing machine making weed, but this right here is just something that you can just one two put together, so we're putting it on backwards. So all that hair is shifted to the front and then we'll blow dry. Her down okay, so you notice, i didn't put any glue down in the back part. So what i'm going to do is. I am going to part this and i'm going to put a track on top of here, just a short one, all right! So now we're ready to remove the actual stocking cap. Voila voila. I just always want to just say my own thing. It took me like voila. I thought it was it's voila all the plastic out. I want to go in with my spritz lightly, just to make sure it's gon na hold and i'll dry it with the dryer. If you got any excess plastic go ahead, just take it out mama. When you get these 27 pieces, they actually come with a closure. I don't know if it maybe it could be like a matter of taste, but this just makes it easy for somebody who don't really know how to do a wig or whatever, but it comes with a closure, but i really feel like this looks fake. So that's why we're not using it just so you know you can get that in there. I think it looks fake, but you can spruce it up, but we're not using that we're using a closure all right. So now i can put it back on. I think i want to use a couple pieces of tape just for sliding purposes i'll do like two in the front and two in the back. We'Re gon na do the bow hole, lace, tape, some people like for the first time, they'll cut it wrong. It'S a slit in the middle and what you want to do is don't cut with the slick cut against it. It just depends on how you holding it - i will say vertical horizontal, but it just all depends on how you holding it, but the ultimate goal is to make sure that slit is in the middle. So that way, when you take it off, it's easy to remove all right. So i'm going to go in with my witch hazel wipes and i just want to wipe this area, i'm just going to put two pieces of tape. I'M not trying she wants to take this off at night. This is just something like really quick and then that way she can wear it again. If she wanted to wear a different wig tomorrow she can and then she can come back and put this one on. So that's the good thing about it, so i'm gon na go in with my skin, protect just gon na dab. It don't wipe it if you want to be wiping it off, so just dab it and we'll let that dry, i'm going to go ahead and pull the tab off from the silver piece. I'M only doing two pieces, it's just for a temporary hole, we're not trying to keep it on she's, going to be blonde tomorrow right. So i'm gon na do two pieces of the back turn to the side, so they can see. I'M just gon na do two pieces in the back. I use my tweezers to remove the tab and now we're gon na put this on we're gon na cut this bang and mold her and curl it and fold holy holding all right. Okay. So i'm going to clip the longer hair out of the way turn to the side and i'm just going to go ahead and cut everything down so that it looks natural. I like to use a razor. You can get this from sally's or from your local beauty supply store, it's a calm, raiser, so easy to use. You can use your shears. I just think that a razor really helps the weave to look as natural as possible. You know i like using a razor, but i feel like it helped if you really are not familiar with cutting so you're, going to use a mousse of your choice and i just want to mold it. It doesn't take long to dry, but this really helps in making it look as natural as possible. So now the hair is dry and we're ready to flat iron, her hair, going in with my ultimate silk. So at the root i'm going to go in with my easy route just so i can make sure that i am perfect and there's a track underneath, so i want to go ahead just in case like somebody is standing over here. We don't want them to see that, so, if you look, you can kind of see the track. So what i'm going to do is i'm going to take this easy route to cover that and conceal it all right guys. So this is the end. Look. She looks. Amazing, yes, she does. We don't get her to turn around in the back. I feel like there's something quick and simple that anybody could do tilt your head forward. Simple, really, really simple: you can do whatever you want to it. I didn't do much. I decided just to flat iron it just so it's just something: sleek and simple, nothing much just a small flat iron. It doesn't take much to make this look happen. Go ahead, turn around to the front for me and she is done. Would i say voila voila love it guys. So if you enjoyed this video, make sure you like comment and subscribe below


Comments
LaTisha M Moon: As always Ms.T, impeccably done Luv the idea of turning the closure the opposite direction. Gonna try it.
kdub nyc: Yesss I LOVE everything the color, cut, technique as always you did a fabulous job. The model looks stunning. Please keep bringing the great tips
Sunshine Roberts: That is beautiful!! I loved everything about it.
Cookie: I love it! I'm definitely going to make me a wig using this method.
Jackie Bang: OMG I love all your videos so tfs. I always wanted to make a 27 piece wig so I've learned from watching you. Thank you again!!! This masterpiece you made is beautiful and creative.
Ellistina Godwin: Absolutely gorgeous! Love th color too!❤️Thanks for sharing this
lshardy1up: Love it love it love it!!!! I've learned so much from your videos and it's always fun . Can you do one of the long mullets again? (Inspo: Rhianna, Rico Nasty, Tokyo Stylez) I feel like they're so cute and edgey but the cut makes me nervous to try.
Clarissa Charles: Beautiful! Thank you!
Kila Russell: You’re such a selfless & talented person‼️‼️‼️‼️ Thank you sharing these
Hairbyhe Graham: Hey Motha you can also flat iron the tracks before installing it gives a nice install and its super easy and quick
prettygurlyj22: I’m waiting patiently. I love everything you do!
hair2staybyms.e Michelle Echols: Love it!!
That's Me Sherie: Can’t wait to see this !!
Denise Brown: I love it!!!! Iam going to try it!!!
Jasmine W: You deserve all your blessings because you let God use you fully. This is truly your lane, you really DO this hair shit!
MONEY MONEY: ❤PERFECT !!!!!!!❤
Razor Beauty Makeover: U can also just use a flat iron and press out the tara pieces instead of wetting it.. Also instead of using the plastic wrap just use a shower cap...Love your work❤❤
lindyanne3419: OMG!!!.. you are so talented, I just love watching your videos!!!..you are just the best!!!
Monebyrd: Soo Beautiful
Latonya Caldwell: Perfect video thank you soooooo much
tenice0526: Love this
Kimberly Colbert: I'm so ready for this...
BLACKSHAMPU: Love how you added the lace.. and not the closure it came with!
Helen Jones: That is Beautiful
Ugochi Nnamdi: You are my latest obsession. What! You got such great talents. Where has this channel been all these while?
It’s Me Tracie: Love it!!!! Are you in Huntsville? Girl I need to come see you for this style!
Celeta Cruz: Genius! you bad girl. Did your thang
Celeta Cruz: I love you hair coloring skills. Is it possible you could show us the proper way to color hair red brown? That hair color is becoming popular. I want to learn it from you. Thank you so much
Susan Alatan: I enjoyed this video. I enjoy all your videos. Love from
Jmw201218: Can you show us how to do a pixie cut on a wig & how to make a half wig?
Stephanie A.: You’re good!
Supreme_100:
Mooni:
Kristal Thomas: THE
Jakob Thomas: Girl I came to watch this I need to knoooow