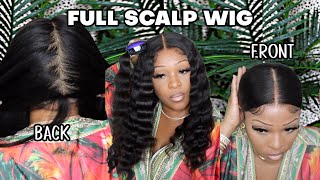
Cute Pixie Cut Wig That'S Affordable Sis!
This short bob/ pixie cut wig is inexpensive and cute! Here's how I slay it! Part 2!
Love you NAYvy !
Wig: https://www.ywigs.com/180-density-deep...
----------
Have you watched these yet?
BABY TRIES FOOD: https://youtu.be/0KQptQYwBHQ
BABY ITEMS I LOVE: https://youtu.be/WjoL9S8iCM4
BABY ITEMS I REGRET BUYING: https://youtu.be/WO5W5KPoPmk
TRUTH ABOUT BEING A SINGLE MOM: https://youtu.be/ZlMHQtZwdUg
-----------
CONNECT WITH ME FOR BEHIND THE SCENES OF MY LIFE:
https://www.instagram.com/Nayrosee/
**************
Must Have items I use Daily : www.amazon.com/shop/nayrosee
My Inexpensive Film Equipment: https://amzn.to/2Hgx1oa
BUSINESS INQUIRIES: Contact me at [email protected] for collaborations!
**************
ITEMS YOUR BABY NEEDS (Inexpensive):
https://go.shopyourlikes.com/pi/a5f9a8...
https://go.shopyourlikes.com/pi/05ee42...
http://go.shopyourlikes.com/pi/cf5161f...
http://go.shopyourlikes.com/pi/d6f5c2c...
http://go.shopyourlikes.com/pi/50159bd...
https://go.shopyourlikes.com/pi/26bcd9...
http://go.shopyourlikes.com/pi/465a894...
http://go.shopyourlikes.com/pi/a1026e5...
( Find more BABY MUST HAVE ITEMS here: https://amzn.to/2x8PRM7 )
Hey navy welcome back to my channel if you guys are new here. What is up welcome to my channel, so in today's video y'all already see by the title, we are back with another hair video showing you how i style and apply this pixie cut, wig um. Let me know what you guys think and make sure you guys watch the whole video in its entirety, because every step counts and y'all know you'll be looking crazy until it all comes together in the end, so um yeah y'all. This is how it's looking. You know. I'M feeling it i can do a little little over the ear. You know, i don't know, i'm feeling it. I i think i could do short. I think i can go short but anyways we're about to get into this video, so uh, i'm about to be looking crazy in a minute about to have the bow wow braids, so y'all bear with me. Let'S get into it. Okay pause, you guys so real quick. I wanted to remind you to watch part one first, if you haven't already. This is a different installation method that i use that i actually really really like. So if you guys like how this looks, go watch it but yeah getting back into this video so boom, i got my bow wow braids going y'all already know. What'S about to happen, when you see the braids, i look like jaden smith off karate kid. So yeah i'm just braiding the ends of those braids together and tucking them away. That way, we don't got a little rat tail sticking out the back of our wig, but yeah you guys can either like sew it down that way. It'S sturdy and not moving nowhere or you could do something quick and bobby pin it like i did, but i was kind of just like messing around still testing it out, so i just bobby pinned it, but in reality i would sew it down. If i were you - and this is how the hair was looking after - i bleached the knots - let me know once again, like i said in the first video: if you guys want a video on that and honey, we got ta fix this, so i just took the Clips and tucked them onto my braids, so one thing you don't want is your wig to sit on your head like this. So after we, you know, find our part and everything we're going to make sure that it's more snug on our head. So i'm just going to pretty much like play with it and go ahead and glue it down. My go-to is the got to be glued. I think most people use the got to be glued only because the hold is so great and y'all do not kill me. No, i did not have a wig cap on i'm putting it directly on my skin, but i have a great like glue removal, so it never really damages my skin or pulls my edges or anything like that. So if you don't have one, i would not recommend this, but at the same time i was still kind of like playing with it and seeing the placement and seeing how the lace looks. So i wasn't sure if i was going to keep this on for that long. When i put this on so i would definitely use a wig cap if you know that you're gon na have this on to stay but, like i said i do have another method on how i apply this wig so make sure y'all watch that as well. But it's looking pretty good. I liked how it was laying down um, but just to make sure it gets like that extra hold. I go in with my blow dryer just to make it a little more tacky and make it stick better and then, after that, after i blow dry. That'S when i go in with the regular glue for the little spots that are still lifting and just like some last minute fixes so yeah so so now all i have to do is pretty much style it. So, of course, i'm going to re-wet it and put some product in it just to give it that fresh, wet type of look - and you can't forget your edges of course, of course, and i like mine, tucked over the ear, that's how i styled it in the Um part one as well. This is how i've been wearing it lately so, and also i like to just put a little bit more like contour around my edges and where the wig starts just to have it like blend a little bit more, nothing drastic, nothing, crazy, but but yeah, that's just Another little trick to get it to blend and, of course you got to lay it down, and that is it you guys so yeah y'all. Let me know if you like this method with the you know, traditional lace front or if you like, the other method that i did, which was mostly like a little hack that i kind of made up, but it looks a lot more natural. I, like the more natural way honestly looking back on it, but before i go you guys, i did want to show you guys how the wig came, because i know y'all are going to ask um. This is how it looked before. I did anything to it. So this is before i bleach the knots before i cut the lace um before i manipulated it in any way, so the wig came pretty much looking really good. Actually, it had some of the baby hairs. They were a little long, so i did cut them down a little bit um. I got a size, small wig cap also by the way and like i said, all the details will be in the description box, but i just wanted to show you guys fresh out the box how it looks i did not have to cut it anymore. It was already like cut and styled in a perfect way, even with me parting it on the side. It was still cut just how i wanted it and um, as you can see it has the clips on it already, which is perfect and, of course, the adjustable straps, so anyways y'all. Thank you so much for watching. I hope this video was helpful. Don'T forget to see the other method, which is actually my preference in part one, and i will see y'all in my next video bye, navy love. You guys you


Comments
Chantelle Rose: This is soooo cute!!!
Emani Dimone: Love this style on you. Givin me face, yassss