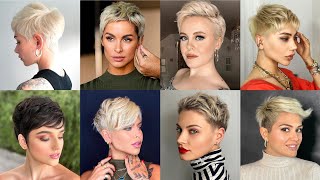
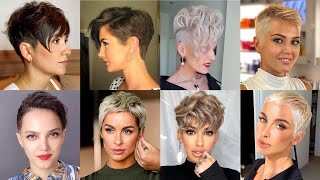
Diy How To Make A Short Pixie Cut Wig With A Closure - Easy Beginner Friendly Pixie Cut Hairstyle
*THIS IS THE MOST DETAILED AND GUARANTEED BEGINNER FRIENDLY PIXIE CUT WIG USING A LACE CLOSURE FOR 2019.
Hey my lovely people, are you thinking about making a summer pixie cut wig using a lace closure and just some simple hair glue and giving you the most natural looking haircut-like pixie cut hairstyles...Yes guys!!..super quick and easy...watch the video to see how i did it and how you can also recreate this simple rihanna or Nia Long inspired pixie cut hairstyle, products/items used would be listed below..
Products/ items needed
1. 27 piece weave
2. Wig cap
3. Razor comb trimmer
4. Scissors/clipper
5. Comb
6. hair glue or bonding glue
7. curling iron
8. Mannequin head
9. 4x4 Lace closure
10. Hair Pins
You can also email [email protected] to place an order for any type of wig you want custom made just for you.
————
PLEASE SUBSCRIBE TO MY CHANNEL HERE @
——————-
Let’s stay connected:
BLOG @ www.bijouxquibrillent.com
Instagram @bijouxquibrillent
Twitter @bijouxquibrillent
Facebook @bijouxquibrillent
SNAPCHAT @trinket007
Business page @slayedbyterrie
BUSINESS INQUIRES
For serious business please contact
Videos you would also Love
If you're looking for the best most detailed pixie cuts, wig tutorial, then stay tuned grab some popcorn and sit down and watch, because this is the last video you're going to be watching for today. This tutorial is super easy guys. I PROMISE. So let's get started, shall we turn your wig cap inside out and start by sewing in your wig combs one on each side, one on the left, one on the right and one at the back. This will be for extra security, while, when your wearing your wig, once you're done snip off wig straps on each side, that this helps your wigs only super super flat and prevents them from sticking out when you wear your wig. So as you can see, I'm turning. My wig cap back right side on the mannequin and I'm going to start with gluing my tracks onto the wig. The black poly bag is just prevents me from making a mess on my mannequin. This is the 27-piece hair I'm going to be using, and it comes in two lengths, the shorter length and a longer length. The longer length will be used on the front side and the shorter length we used on the back side. I'M also going to be using an 8 inch 4 by 4, then place it as neatly as you can track by track onto the wing snip off each end, once you're done so try not to make a mess, but if you make a mess, don't worry it's! Okay, it's a learning process for us all, so lay your neck strap continue with this process cause. This is the exact same process you're going to be doing until you get to the center of the wig, where you're going to place your closure. So, as you can see, I'm trying to lay my closure onto the way and I'm placing it on the central portion, the central portion of the wig, I'm going to secure it with my pins and start sewing once I'm done sewing, I'm just going to continue doing My tracks, as usual, like nothing ever happened, try to leave as little space as you possibly can, while in your tracks to make sure that the wig is really full and realistic, we are going for the whole. I got a haircut look so yeah, okay. So let's address the white elephants in this video, as you can see the closure and the hair don't match, but we're going to make a work. We'Re going to make you trust me To make the closure lay really really flat i'' m, going in with some wrapping foam and my hair scarf. I'M going to tie that down and go and get some breakfast make sure your cutting section-by-section or track kind of track-by-track section by section to make sure that you're not making a mess or you're not making a mistake, because but this hairstyle, once you cut, you cannot Put back so be as careful as you possibly can so I'm gon na section off the hair, using my section in using my duckbill clips and a comb. All right Sal is getting to styling, so we're done cutting now, let's go in with our argan oil wrapping mousse again, so I'm going to be doing a little cutting here and there to make sure that the wig is seamless and frames my face perfectly. But as you can see, we are done. This wig would look exquisite on anybody, any skin tone anybody at all. So yes guys. I know you've now seen this tutorial on YouTube before, but this is the first I'm trying to make it as easy as possible. So you can also recreate this by yourself. I dare you to try it recreate. This look and tag me anywhere in social media. Send me pictures, send me emails stalk me everywhere and yeah. I love you guys, please remember to like share and subscribe.

Comments
Ey Prul: I've been looking for this video for 2 days and finally found yours! I'm going to make this in ice white now
Cassondra Hill: Very creative . I love this..great idea with closure in the center!
Pure Estrogen: This is cute and the density is prefect!
Odo Blackstar_:: Such a beautiful smile sis! Love the wig
Priscilla Baaba Koomson: Waaaoow how did I not see this..it’s been a year..waow I love this so creative Please did u cut the excess lace of the closure
nic c: Great work. Just a suggestion...I have to turn volume way up to hear your voice then the music comes on blasting. In the future can you lower music volume. Thanks.
martin steere: lovely