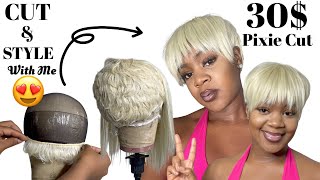
Aliexpress Curly Pixie Wig Application Tutorial
Hey B.O.M.B Squad!
Welcome back to my channel
Merch line: https://www.beatbyburstapparel.com
Hi! I’m back with another wig application video. This has to be my favorite wig from Aliexpress. The products I used are listed below. Enjoy the video!
SUBSCRIBE to my channel
https://www.youtube.com/c/BeatByBurst for a new video every Sunday or Tuesday @ 6:00pm EST
DONT CLICK THIS: https://bit.ly/2QfuUpG
WANT TO BECOME AN INFLUENCER: https://bit.ly/35kDDLt
Get started with Influenster TODAY!
Influenster link: www.influenster.com/r/2879901
Products
Wig: Cranberry Hair Malaysian Hair Water Wave Wig 13X4 Short Human Hair Wigs Remy Hair Lace Front Human Hair Wigs Bob Lace Front Wigs
https://star.aliexpress.com/share/shar...
Glue: BMB CRAZY HOLD TUBE SUPER LACE GLUE ADHESIVE
Gots 2 Be Freeze Spray
Shine n Jam Extra Hold
Shea Moisture frizz free Mousse
Toothbrush & Rat tooth comb
That is full of what you like doing. Then, a long life spent in a miserable way, hey come on yeah come when i come to hey everyone. Welcome back to my channel. So for today's video we are doing a wig application. Okay, so i'm going to a wedding tomorrow - and you know i wanted to try something new do something different. You know i haven't been out. The house we've been quarantined, so i kind of want to shake things up a little bit. Okay, so we're going to secure a wig now i do have another wig video on my channel, so from then to now is how long we've um done a wig application. So we don't need to uh strap up for battle over here. Okay, because i need this thing to be slayed and laid slayed and late. So this is what the wig looks like. I was going for like a short pixie cut wig. This is a curly wig unit. She is curly, honey, okay, so the brand of this wig is by cranberry hair. Once again, i bought my wig off of aliexpress, so this wig cost me around. I think it was like 69.70 and i ordered it in a 10 inch. Um 10 inch length, but i cut her. I definitely cut her. I literally went it versus your hands and was like chopping her up. Okay, um. I also added some highlights as well as you can see. This wig came straight black, so try to add a little rasp dab. Okay, so we're just going to get started, so i did um actually like spray, the inside of the legs with gots to be because um, i think i bleached the knots for too long and the hair was coming out and i started freaking out because i did All this work, and i'm like instead of using, if you can hear like a chainsaw going on in the back um after that little storm, we had on thursday they're cutting down the trees now and they want to do it at five o'clock. I did spray the knots with dots to be just to seal them. So if you do not have a wig or not sealer, you can definitely use guys to be so we're going to put the wig cap on now. You can see. I have already braided my hair into the setting off braids um, they're kind of messy only because i have these long, tarantula nails and i have not worn nails since march, and so i was a little um, a little newbie with braiding my hair. I actually did my nails myself, y'all. You know that polly gel that i ordered that's what i use so i'm just going to wrap my hair together, how i did in my last wig video just to get my hair as flat as possible when it's under this wig, as you can see, and i'm Just going to secure it with bobby pins, just so that it doesn't fall under the wig, so we're going to pull this down, you can barely see so we're going to put pull this down over our eyebrows, because i can't see if it ain't and we're going To pull this part down and we're going to cut out the little ear holes, we're going to use the gots to be glue free spray in the yellow bottle and we're just going to put this all over the lid all over the wig cap and make sure You kind of press this going backwards, so you're actually going to spray this free spray like two to three times and just make sure you blow dry in between each application once that is completely dry, we're going to start cutting the wig cap. So, honestly, if you just, i mean it's really, how far back you want your wig. I wanted this to be at my hairline because i do have a low hairline, so i'm just pulling it back and just cutting it with no rhyme or reason. Okay, so i had to cut the side burns down, because when i put the wig on you can actually see the wig cap and i guess my sideburns are just hella long. So that's what we have there um now, i'm just going to make this a little bit more smooth so that it doesn't unravel how i'm going to do that is i'm going to spray the rat tail comb and kind of just push this down. We are going to clean this hairline because we got hella glue on here, i'm going in with 91 alcohol. Okay. So now i'm going to put some foundation on this um wig cap and the lace just so it can match my skin tone. So me finishing putting the foundation on my wig in this part of actually me putting the glue on and showing you what glue i use the file got corrupted. So i don't have that footage, but for the glue that i use, i got it from the beauty supply store. Let me get the name hold on, so the glue is called the no mess crazy, tube super lace, glue for lace, wigs for professional use. Only it does dry clear and it comes with that wooden. Stick that i'm using in a brush. I did apply two layers of this and, like i said it's supposed to dry clear, this is pretty pretty sticky, so it's really for professional use only, but i did you know, make it work so um i dried the glue just a little bit, so it can Get tacky and then i applied the wig and now i'm back combing the wig, so we can get that scalp edge that we want so a little bit more about this glue um it has a strong hold. I don't usually wear wigs for that long and they do start to lift. But when i tell you at this wedding, it did not move at all. So if you're looking for a cheaper alternative to ghost bond or um, the other wig glue, i can't even think of the name right now definitely try this glue out. I think i only spent like five dollars on this glue and honestly it's the bomb, but it's just really messy, even though it says no mess it's messy. But if you can get past it, then you are good to go also a little bit about the actual wig um i did have to the wig does say it comes pre-plucked, but i actually plucked the wig to my hairline and i actually um raised the hairline Of the wig so that it can match my actual hairline, because the sides of my hair are really low, but the top of my hair is a little bit pushed back. So i did kind of have to like pull some hair from the top of the wig. So it can match my hairline okay. Now we're going to put our scarf on just to lay down what we have doing. Y'All praying that this works. Lord, be our shepherd securing this wig and like something is like itching, my head, so on a scale of one to ten. With this glue, this glue is really messy, but i feel like it will hold like through thick and thin a storm, the storm we had two days ago, so it says for extended, wear bonding use only it's only plan on wearing this like until tomorrow. So i'm hoping that this comes off my head, but i will be back after this set, so i'm going to leave it on for like 20 minutes just so everything can lay nicely so we're going to do the dots to be method again and we're just going To spray the hairline, because that's what i'd be seeing them, girls do just spray, so i'm actually going to cut the lace with eyebrow scissors, but i need to get real close and personal. So i do apologize if you cannot see so now, i'm going in and securing the lace even more um, some pieces did lift up after i cut the wig, the lace from the wig, so we're doing the same method. We did for the wig cap just spraying. It um on the back of the rack, tail comb or actually on the lace and pressing the lace down so that it can be a nice secure, scalpage, look and honestly, all this wig is going absolutely nowhere. I tugged on it and this thing is stuck to my head, so i'm gon na style it first. So i'm going in with the shea moisture frizz free, curl mousse, i don't. I didn't have the the other setting lotion so we're just gon na go in with this, and we're just going to put this all in the hair and they said not to go in with water, because you don't want your hair to be frizzy. I actually went in with water on the day of the wedding, and then i went in with the can or the cream of nature, um curl defining cream, and i used the goss to be free spray to kind of hold everything together and my hair did not Frizz, so just keep in mind, you don't have to just use the mousse. I don't know i'm just feeling the bang on this side, but i kind of messed up with the hair. I don't know why i decided on my hair, but if i take this off, then you'll see my hair okay. So this is what it's looking like. So for my baby hairs, i'm going in with the shine and jam. This is in the extra hold formula. I did the baby hairs on this side, and i kind of fix this area right here so now we're going to work on the baby hairs on this side make sure you go in with a gentle hand, for this do so. This is basically what the look is going to look like i'm going to finish the rest tomorrow, which there's really that nothing to be done. I'M going to actually you know, do my makeup tomorrow, so i'm actually going to put this on to lay down the front. Still and then put a bonnet on to secure the wavy curls you'll, see me in a different location tomorrow, i'm actually going to be in a hotel, so we're going to shoot that clip right now, all right guys. So that is it for this video. If you enjoyed this video, please give it a thumbs up, also subscribe to my channel, if you haven't done so already. If you are new to my channel, join the bomb squad because we are the real squad on the internet. Also, don't forget to leave a comment in the comment box below, but i look forward to seeing y'all in my next tutorial. Bye, guys


Comments
Prancer 1000: Beautiful!
J Butler: I love this how’s the hair holding?