Making A Pixie Wig With No Ear Tabs Using A Sewing Machine
making a pixie wig with no ear tabs on an adjustable wig cap using a sewing machine
Facebook Link. https://www.facebook.com/jocelyn.daah
Instagram link:
https://instagram.com/jojosplace_?r=na...
Instagram: @jojosplace_
Links to My YouTube Videos:
The best way to tong a layered cut: https://youtu.be/N9DEV15OL5g
The best, fastest and easiest way to straighten a weave to look bone straight: https://youtu.be/JpD0wEcgcqA
How to make a wig using a 4x4 closure on an adjustable net using a sewing machine
How to cut and style a bob using a 6x6 closure. Start to finish. Beginner friendly
Tools and products.
Tripod stand
Canvas head
T-pins
Needles
Thread
Frontal
Sewing machine
Hair polisher
Straightener (big and small)
Spritz
Trimmer
If you want to purchase the thin flat iron or curler for pixie cuts, this is the link below: @justlinhairwigtoolsgh
https://instagram.com/justlinhairwigto...
Thank you for watching this video. Please don’t forget to like, comment, share and turn the notifications bell on. We will be bringing you more videos every week✅
Email: [email protected]
Attachments area
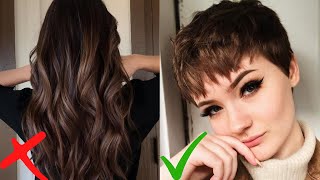
Hi family welcome back again to my youtube channel. If this is your first time seeing a tutorial from me, I am Jojo a hair stylist from Accra. Ghana, please subscribe to my channel and please turn on your notification bill so that each time I post you'll be updated. These are the main tools we are going to be needing hair, clamps, the canvas head and then the tripod stand, hair, politia and then a flat iron, a thin flat iron and an adjustable wake up and then their trimmer. And then I went be some spirits, t-pins and then Tara, hair pieces and then a sewing machine for this. We are going to be doing a pixie cut with a front ow, but this time around I'm going to cut their tops. So it's going to either be a six by four or a seven by four. The reason why I'm cutting off the ear tops is because, usually when it doesn't start well on the edges, the ear tabs will not lay flat and you might have to use glue to lay it flat. Okay. So I'm going to reason: I'm not just about wake up in a sewing machine, but usually the adjustable wakeup is big at the occipital area or the back from the occipital area to the nape side. So I'm going to reduce the cup before I start laying down and stitch in my tracks, so I'm going to use a sewing machine now to hold about one to two inches depending on the size of the peasants head. So right now I'm reducing the wake up. I'M stitching it to reduce it, be sure not to make it too small because, as you stitched, the cup is going to shrink. So if you hold it too much by the time you are done, you wouldn't be able to wear the wake up. It might be too small for you. You need to cut off the excess Nets where you wouldn't be needed so that it doesn't look puffy at that side. So just what it looks like I'm going to be using Terra 24 piece and it's usually very light. So I prefer you something that's at the back, so this is what it looks like. So I'm going to start laying in and stitch in my first track. I make sure I start from the flap, and then I saw about two tracks so that it can cover the nip area so that it doesn't become very short when you wear it. So that's why I start itching on this pad and also I stitch about two tracks down there and I make sure I don't stitch on the holes that have been provided for adjusting the net. So that's what I'm doing. I make sure I so over the ends of the tracks. I go forward and I come back onto the track and - and I saw through so that I don't have loose ends. If you don't do this, it's going to loosen after some time and then I'm not sure you'd like that. That'S my third frock and I make sure I don't stitch on the elastic band. If you stitch on the elastic band, it's going to shrink their nets, which is going to make it difficult for you to weigh and, as you can see, I'm not stitching on the holes that were provided for I just in the knit okay. So this is the outcome, so I'm using a zigzag actually to show that tracks down, I'm not using the straight line to stitch it, but this is the exact okay. So I continue stitching and I make sure I don't stitch on the band you see and that thing has been provided for passing the elastic band through it to be able to adjust other back. So I make sure I don't sew on that one too. So I keep stitching and then I make sure the back is closed. I don't leave so much space, but if you are not sure about the space and you can market with it, you can mug the net with them maka that will help. You know the exact place you would like to stitch your tracks on, so I'm repeating the same thing over and over again and since it's a pixie cut, I'm suing my tracks very close, because I wouldn't want this to issue whereby one side will be empty and Look flat, I wouldn't want that. So I keep my tracks closed, but as I get to the occipital area and make sure I double my tracks - and I saw them closely - I usually don't even leave spaces. I draw area so that I can have that bump at the back or that rounded look at the occipital area. As you stitch, you must make sure that the net is lying flat on the sewing machine, make sure it's not folded and don't stretch it. When you stretch it, the net is going to become bigger and it's gon na have bumps it wouldn't be smooth. When you place your hand or you rub your hands on the wake up, so you need to make sure that it's just straightened out make sure the net is straightened out, as you continue to stitch your tracks onto their nets and if you don't also straighten it Out the net is likely to shrink and you didn't get the exact size you measured, I'm so going over the ends of the tracks to keep it in place and when I'm done, I actually sew over the closure with a swing machine to keep it firm. I'M cutting the excess Nets off. So that's what it looks like at this point: if you've not subscribed to my channel, please do so and please send a notification bill so that each time I post you can see the updates, the wig is done, and this is it. I'Ve placed it on a mannequin and I'm going to be cutting it. I'M going to use a trimmer and blade to cut this hair so guys this is it so I'm using a trimmer and then there's a bleed in it. So that's what I'm using, but as I cut I trim the hair. I hold the hair as I cut so that I don't make a mistake by cutting its deeper than I should so. I cut through. I keep cuttin cuttin cuttin cuttin, but when I get to the top I don't cut much that's the occipital area. I don't cut much so that I can have that rounded look. I want to achieve so this is it so I'm using water to control the hair and to keep it flat. So it's just what I use in the spray bottle and then I'm coming it through. So I'm using a bits of hair polish just to give it a bit of shine and then I'm let it dry out before I start talking in it the Corolla I use for tongue in my pixie cuts it can give you really good. Curls went wrong again. Very short hairs, so I got this from jocelyn heads who was GH she's in ghana, so our boss is from here and that's what i've been using to turn my pixie cuts. It'S very good. You can look it up on Instagram, so I Tong track-by-track just make sure that I'm getting access to all the tracks. Okay, so and this Corolla is able to heat to about 280 degrees, I'm still using my trimmer to trim the excess of the hair. So I make sure the NIP area is no bulky emissions as light as possible, so that I can achieve the look that I'm looking for. So this is the frontal area, I'm talking with a normal song in Maschine the bigger size you pixie cuts really took a long time. So it requires a lot of patience and what does kerala? It hits up to 230 degrees, which is enough to enough kids to be able to talk my head to get a desired. Look as your tongue, it's okay, to cut off the excess hair that you don't need, so I'm so using my dramatic cut off the excess. You can use a trimmer or scissors, but you need to be very careful. You don't cut more than you need to. I'M done talking the hair, so I'm going to style it so I'll be using my hot comb. So I make sure I heats up really well. So that I can leave the areas that I want to be flats down, you need to be careful with a hot comb so that it does not bend the net make sure you don't place a hot comb on the net for a long time. If not is going to end of the net, so I'm using the hot comb to lay the hair down flat or the area that I need to be flat, I feel lean it. You can decide to use wax or the wax stick to leave a bunch of flats, but you need to apply a little of the wax, not so much okay, so I'm through with the pixi. So does the outcome. This is what it looks like so you're not going to have any issues with air taps when you wear the pixie you're, just still gon na have the frontal effects, especially where you want to Pat it. You can pass it anywhere that you want to pass it through, but the closure or the frontal is known from eyebrows eyebrow. So it's enough for you to tell it as desired. It is okay not to have ear tabs, because you wouldn't be needing it to pass or make a pattern in the closure. So it's okay for that side not to be there. So you can tell this pixie cut by using a wide tooth comb or you can run your fingers through it. I'M cutting off the excess net. I already plugged the frontal, and since I did before I staged it, but unfortunately I was unable to capture that. So we missed that part, but I'm going to be making a video on how to pluck and then send to your front owl. So does the outcome this? What it looks like I'm just applying a bit of holding spray to give it a hold thanks. So much guys for watching this video to the very end. Please like this video and please subscribe to my channel and please turn on your notification bill. So that's each time I post you'll be notified thanks, so much guys hoping to bring you more from Georgia's place. I'M going to leave my info, my email address and my Instagram handle and Facebook handle in the description section. So please feel free to contact me and ask all the questions. You'D like to ask me I'll, be glad to assist. Thank you so much for staying tuned. Thank you thanks guys, you


Comments
Adobea papabi: Hmm God bless u wai I did mine on the machine sometime ago I didn’t take away the excess lace off after everything it ended in tears ... thank you for this details
Andthentherewasme: Ok Jojo do your thing!!! Very nicely done ✔️ almost makes me feel like I can do it to.
Janice Daah: I love this tutorial, so detailed
Steven P. Daniels: Absolutely beautiful job!!!!! Very educational
Elsie Tiere: I really enjoy watching your videos, keep up the good content
Josie Rosie: This is so good . I love it
Evelyn Mensah: this is beautiful
Bibi Hairz: Wow, thank you
Jessica Nataba Daah: Nice one
Kayla: Thank you ☺️
ima bemedou: You did that!
Priscilla Baaba Koomson: Been waiting for long But can you use the spandex dome cap
Celinda Farlow: Are you selling this exact wig love it would love to buy it
Golden Grace: Pls I want to know how you got to know the person head size before sowing the net from the top to the down
Krine pelkam: Please where did you get hair from thank you.
Samira Samgil: Where in Accra is your salon located please?