Diy Short Pix Curl Wig / How To Diy Short Pixie Curl Wig Using Xpression Braiding Hair
DIY SHORT PIX CURL WIG / HOW TO DIY SHORT PIXIE CURL WIG USING XPRESSION BRAIDING HAIR,Welcome to my channel so today I will be sharing with you all how I achieve this lovely curly pixie curl wig using xpression braiding hair to achieve this lovely diy pixie curl wig i made the frontal my self this is a very amazing budget wig to achieve,thank you so much for watching this video do not forget to thumbs up and most importantly subscribe so you can stay update with my latest video thank you have a bless day ❤
_____________________________________________
For sponsorships & business opportunity-
_____________________________________________
PRODUCT USE
xpression braid hair Color 35
13 by 2 frontal
Wig cap
Ventilating pin
Hair rollers
Hair conditioner
LINK TO WATCH MY OTHER VIDEOS
BRAIDS&TWIST / cute &
easy protective style for kids https://youtu.be/kqLbZsTMVyE
LINK TO WATCH MY OTHER VIDEOS
How to make a headband wig / using kids pantyhose https://youtu.be/8Teh-Z1xMzk
fake it till you make it natural hair style / using braiding hair https://youtu.be/b3AYVdXd1Ow
Diy passion twist using braiding hair https://youtu.be/5JjlrDXINEY
Diy: super tight curls using kebab stick https://youtu.be/pSYbQPeA3wI
how to passion twist on natural hair, https://www.youtube.com/watch?v=53uQbG...
Jumbo box braids /Brazilian wool box braids, kids hairstyle ft discoveringnatural https://youtu.be/9ScHVKV7tBU
How to goddess box braids tutorial for beginners,https://www.youtube.com/watch?v=ykU7Ok...
diy needle and thread flat twist cornrows diy hair style with brazilian wool,https://www.youtube.com/watch?v=NKCYRe...
Jumbo box braids using Brazilian wool /butt length braids https://youtu.be/kkzAK4740OQ
Let be friends on instagram https://www.instagram.com/invites/cont...
#crisscross #protectivestyles #ventilating
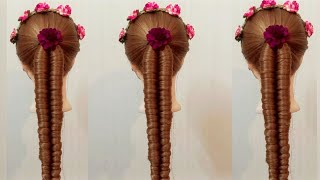
Hello beauties welcome back to my channel. It'S your first time stopping by to my channel. My name is attenua k. So today i'll share with you how i think this lovely diy, pixie short coily, frontal wig, using expression braiding to achieve this good jozel style. So you can see what i'm doing i'm just pinning down my wig cap then show you guys the front i'm going to be using. I used to buy, to buy, i think, to buy sorry. 2 by 13. Sorry, sorry, 2. By 10 frontal, i cut out the two out myself. This frontal is 4 by 13, but i cut out two out of it myself, because i don't want to ventilate all the old frontal and i don't have the front i'm going to mention myself these daily fronts. I have the one they already mentioned down, so i can see what i'm doing after i'm done doing that i'm going to be cutting off the excess wig cap under the front, and we don't need that so now i have a tutorial. If you don't know how to slow down your frontal on your wig cap to ventilate yourself, i have a tutorial on my channel. Can you please check that out? That'S why i speed this part, because this video - i don't want it to be long, because we are doing a lot in this video we are ventilating, we are crocheting, we are coily we are cutting, is just too much, so you can see for the front side. I did cut four, i cut my expression ready into four and i'm using color 35 expression, brilliant and color color. Two yes color, two just a little touch of two at the front, so this is the crochet hook. I'M going to be using now i already started ventilating off camera see guys just hold on. This is not a normal ventilating. This is a ventilating tutorial for your frontal to be very very fast. Let me tell you why i said so guys i i jumped to line not one like i crocheted sorry, i ventilate on you all right. I was like. Let me try that out. Maybe my wig is going to look natural. I'Ve never done that before. I always jump only one line, but i was so glad to try out this method me jump it online ventilate on your whole row then jump to a row that means ventilate on a line. Then jump to life. This really make my frontal really fast guys. I finished the ventilating two days and i was even busy doing something else. Two days not a whole day i'll do it for some time, then i attend to something else. It was so fast, and this came out so nobody's going to know i jumped to line yes guys. This is what i'm going to be doing now. Watch out for you today, i'm going to use this method to ventilate a frontal for a braided wig. So just watch out for that guys. This really make my work very easy and fast. In fact, i was so glad i tried this method, so let me explain what i mean jumping into oh, a roll to you guys, so you can see now you can see. I ventilate i skip it all. I eventually skip it. So if i finish ventilating a line, normally you're meant to jump one line, but me i jump to line, and this came out so so natural, very natural and the work i'm using pick one to two strand. That is the crochet. Sorry, when selecting work, i'm using you can see, i jump to line not one guys two line just showing you guys how natural this looks like very natural, so i didn't ventilate to the down part. So that was, i said, all the parts in this video is very important for you to watch. So i added a touch of color to attachment. I want. I want a little bit of color at the front, so you can see that's what i'm doing now. Just a little bit of color, i'm just ventilating that part for you guys to see. So this is what it's going to look like. I can't ventilate everything on camera. The video is going to be very very long. You want me to do another video on how you can ventilate your frontal very fast, very, very fast comment down below i'll. Do that so now we are at the back. We want to start crocheting the air at the back. Now you can see i'm using my metallic pen to draw out the line at the back. That'S what i'm doing now, then this is the attachment i'll be using for the back i'm going to be using color 35. I took a new attachment because i'm going to do cut five on the back, if it's even possible for you to do cuts this, it will be good because i did a lot of cutting just keep watching. I didn't even know that something's in my clothes, sorry for that guys - i didn't know - i did this video late in the night after i finished eating late right late in the night, so you can see. I start crocheting that back the reason why i didn't allow my crochet head to be tiny, don't allow it to be huge, like medium size, like mine, we are going to still dip this into the auto tan. The air is going to shrink and we don't want that. We don't want the air to shrink. You understand because we want a very full natural looking air. So i followed the line and i didn't follow the line you're going to understand what i'm trying to say. As we keep crocheting, i did the crocheting notes. I did it twice just keep on watching this amazing tutorial and if not subscribe, can you please subscribe to this amazing channel? I really appreciate that so so much so, can you see this, but i said i follow the line. I didn't follow the line. So if i notice that the way i'm appreciating there's a lot of space showing at the down of my crochets, then i will take my crochet i'll take my hair down before i crochet the top part. So you can see. That is what i'm trying to say now i'll crochet on the line now. So that was what i was trying to say like i followed the line and i didn't follow the line. Then, when we get to the front part, let me tell you guys, i crocheted a little air on that thread: side that is so needle and tread. I use my crochet hook to crochet a little air because i don't want that tray to show. Then i brush as i crochet to detangle the air very, very well. I brush as i crochet. So even if you don't want to call it here, you can rock it like this. Just keep it in hot water or straightening. It then you're good to go. This is really tempting me to do something like that so guys. Now i want to start curling the air i'll show you guys, because i don't want this video to be long. That was well. I really follow this video like that, so the coiling method is easy. Do not twist just flat roll, you understand, do not twist flutter when you want to coil it flat through do not twist. You can see that i added some m from the back to the crochet a and do not uh, so i do not call it to the front, because i want the front to be flat off camera. I adjust my coils so you're, going to see what i'm trying to say and make sure you coil all the egg to the back coil everything to the back. No pattern, nothing! So this is it so we are going to be using this olive conditioner. Please use a lot of conditioner so that this air is going to be soft when you touch it use a lot of conditioner, do not manage the cushion the conditioner and make sure your water is very hot. Do not manage the hot water make sure it's very hot, then i put a bucket on my seats, then start adding the old water. I don't want to mess the floor later on. I took this into the bath. I had it all water very well. I dip all the air into the hot water then allow it to dry overnight. My i think i did the video final look in the afternoon. Yes, the final look in the afternoon, so it's overnight then later in the afternoon, then i took out the cords. Just take it out guys, let me be sincere with you guys. I was kind of scared when i was taking out the course, but something was like keep on going do not give up. This is going to come out what you want just keep pushing. So don't worry if your cause looks like this, do not worry, keep pushing keep pushing. So you can see, i use my hand to separate the core. The air is my hands, separated, separated. That'S why i was using my hand to touch it. I was like. Would this come out so nice with this, and this came out so beautiful, so nice and looking amazing? So now, let's start trimming, please guys trip a little bit before you put this on your hair. That was what i did if you over trim ready spot the wok you've already done things. I was even scared of trimming because i don't want this to be over. You can see i just stream a little. I don't really go in like that. I don't want it to lose the shape, then i use mousse. I apply moves on it to make the front lay to the back very well, because we want this to go to the back. Can you see how the inside looks like very natural? The frontal natural can you see so neat so now i want to apply this on my arm, just showing you guys how this looks like i have not trimmed it. Don'T worry. This look, may look messy, don't worry my god to be a gel and spray. I use both then i start trimming again after i lay my head down. This is the final look. Oh my god guys. Wait! Wait! Wait! Guys! Oh my god! This came out so beautiful this game was so amazing. Oh my i was just kind of smiling. I was happy, i was all over the place in-house hours. I didn't even know what to say. I will use this air to make a tutorial on my second channel watch out, for that also, can you see how the back looks like? Oh, my god decoys is bouncing bouncing. Thank you so much for watching. Please don't forget to like subscribe to this amazing channel see my next video stay blessed, always bye.

Comments
Pamella Jane: Yes,yes it came out perfectly
Margaret Owens: Fabulous Sis, also ur makeup. Look Pretty.... Keep up the Amazing Work!
Obukevwo Odiri: Lovely
KYNA: beautiful
Verona James:
Verona James: good job