Curly Pixie Wig Ft Aligegous Hair Store On Amazon
Link to hair:
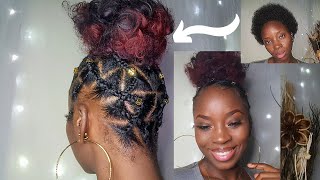
Hey guys welcome back to my channel, if you are new, welcome ! In today's video iI will show how I install this Curly Pixie Wig that was sent to me by Aligegous Hair store on Amazon.
Don't forget to hit that ✔
Share our videos ➡✔
SUBSCRIBE! ✔
DISCOUNTS
Use my discount code: PAITY to save 70% off your order
https://duvolle.com/?rfsn=4136961.54cc...
AliGrace Hair
Amazing Beauty hair Extension
https://www.amazingbeautyhair.com/?ref...
Use my code PAITYJ for $15 off at ywigs.com
https://www.ywigs.com/?ref=z6smdkqt2h
Use code: daq for 15% off at Luluholistics.com
SUBSCRIBE HERE!
https://www.youtube.com/channel/UCGfaC...
PRODUCT REVIEWS:
https://www.youtube.com/playlist?list=...
FOR MORE VLOGS:
https://www.youtube.com/playlist?list=...
POPULAR UPLOADS:
https://www.youtube.com/playlist?list=...
FILMING EQUIPMENT:
SAMSUNG S8
EDITOR:
VIVA VIDEO
IMOVIE
Follow Us:
Facebook: https://www.facebook.com/paitysworld
Instagram: https://www.instagram.com/paitysworld/...
Instagram:http://instagram.com/paitysnails
TikTok: paitys_world
Pinterest: paitysworld
For Collabs and Business please email:
Sub count : 1480 Thank you all!
Some links found in the description box of my videos may be affiliate links, meaning I will make commission on sales you make through my link. This is at no extra cost to you to use my links/codes, it's just one more way to support my channel!
If you would like to donate to my channel, you may also do so at :
PayPal ~~ [email protected]
Hey guys welcome back to my channel and in today's video i will be reviewing this wig that was sent to me by alejiga's hair company from amazon. It is a short curly lace, wig, pixie, cut lace, front human hair and the cost is 47.99 for all. My friends that live in jamaica and me want to try. It is human hair convenience under the fifth la mark, so you can try it out. So this is how the hair came in that package. Um, it's not a box, it's just a package, as you saw it was in a clear ziploc bag, and i also received two wig caps with it. So this is what the hair is. Looking like fresh out of the package, i'm showing you the amount of lace space that is at the front um. It'S basically like a inch of lace at the front and to the sides it's more like half an inch. So it is a lace frontal, but with minimal lace. So you'll see here that it has two combs to the side and there's also a comb in the back and it does come with the adjustable strap. So you can tighten the wig if you wish, or just leave it loose like that if the wig cap fits comfortably so across the front of the wig, it does look a bit pre-plucked but, as i said, there is not much space to the sides. So there was no room for plucking, so i didn't do anything to it. All i'm going to do is just co-wash it before i install it, so i'm just going to jump right into it. My hair is already braided back and i'm just going to be using my edge control to split the edges to tame those flyaways before i do my installation, so that is what i'm doing here after i get done with that, then i will be applying my lace. Frontal glue my lace wig glue across the front of my hairline in front of the hair, and then i will apply my stocking cap. I did also put some oil in this vitalism mixture of oils that i use in my hair. You know on the parts since i'll be wearing this wig for about two weeks. I want to just moisturize my hair. First, all together la la la la la la after i put the lace glue and then the stocking cap on i'm going to go in now. With my got to be spray, where i'll be spraying, that um right, where i stopped the glue and onto my hairline, because the got to be spray is actually safe enough to use on your hairline. So that is what i'm doing now. So i am spraying that and then i will be using my hair dryer on cool air, and i did that step three times just to ensure i had a good hold for my wig, a good foundation jesus. So now i will just be using my eraser to cut away the excess stocking cap after i have laid my foundation as you can see here, um. It'S the bottle cap method that i'm doing and um just removing the excess right. There was a bit tight. So that's why the facial expression, so i'm just going around and taking my time and cutting and removing the excess stocking cap. You want to do that and have it at this time. You'Ll start shaping your hairline, basically, for when you put your wig on what i also do with the back of my stocking cap after i've cut, it is just tie the piece that is hanging underneath my hair just to have it hold. You know like a cap. Instead of cutting it all off right around do so we're using this foundation powder across the edges of the stocking cap. I know it looks lighter than my complexion. I do have a bit of a tan, but it doesn't matter. I have a darker foundation, but it's liquid foundation and i didn't want to use a liquid foundation on the stocking. So i just used this powder foundation across it and i also had put some on the inside of the lace that was on the wig. So i'm just putting some more of the glue around the edge of my stocking cap just for added security. I bought this this glue out here in jamaica guys so about 550.. It don't know because honestly, there's not a lot that comes in the tube, but i really like it it. It does the job and i'm just going to go over, that no just one layer and i'm going to go over with um cool heat just to have it tacky to lay my way down, and then i'm just gon na get my wig on adjust it line. It up with a stocking cap spray across the edge with my got to be and blow dry on cool air to have it laid so also guys. Um, where i cut you know usually other weeks, have a lot of space, at least to cut behind um around the air. This one did not have that, so it was not hard for me to you know, line it up and cut um at the earpiece. It was really easy to do because there was not a lot of leaves um on the sides. I also struggled a bit because it was kind of hard for me to look in the mirror figure out how to position my hand to do the sprain, and all that also, you know when you spray the got to be the hair, gets really tacky and kind Of hard to manage so that kind of i struggled a bit with that, but i got the job done now. I'M just going to go in now and take my time with my razor and cut my lace across not just one motion across i'm trying to do like a wavy kind of yeah, not zigzag kind of wavy pattern while cutting my leash straight across i'm sorry. I couldn't have you guys see that clearer, but that is what i'm getting done here. You'Ll also be noticing the residue from the got to be spray. That'S one thing i kind of don't like about it, but hey after you're done. You just use a cotton ball with alcohol and clean up around the edges to remove all of that residue and everything will be fine. So now that i have had my excess leaves removed, i'm going to attempt to do to section off where i want to use for, like my baby ears or my sideburn and stuff. So that is what i'm doing now. That was also a bit of a challenge for me because, as i said, there's not a lot of lace at the front of the wig um plus it's the first time. I will be trying to do this baby hair thing, so i struggled a bit with that. As well, and also because this sprayer residue was under here, it was kind of stiff um from the spray. So you can, you will see me like combing it out to loosen up the hair to separate the baby hairs, but i got it done. I did it. Wow now that i'm done separating my baby hairs, i'm just going to tie down all this elastic band just to have the edges more secure to have them laid and wait for like about 15 minutes. And then i will come back fix up the baby ears and finish styling the hair, so so so after i'm done getting, the baby hair is looking like. I think i want them to look, i'm just going to go in with some water and mousse under here. It'S a curly hair, so it doesn't take much effort to style. You just spray some water and it basically falls into place with the mousse. It holds it into place. So it's better to use water and mousse on the curly hair. If you want to have that wet look instead of using conditioned water because, after a while condition, water dries out and the hair looks puffy, but if you want to maintain the wet look, you use water and mousse. So that's what i'm doing here. Just you know getting my keisha coal on not gon na lie. I i was feeling this wig, i'm feeling this wig. I really love how everything turned out. It was pretty easy for me, so i hope you guys are liking it too, so guys this is it. This is the final result of my wig that i was given to buy a company on amazon. I am in love, i am in love, i love it. Um, it's very soft. The hair is very soft and nice. It doesn't take any um, much effort for the curls to come in. As i said, i had shampooed it when i received it, so it was shampoo before there's no shedding that i've experienced with this here, which is good. The only thing that i think could be done is the excess lace that is there to cut off. They could put a little bit more on it because at the sides here there was no plucking to be done. If i had done that, then there i would literally be at the weft. It'S only it's like literally this amount or this amount of lace. That is on it at the front here and at the sides it tapers down, so it gets even thinner, so some of the excess lace that they have they could, you know, put it in there. But apart from that, i think this wig is perfect for a beginner, so you know, use the lace front wig for putting the nymphs up there for tweeze and pluck this is it this is it i struggled a bit to cut the lace, but i don't know: Maybe that's just me because it's the first time ever actually installing a wig where i have to cut the leaf, so that was kind of difficult for me. I tried with the baby hairs. I think i did well. I am absolutely loving and loving loving this wig. It feels so good and soft. It'S worth the money i mean if you want to try totally say if you're, a beginner and you're just a learner, you know i spend what, if i'm going to put a deer, we going and go freak it up. Then this is the way to try. So this is the final look. I did a little face thing and um to show you guys and let me know in the comments down below how you think i did with this wig. Let me know if you're going to try it. The link and information to the wig will be the first in the description bar down below now. Remember guys, if you are new to my channel, please i would love for you to become a part of the family hit that subscription button and turn your post notification on so that you are the first to be notified each time i upload a new video. I am attempting to do vlogmas. I hope you guys are enjoying it so far and if you like this video go ahead, leave a thumb up. Leave your comment down below share the video. Maybe you won't be wanting to try this wig, but you know our friend who won't try it so don't be selfish, share the video alright guys until the next one m food
Comments
Humo Travels: The struggle is real but you did an amazing job. Love the finish look a lot!! I also love the fact that you show the real process!!
natJ148: It came out so good! You did a great job && it suits you love luvin dis Vlogmas
IshaMoy Williams: Got the exact same wig form another store on Amazon as well
Jodi Pinto: You did good! And it suits you.
Natural Nasheka: Love the curly hair on you it looks like your hair.
Coreen Smith: Very good job Paity!
IshaMoy Williams: Your makeup is super cute next time try plucking the front a bit more and taking out less baby hairs it’ll make it easier
Natural Nasheka: Ketch the lash dem too nuh. Fly away Peter fly away Paul lol