Affordable Amazon Human Hair Lace Front Wig| Inviteyou Hair| Dazja Jordan
Hey Kinfolks!
We are back with another wig tutorial. I have been trying out affordable wigs on amazon and I think I am obsessed. So you guys please let me know what you think and I will see yall in my next video!
Please dont forget to subscribe, comment and share :)
Connect With me:
IG- Dazja' Jordan
TikTok-DazjaDazj
Wig Details:
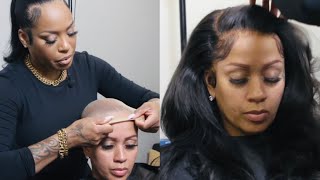
Hey guys welcome back to my channel, it's sugar danger, jordan for those of you that are new and from my returning kim folks. What'S up so you guys in today's tutorial, we are going to be installing this, a wig that i got off of amazon for a less than 150 dollars. Now, let's get into it. So you guys, i do like to use the bald cap method to hold the wig cap in place. I like to go in with the got to be glued um, frizz spray, and i like to um spray, the not the full cap, but just the front. Just so like right there, where i'm gon na, be laying the glue laying the wig it is. You know nice and clean once the got to be glued is um dry on the wig cap. I go through it and i cut off all of that and cut off the parts of the wig cap. That'S not molded to our head. After cutting the wig cap to my liking, i like to go in with some hair bonding glue and or not hair bonding, but at least blonde and glue. I'Ve got that from my local beauty supply store. So if you don't want to order any lace bonding glue online, you can always go into your other beauty store to get some see. Look that's what i have to do, but anyways you guys. I like to take the lace bonding glue and apply it to the perimeter of my head every place that i'm going to be placing the lace so once the lace bonding glue is applied. I like to take the end of a retail comb and i like to just kind of smoothen it out. This is the packaging of the hair of invent. U it came with a wig cap; it always comes with one of those little headbands, and i like this one because it came with a ponytail holder and again you got some lashes, but here's the weight right here. I like the little curl pattern that it has. It was nice, this wig did come pre-plucked, so i didn't manipulate too much, but the only thing that i wish that it would have came was pre-bleached. So, instead of me bleaching it myself, i just got some lace tint and called it a day. Really. I do find it easier to cut a couple of slits in the front of the wig just so that when i apply it, it's easy for me to you know, get everything nice and smooth. You know just doing what it's supposed to do. Lacing on my forehead or something that was corny but whatever so so you guys this wig is glueless, and i like that. However, i just be needing my wigs to be secure because i've been wearing mines for a couple of days and once i take it off i'll, be trying to like look raggedy for a couple of days. So i just need to always: you know wiggle, my head or something, but this invent you lace front, wigs human hair um. It is 20 inches, it's a 13 by 5 lace front and it has a density of 150 percent. And i like it because it's you know real soft. This hair was easy to work with and it wasn't expensive and it also gives me the opportunity to have a free part. I can have a side part, a middle part, whatever kind of part. So so do so after i cut all of the excess lace off, i like to go through and kind of, um pluck a little bit where the baby hairs are going to be just so that they're not so thick, because i don't know how i'll be doing It with them thick edges, you know so i'll, be happy to make sure it's not too much. So in order to get my hair straight. The way that i, like i like to go in with the edge booster and i like to add that to both sides of my middle part, before i put the flat iron or my hot comb on it or you know just before i add any type of Heat i like to use that edge booster, so that everything is a straight straight like don't get me wrong. It'D be burning a little bit if it touched your scalp, but it's all good, but look. Look how straight that gets y'all see. I really like that. So so, if you need to don't be afraid to go and pluck a little bit more, especially like if you're wearing a side, part or a side part a side, part or a middle part is what i meant to say. Even if you're wearing a side part or a middle part - and it's just not enough for you - feel free to go through like i did and just pre-plug it - i am pulling it back. So i don't know. I don't really know how to explain. Um plugging, but you know pull to the back but anyways you guys. Thank you so much for watching this um wig tutorial and y'all. Don'T forget to subscribe and i'll see. Y'All in my next video bye,

Comments
Jevon Russell: Keep up the great work Dazja!!!