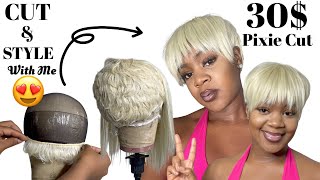
Black To Honey Blonde Pixie Wig | Plucking & Pre-Installation Prep | Khanyi Madikiza
Hey Gorgies & Gents!!
Back with another hair transformation video!
Enjoy!
#PixieHair #BlackToBlonde
BUSINESS ENQUIRIES & PRODUCT REVIEWS: [email protected]
SOCIAL MEDIA:
Instagram: @Khanyi_Madikiza - https://bit.ly/2lWECQZ
Facebook: Khanyi Madikiza - https://bit.ly/2lXvJXv
Twitter: @Khanyi_Madikiza - https://bit.ly/2lvn4v7
South African Beauty Blogger
Camera: Canon G7x Mark III
Editing: iMovie and Filmora Wondershare
Music: Epidemic Sound
Pictures: iPhone X
Thumbnails: Canva
Hi gorgies and gents welcome back to the channel. I hope you guys are doing well um today i'll be showing you how i colored laid and slayed this hair, and if you are here for it, please stick around. Please do watch if you're new to the channel. Please don't forget to subscribe, don't forget to like this video and comment down below if you are a returning, sabe, a regular zegular, an og koji. Thank you so much for your support. I truly truly appreciate it. Now, let's get into this hair chart the first thing i'm gon na do is um start plucking, my hair. I do like doing the plucking and everything before i actually color the hair, because it just helps me to see what i'm working with. If i want to correct anything so i'm going in here with plucking, as you saw, i did wet the hair before i prefer to pluck the hair. While it's wet it's easier to just you know, control and do everything so um. If you haven't seen my method of plucking, i did do one in detail in my previous video, so i will link it above and you can check it out. So i'm basically just going in with my tweezers, i'm just making sure that the hairline looks natural and that it looks like you know it must look laid. It must look gorgeous afterwards and not you don't want a thick. You know hairline. That looks very unnatural. So that's basically what i'm doing here and i'm gon na hold up this side and then i'm gon na move over to the other side and to make it easier for myself. I also just like like to go in sections. That'Ll help me to see exactly how the hair looks at the end and also when you're plucking just make sure that you don't pluck in one area too much otherwise, you'll end up with balding areas in your wig, and you don't want that girl. You do not want that, so this is what the hair looks like. After all, the plucking is done. This is a pixie from snazzy glam, and this is how thick the hair is and how the hair looks like before. I absolutely love this hair. It'S very very, very thick, so it's easy to style, i'm using a bleach powder that i bought on take a lot and i'm going to be mixing it. With my 20 volume developer, i usually prefer to use like a 30 or a 40 volume developer. The only difference is that, with a 20 volume developer, it takes longer for the hair for you to start seeing a difference in the hair versus a 30 or a 40 which are much stronger. So that's the only difference between the two. I got them both from take a lot. Delivery takes such a long time, so i do suggest checking out instagram boutiques such as flexit beauty supply, as well as saloon tools sa another important thing to note about i'm using bleach and developer, and all of that is that you don't want the consistency to be Too, like runny, so don't make it a runny consistency but also like don't make it a thick consistency. So you must just find like a bit of a balance between the two, because if it's too thick it'll be hard to spread it over the hair. But if it's too um runny, then it'll just be dripping all over your carpet, i'm so sorry for that carpet. I'M sorry for that canvas head because, as you can see, i did not protect my canvas head in any way and um yeah, because the the consistency that i went for is just in between runny and in between um thick, so that i'm able to apply it Easily on the hair and that it stays and yeah so basically, that's the trick to use i'm applying it everywhere on the hair and um so also like as i'm applying it, i'm not really very particular or detailed when i'm applying it at the back. The one place where you need to be really careful when applying the bleach is with your frontal. So that's why i'm starting with the back and with the back i'm going crazy, i'm applying it all over, but then i'm going to separate my frontal and the rest of the hair so that i can be more careful with the front. So now, as you can see, we're getting towards um the frontal, so i'm just laying everything at the back properly all the hair making sure it's all covered in bleach and for the front. What i'm doing is i'm avoiding in putting any bleach on my actual lace, because that is gon na stain the lace um. I don't want any stains. I don't want the legs to be bleached in any manner, i'm going for darker roots and um lightening over the rest of the hair, so i'm avoiding putting any bleach there. As you can see, i'm just leaving like a a few centimeters of hair like two centimeters or so, where i'm not putting anything to make sure that it doesn't touch. My lace doesn't do anything to my lace. It just bleaches the hair, so be very careful with this step. If you didn't go ahead and protect your lace prior and the way that you would go about protecting your lace is applying got to be all over the lace frontal and i'm allowing it to dry or you could use vaseline. I do have a video on my channel, where i showed you the entire process. I will link it up above, do check it out. So now, i'm very happy with where i've applied the bleach um. I think i've literally covered the whole head and i've protected. The small part where i want to have dark roots, i'm leaving it on for 40 minutes and then i'm gon na use my shimmer lights purple shampoo to wash it off. This is the end result after washing it the first time i like it. I think it looks cute. I like the color, it's not too blonde. You know it's not still too black. I like the different tones of it. I like basically i'm happy with how it turned out, but i do want a few lighter highlights. So i do go back on my bleach on all of the darker parts and i try to lighten them a bit and then i do also go into the front to um highlight some. You know strands there guys ignore the fact that i'm using this envelope, i was trying to find some foil to separate, but i couldn't find any foil. So i am using this just to make sure that the bleach does not um bleed into the rest of the hair, because i'm happy with the rest of the hair. I just want to you know bleach this specific part. So, that's why i'm separating there you can use um, you can use foil or you can use like. You know those plastic wraps that people use. You can use the plastic wrap as well just to protect and separate that hair. So now i'm going into the front where i want the highlights these are going to be just a little bit more blonde. Just to you know bring in that that zoom, you know, that's fire bring in something cute and i'm gon na leave that on for an additional 20 minutes. Oh the next day, it's the next day go. I was tired, but this is how everything turned out. So now we're getting into the styling portion of this video, i'm going to be using my tresemme oil. Just to you know, because you can see the hair after you've bleached the hair, it's obviously dry. It needs some moisture. It needs some love, so i'm bringing back some moisture with the oil. I do think i put in a bit too much of the oil, but we'll fix that and then i'm going in with my coco loco protection protection mist spray. This is basically gon na. It'S like a heat, protectant spray. It'S gon na protect it from the heat that it's currently gon na, go through with the hair, dryer, the straighteners, etc, and just like protect my hair and keep it vibey and looking cute. So now let's go in and blow dry. This hair, so that we can get ready to install it. Another thing that i really enjoy is prepping my hair before i put it on my head, because it just makes it easier. You know you don't want to struggle with certain strands. So i'm using my ors olive oil mousse just to make sure all those hairs are like laid back they're not going to bother me when i'm trying to install the hair and then i'm going in with my hot comb. I also got the hot comb from take a lot and that hood comb is going to help me to just make sure that hair is nicely laid. I'M also going to go in and separate the hairs that i want to use as baby hair, because the esco we are definitely doing baby hair today, as you can see, i've gone ahead and put on my um wig cap as well as my got to be Glued, so i'm not going to be doing the bald cap method today, if you do want to know how to do the ball cap method, i do have a few videos on my channel. I will link one of them up above and you can check it out now. I'M just positioning the wig, where exactly i want it to be. As you can see, there are strands that have pulled forward already. This is going to be the hair that i'm going to use as baby hair and i'm just using my got to be glued blasting free spray behind those hairs to make sure that my hair is melted for the gourds okay. So after securing the wig with a blow dryer, basically making sure that that glue dries, i'm going in with my brow razor and i'm just going to start laying the baby hairs. I know you guys saw that bev. Please pretend as though you didn't see it. I'D had a long day be tonight, please please, please, so i'm gon na go back in with my hot comb and just make sure once again that all the hair is laid back and that i'm gon na have no troubles when i'm laying my baby hair and I'M using my mousse to lay the baby hair. I did find that the mousse becomes a bit more runny for me or for my own liking when laying baby hairs, so i've kind of stopped using the mousse lately, i'm using a lot of the got to be glued wax because it's so thick in consistency and It just helps the like. It helps you to manage the hair more, and it also helps to just keep the hair in one place like you're able to direct it where you want it to go instead of the hair, basically taking over the show, but yeah those baby hairs are looking good Honey they're looking cute sham comment down below if you like, my baby hairs. Okay, now i'm happy with my baby hair. So i'm going in and i'm using my sears hair studio, hair, wrap or head wrap and i'm securing that then we're going to go into the actual styling of the hair. So now we finished the coloring, we did the installation and now we're getting into the styling. I know it's a lot, but it's quite easy when done well and when you practice so i'm going in now and i'm gon na do the side soup. Obviously, because it's the pixie, it looks really cute when you do a side soup on a pixie and i'm gon na use my um straightener. I always use my straightener to get my curls. You guys would have seen a lot of videos on my channel where i actually use my straightener to get my curls. So that's what i'm doing right now and i'm basically just styling the hair like this video. If you think i styled my hair nicely, i'm on. Please give a girl some hype kind in high pick eyes, because i wow listen. I did the things. Okay, i really did. Okay, i'm happy with the hair. Now show me some face. Girl show me some face. Yes, queen okay, she looks so cute. She looks so cute cheers honey, cheers i'm going back in um just to revive my curls a little bit, because i did brush them out a little bit too much. So i'm going in with my hair straightener once again that curl looks good okay. So this is the last portion of the video guys. It'S basically me just like figuring it out, styling my hair, trying to figure out what hairstyle i wanted do because i look too cute. My makeup looks too good not to have a nice hairstyle. You know but yeah, i hope you guys enjoyed the video. If you did, please don't forget to comment down below, don't forget to like this video and please subscribe to the channel. Let'S grow this channel guys, hey bo. Also, please send bears me to 99 love. You bye, bye,


Comments
Koketso Shilakoe: You did an amazing job girl!!!
Zikho Mkosana: You definitely did the things sana with this pixie. I love it, for someone who just started doing edges girl they are looking gooooooooood
Asanda Mpumlwana: You did a great job Honey as usual
Nomusa Nzama: Love your work... Your look stunning...colour & style
Isabella Moletsane: Yesssss!!! Hunny!!! That's my Gorgie❤❤❤❤Beautiful queen
koketso chidi: Looooooove it!!!❤️❤️
Zanele Vaas: Awusemhle maan Khanyiuyandidika shame Loved the video babe and the baby hair and the curls♥
Griselda Talane: Hey Gorgie da hair is layed nicely.......Nd i love how u play wth it...Umhle ...and dat colour nd ur skin tone beautiful ❤...nd i jus love how da baby hairs correspond...Natural i tell u......Mwah...
Viwe Hinxa: Good job gorgie. Hair looks soo good. Asemhle....uyasidika. And ke i country ivuliwe... bottoms up. #Roadto10k Regards CEG(Chief Executive Gorgie)
Yangomusa Vazi: Notification gang ... an old gorgie ♥️
Chumani Mgushelo: uyazizamela mntase
Zonke Shirley Komani: ❤️❤️❤️❤️ Gorgie-ous
Swazie Khathideh: One thing about Khanyi is that she will lay her hairand beat her face
Ayabulela Sajini: As for 'ndinxaniwe' soze uwubone umendo xa unje ❤
SINDY MLAMBO:
Inuka distributor fragrances: Link to the hair please
Siphosethu Jadu: Early gang ❤
fylycia M: Notification gang
Sinesipho Yoywane: Can we talk about ubuhle bakho