How To Hot Glue A Wig~Pixie Cut
In this video i'll be showing you how to Hot Glue a Pixie Cut Wig! I used less than a pack of Janet collection 28 pcs. I'll also be showing you how to shape it up to acheive your desired look! Hope you enjoy! I love to interact with you all, so please leave a comment below!
?
Hey Youtube! My name is Maiuple but you all can call me play. I’m a multitalented beauty professional with a passion for the beauty industry and it’s ability to make others look and feel their best. I’ve always been a creative and EXTRA person and I feel like youtube is the perfect place for me to showcase my talents while expressing myself through creativity. On my channel you’ll find videos related to hair, makeup, health, motherhood, DIY’s, physical and mental growth and much more! My dream is to use youtube as a gateway to help others even if it’s just offering a cool hair tip or making you smile. I Hope you subscribe to my channel and embark on this Journey with me! Much Love!!!
꞉ @playslaysbeauty https://www.instagram.com/playslaysbea...
#howtomakeawig #wigtutorial #janet28pieces
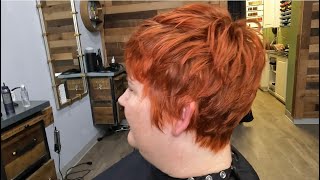
Okay, so what you're going to be needing is a wig head and I'll wrap in mind -- and saran wrap to protect it? I have my stand and this is the type that you can attach to a tabletop you're, going to be needing one pack of hygienic collection, 28-piece, hair yeah, one pack. This is going to be, and I have a dome cap. Two little wefts on you'll need scissors to cut the wefts and you're going to be moving a razor comb to shape it up and can't forget the glue gun and the glue sticks, and I also have some measuring tape, and I use this to measure my head. So I can get a perfect fit and I'm also going to you know, leave a little bit or a tie, like maybe like half an inch to the the measurement going from the nape to the front of my head, because I don't want it to be too Snug, I mean because after a while - because I did this before and after a while like it starts to hurt right up here, like the pressure from wearing it for a long period of time, so I'm gon na leave like a half an inch. I think that should be okay, so now I'm gon na go ahead and put the cap on to the head. Okay, so my wig cap is on - and I forgot to mention that you will be needing straight pins to secure the cap on to the head and I use straight pins instead of two pins, because the diameter is smaller and it also helps to protect the longevity Of your cap I mean you're, wicked okay, so use it straight pins and I also opened up the pack of hair and in the pack, which is cool. It comes with this, and this is a shower cap, so you sharp cap, so you can use this instead of the saran wrap and also comes with a stocking cap with nice and the hair comes in, like three bundle pieces or three different lengths. They have like this shorter, medium and a longer piece, and it also comes with a closure piece which is cool and you just after you done, take it glue it on in Boop. There you go so yeah, so let's go ahead and I'm going to start the process. Okay! So now I'm ready to start and make sure your glue gun is plugged in and hot and ready, hot and ready, okay and whatever surface that, you're laying it on protect. The surface so I'm just using the package from the wig cap to lay it on because the glue will be you know coming out and okay, let's go ahead and start with the web. So now, if you have a longer or lower hairline in the back like you could go in with the medium lip the way you can like cover the hair so use, maybe a couple wefts of the medium length and but I'm going to. I think I should be okay with the shorter, so I'm gon na start with the shorter in the back, but you know just a tip and I'm gon na go ahead and start gluing. Hopefully we can do this. Okay, I'm gon na set this up like so. You can see properly and I'm set up them go strike a little hug. Okay. So now I'm gon na start to glue the weft and I'm going to start it at where the back of my ear lobe would be - and I just marked it with some eyeliner. So I can tell where to start or where to stop on that side, so you could measure the web first cut it and glue it or just cut it after you, finished learn is up to you. So let's go ahead and start gluing like I like to work in sections because it dries pretty quickly, okay, so this is what it's looking like. So far, I've been going straight across to each side and I'm going to do a few more rows with the short piece I want to stop like to wear. My sideburns would be like a rock right around here and I'm gon na go in with the medium piece. So, okay, so I'm now gon na stop blowing in the short pieces, and this is what it's looking like. Okay and I'm gon na go in and start gluing the middle piece or the middle length, and I'm gon na do a few rows of this one and then aren't a few rows here before I start going in a circle so yeah, let's go ahead and start Okay, so this is what it's looking like so far and did a few rows of the medium length, and then I also add it just a few just in the back from like here to here and now, I'm gon na actually go in with the longer piece And then just add a few and the very front, so I'm gon na add like this a couple rows in the front here with the longer here, make sure there's just a long one yeah and don't mix up your hairs. It'S easy to do that. Okay, yeah! This is the log water okay. Now this one, I want to make sure it's very close to the edge of the cap and also it's a little bit less hair on this side or, like you know, I brought it a little bit over here because I want a side part kinda. So I want more hair to swoop to my left side. So that's the reason why so you just kind of play with it. Okay, so now I'm gon na go back to the middle length pieces and start moving in the circular direction until I get to the middle, the top middle top, and yet so that's like so far, okay, okay! So this is what it's looking like and I'm just going to continue to work my way around in a circle with the piece here and I actually have one more piece of the medium length one. So once this is finished, I'm gon na go ahead back to the longer pieces and then just you know, measure it up and see how much space you need for the closure see almost there okay. So I left this much and now I'm going to move in the closure piece. Okay, so at this point you can go ahead and try it on so you can see what you're working with before you trim it. So this is still big. Okay, let me show you: the inside looks alright okay, so let me see where it is the front. Oh yeah, let me take this off. First, okay, we're gon na just ignore! What'S underneath here, guys, okay, ignore it okay, so moment of truth, okay, so this is what it looks like without me and doing anything to it. Okay and like I can you can just play with it and figure out like what you need to do and I think I'm gon na you know I'm cool, I'm gon na shave it down in the back, probably like up to the right around here and just Go ahead and trim you see all of this. Most of this has to go, but - and that's that light I love this hair because you can just really just play with it and might just run your fingers through and put it a harbor. You need to go so I'm gon na go ahead and start fixing it okay. So now I'm going to go in with my razor comb and just begin to trim it down and don't really mess with this part. You need this to cover up your kitchen. So don't really mess with the bottom part or too far the bottom, but you know just go ahead and shave it down to your liking. Okay, so this is the finished. Look and yeah just continue to play with it. So it's like you can always go back in, you know, continue to fix it. Whoever needs fixing. You shave it back. You know this is her.


Comments
Blessed Bellz: Ima try using hot glue... it looks less messy .. thanks Play