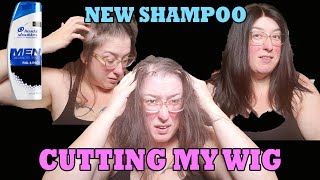
How To: Transform Your Long Wig Into A Pixie Cut
In this video I’m going to be cutting my long wig into a short pixie cut and how to use our silk serum for maximum shine when styling
Subscribe Now!!!
WEBSITE: https://www.taidaviscollection.com/
INSTAGRAM: https://www.instagram.com/taidaviscoll...
FACEBOOK: https://www.facebook.com/taidaviscolle...
Business inquiries: https://[email protected]
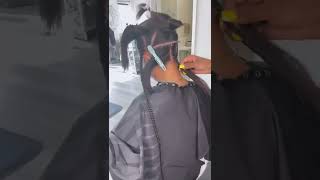
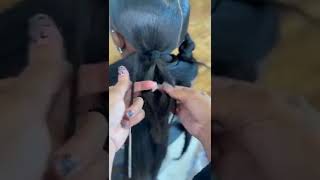
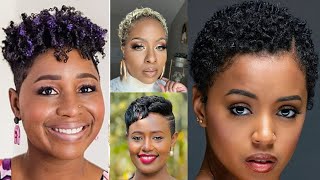
Hey guys welcome back to my channel, so what i'm going to do today is show you all how i got this really cute short pixie cut, and you can style this in a lot of different ways. You can make it pixie. You can do it in finger waves, so don't forget to click the button subscribe like and comment, hello guys. I am ty from ty davis collection and today i am going to show you how i took this unit from long to short, and this is a fully constructed. Um wig that i constructed on my sewing machine so you're just going to use a spray bottle to wet the hair and saturated evenly, all over and you're, going to start with the horseshoe parting at the top. Pretty much sectioning the hair from temple to temple and just combing everything else out of the way, and you want to do this to separate it from the top section to the bottom, because i like to break my units down or just hair in general. I like to break it down into sections that way you can gain full control on how you're actually cutting the hair okay. So next we're gon na go through and part it from ear to ear on both sides and you're. Just going to imagine that there's an ear right there and you're going to part from ear to ear on both sides, you're going to repeat the same thing on the other side and make sure you have clips to be able to section your hair out of your Way for this type of cut, i'm going to do quite a few sections, so i would generally need about maybe four to five different clips, just to keep the hair sectioned and out of the way and work your way around as you go with each section. So i'm just make sure you have clips ready for this cut. Also so now we're going to work our back section so you're going to part from the top crown of the head down to the nape of the head and you're going to take your sections going across in the back and typically if this was an actual human's Head the partings will fall, the hair will fall a little more natural parting, so you just have to use your best judgment when you're sectioning the hair off in the back, because again guys keep in mind that this is a wig and it's not on the human Head so the the pattern is not going to fall in at its natural state as if it were, if you were cutting an actual person head, and so next we're going to use the shears. And i'm just going to do like a just a small little demonstration on how i would use the shears if you're not comfortable, using a razor you're just going to hold it in your hands. Just slightly elevated and you're, going to point cut going through to give it a little bit of texture on those ends and one rule of thumb when you're cutting, you always want to start in the middle and then work your way from the outside left to the Center or the outside right to the center. So now i'm just transitioning into using my um razor comb and i'm using my razor comb because it gives it a lot more texture on those ends versus um. You know when you're point cutting with the shears it doesn't. It gives it a lot of texture, but the razor gives it um way. More texture look and feel to the hair, and you would go in the same manner as if i were the same manner that i did when i use my um shears to point cut and you're just going to keep working your way around the hair from the Center from the outside left to right and then again from the center to the outside right to left so you're just going to work in that manner. Going up the whole back section of the head on both sides and can y'all just see how these ends have. So much more texture on the ends and so now we're going to keep working our way up up the sections of the arm hand, and so, when you get a little further up when you cut the base. First of all, when you start out cutting the base, which is the first section that i cut personally, i like to always leave the hair a little longer versus going in and going like directly for the the length that you're trying to achieve, because it's better to Go a little longer than to go too short, because once you go short, you can't re um, so yeah you can always go in and take more off, but once it's short, that's it! You can attach the hair back on there guys so just be careful when you're going in to cut whatever length that you're trying to get to so next, when we move to the next section. This is where all you're going to create the layered effect. So you're going to hold everything out at 90 degrees, and you can test that by holding your comb up against the round of the head and you're just going to pull it straight out, whichever you're going to round that cone to the scalp of the hair. All over so you're going to put that comb to the scalp of the head and wherever it sticks out. That'S where you know it's 90 degrees and so your bottom layer. The bottom length is where you're going to use as your the bottom line layer. If that makes sense, so you see how i part the next section and i'm using my bottom layer as my guide, so you see the short hair at the bottom. That is going to be your guide, so you're just going to razor cut that or cut it into that length and that's how you're going to achieve the layers and that's how you um basically get consistency in your cut. So that's how you create more uniform layers and not having them too long or too short, because you're going to always use that guide. You'Re going to use that guide to follow you through the entire back section. Okay! So i'm going to demonstrate a couple more sections and remember guys: don't worry too much if it's a little longer, because you can always go back in in the end and cut it a little bit shorter or when you're going through to cross check your work. So after i do a couple more sections to demonstrate, then i'm going to speed up the video okay, okay, so see how this section right here is a little longer. When is that longer, you definitely want to catch that before you move um any further, because it can shift your whole haircut and make your cut come out a little more lopsided or longer than what you intended, and it can also change the shape of your cut. So just go ahead and just cross check your work now and just kind of snip away or make it as even as you can before you get too far in the end before it alters the shape of your cut. Okay. So now that we have completed the back section, you're going to go ahead and release your side section, it doesn't matter which side you start on the left or the right side. So we're just gon na um. Take the clip out and drop that down and you're gon na use your back guide as the guide to um for your length for your side. So that's where you're gon na get your guide from the back section to carry into the side section. So so, since we already know that we're cutting this hair short anyway, i just like to go ahead and just get rid of all of that excess length because we're going to cut it shorter anyway. So just do yourself a favor and just go ahead and just get rid of it just go ahead and cut it off, because you're not going to use it anyway and so you're going to carry through the side with the same section you're going to go through With 90 degrees and again you're going to use the previous section from the back that shorter hair as your guide for the side, lengths, okay and so remember - you have an ear right here. So remember. If that depends on how long or how short you want. Your side to be, but in this case we're cutting it above the ear. So you can go in and imagine that there's an ear right there and cut it to above the ear or you can go back and put the wig on when you're done. To kind of gauge it a little better and imagine and then go ahead and cut it above the ear. Also, that's another little trick you can do and once you're done with one side, then we're gon na go and repeat it and do the exact same thing. On the opposite side: okay, so now that we've completed both sides and the back now, it's time to release the top section you're going to just drop that section down, and so now we're going to go through and part it um with the center part, get it As even or as centered as you can to balance each side off so you're, going to section both you're just going to part um part a section down the center and use the line in the middle of these mannequins as the center to help you um. Just to try to help you stay centered and so that everything is also balanced, because balance is key in these haircuts and so you're just going to section you're just going to clip away the sides. Okay, so again, we're going to use the back section as our top guide to to carry us through the length at the top so again use your back section as your guide for the top portion, and this right here is what we call a traveling guide, because On this first section, you really have to create your own guide and your own links on this section. So again, this is called the traveling guide just to get that length going in the top, and you see how it creates a layered effect, and so next we're going to do what we call a radial parting pay attention to how i'm sectioning this top part off And this is again, it's called a radial, so pay attention guys how i do this part and so you're going to do a horizontal part on one side, you're going to do a horizontal part on one side and then you're going to do another horizontal part on The other side, so the hair that you just used to cut that for the traveling guide, you're going to use the hair in the center of that to start your lines or to start your um sections at the top. Just start your to start. You a guide in the top area and so you're pretty much going to repeat that same step throughout the entire top section, and it's okay. If you have to rewind the video and go back and go back through it, but i'm pretty much taking horizontal partings all across the top from the left to the right side. And when i get to the front area, i'm gon na over direct it. And sometimes you can over direct it as you go and over directing the hair means pulling it back towards you just slightly not too much and again, you can always go in and adjust those lengths when you're closer to the end. But again, i'm doing the same parting at the top horizontal on the left side and horizontal on the right side. And again, i'm using my shears because it's easier for me to point cut the texture into it at the top versus the razor cutting i'm going to go back in the end and just texturize. It give it a little more texture with the razor. But for now, just from left to right, horizontal partings until you make it to the top and remember to slightly over direct it a little more when you get to the front area, which is the bangs, because you don't want it to be too short. It gives you room to work around it or gives you room to cut it a little bit more when you get to the end and again guys remember to cut everything at a 90 degree angle. That'S what gives you those uniform layers, keep it at a 90 degree angle, with this haircut in particular. So now i'm going to go in with a little bit of styling moves now that we're done cutting it it's time to mold it and sit it under the dryer and be careful with the type of mousse that you use, because some moves can leave a really Bad um residue in the hair and it'll turn white when it's dry and when you go to comb it out and they can just throw like your entire cut and style. Well, maybe not the cut but it'll, throw your entire style off so just go in and you can use a water bottle to saturate it more. Just like the water bottle that i had in the beginning of the video use. A water bottle saturate it somewhere with water. If it's dried, if it's dried up a little bit and then go in with your mousse and then just mold it from side to side, you can just mold it. However, you want to style it now that it's dry now we're just going to comb it out, and i have a product that i absolutely love to use and this our silk serum product. This is a weightless high gloss, shine serum and you only need a little bit of pumps, maybe like three to four pumps depending on how thick or how thin the hair is - and you can also use this on the hair when it's wet or dry. But do you see like the shine that it gives in the hair and it's weightless, even though it's on short hair? You can still use it and i don't know about y'all, but when i'm wearing a short pixie cut. I, like my stuff to have a lot of gloss in it. We don't you know, nobody wants to have a pixie cut, that's a bomb cut and then it looks dry in the end like right so yeah when you're styling the hair. It is super super super important to go in with a good styling product on long hair or short hair. Nobody wants dry hair y'all, i'm trying to tell y'all. Don'T nobody want to have dry hair, because i know i don't i hate it so see how high glossy shine is in here. I just love and that's also our number one seller when it comes to like the styling products. We cannot is keep this in stock. So, and i'm just going through just to give it a little bit of curl in the hair, and you don't have to do like any fancy curls on this, because the goal is to keep it soft and this um, the serum is, is going to help you Do just that, it keeps it soft and you can find this silk serum on our website at www.tydaviscollection.com and i'm also going to include the link to it in the um description section also so, if y'all liking, what i'm putting down in this video go ahead and Click the subscribe button go ahead and like and comment in the sections below you.
Comments
Chondy’s Glam: This is so helpful. thanks
Cooky Crum DYI - TIPS : Thanks so much u really help me understand this topic
Modestly embellished hair: Beautiful
Queen K: The best video That goes in details about pixie cuts