How To: Empire 27 Piece By Sensationnel - Blue Pixie Cut Quick Weave | Simplyshon
- Posted on 04 August, 2020
- Pixie
- By Anonymous
#simplyshon #27piece #pixiecut
install begins @2:56
link to Hair -
https://www.divatress.com/products/sen...
I hope you guys enjoy this video.
Connect with me:
IG - simply.shon
SC/Twitter - simplyshonp
FB - SimplyShon
P.O. Box 3944
Saint Louis, MO 63136
Business Email ONLY:
Thanks so much for watching. Comment, like share and don't forget to SUBSCRIBE!
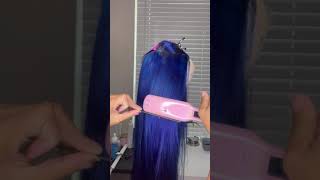
No yeah, i'm feeling like uh, i feel like. I look like the little cartoon off of the movie inside out going with the blue hair. Hey y'all, welcome back to my channel. If you're new here welcome today's video, i'm going to be showing you guys how i got this blue pixie cut. It is a 27 piece, quick weave, so yeah. If you guys want to see how i got this look, make sure you guys keep watching okay. So this is the hair that i'm using right here. This hairs by sensational is the empire 27 piece as y'all can see. It is blue, blue, blue. It comes with a stocking cap and a shower cap. If you want to make it into like a week, and then it comes with the one inch piece, the two inch piece and of course, the three inch piece: okay, it also has a little closure that you can use at the top. You know clothes off. You quickly or whatever you know your way, whatever you're trying to do um this hair is 100 human hair. It features soft and smooth texture, long, lasting curl retention, tangle free and shed free. Also, it is argan oil infused, so i'm gon na go ahead and prep. My hair, i'm doing a quick wave and i'm just gon na use the stocking cap that came in the pack with the hair. Okay, so i got the stocking cap on. I did four braids underneath here. I got one two three, four four braids and i did it like that, so that when i get ready to put that um closure piece down in the middle it'll, you know lay flat right there, because everything else the tracks um are going to be tight enough To lay you know, push down on these braids to make sure that everything is laying really flat. But you don't want to do like a braid down the middle and then put that closure piece down because it's not going to lay as flat as the rest of the hair. So you want to make sure that you have even number of braids so that you got this flatter part. You know the part in the middle, where you can lay your closure flat, also um. You want to make sure that the stocking cap is covering up. All of your edges so that you don't have to worry about. You know the glue get in a lot of your hair. So i put the stocking cap right at where my hairline starts. So i'm using the two inch first back here: i'm gon na lay two pieces of the track down and then i'm switch over and i'm gon na use the one inch until i run out: okay, okay! So now these two pieces in and so now, i'm just going to continue with the one inch piece. They are nine tracks in each bundle. So i'm gon na go ahead and add these and i'm just gon na be adding them from ear to ear like straight across like this. Until i get up to like right here: okay yeah! So i'm about halfway in on applying all of those one inch tracks in so what i'm going to do now is i'm going to take another one of the two inch tracks and i'm going to cut two pieces off of the track for each side and i'm Going to lay them on each side right here so that i have enough length for my sideburns. So here are the pieces that i'm going to put. I got two for this side and then two for this side. So now, since i got those two pieces in on each side, i'm gon na go ahead and finish adding uh the rest of the one inch tracks. As you are adding your checks, you do want to make sure that your checks are as close to each other. As possible, because with hair being so short, you know when you move it or you know, bring your fingers to the back of it or whatever. You don't want to see your stocking cap in there, so just try to get them as close to each other. As you can okay yeah, so i got all the one-inch tracks in nice, close together all right. So now i'm gon na move on to the two inch tracks so yeah. I saw that my hair is even up to here now, so i'm just gon na take these two inch tracks and i'm gon na lay them from this side to this side going all the way up until i run out of tracks yeah. This is all that i have left right here. I got all of the two inch tracks in it is blending and like layering, really nice. So now, i'm going to add this three inch bundle and i'm just going to add these in starting right here. Going all the way around and around and around and around until i get to this middle part, where i'm going to add this closure piece all right. So when i get to this part, where i just circle around, it's just easier for me to go ahead and just add a lot of glue and then go ahead and lay the tracks down and circle them around. And since the hair is a little bit longer. At the top, you don't have to um add the tracks as close as you did in the back. Oh yeah, i'm feeling like uh, i feel like. I look like the little cartoon off of the movie inside out going with the blue hair. So i am at the last piece. This is the last track right here. The last three inch track - and this is what i got left. So i'm gon na fill this piece in right here and then i'm gon na take that closure piece and pop it right on in there. So i got it all in all the tracks are in. This is the closure piece and i got like a little lace piece back here. I'M going to go around and cut all the extra lace off first. So now i'm going to add a thin layer of glue to that little lace. Part not too much because you don't want to like seeping through or seeping out, so just a thin layer of glue and i'm going to press it right in that little open area. I got my blow dryer and i'm gon na put it on cool and i'm just gon na hold it up here for a couple seconds and let it dry that glue up so we got all the tracks in and so now it is time to cut all Right y'all don't come for me, i'm not a professional. I am cutting this hair. The way that i know how the way it is easy for me. The way that i want my hair to look alright. So yeah, like i said, i'm gon na go ahead and start cutting and this whole cutting process will be sped up all right. Oh my god, i'm so irritated. I just recorded that whole thing. I didn't record it. I didn't press record. I thought i did. I didn't, and so i just cut majority of this hair and don't have any footage for it. Oh my god, okay, so i guess i'm gon na have to end up showing y'all what i did anyway, so i'm so irritated. I just combed all the hair down like this, and i started just around my ear pulling my ear and see if they got more to cut but cutting all the extra hair off okay, then i came around the ear. This way you know just the shape around. My ear and then i did the same thing to the other side. I got the hair coming this way and pull my ear up and just cut all the extra hair off. So once i shaped around my ears, i went and took this thinner part of the cone, and i just like literally just comb through the hair like this as the hair. Just you know shed off just to kind of take away some of the volume and the big bulkiness of there you see i could how thin and short it is right there and around right in this area too, because it was real puffy right here and i Can actually cut a little bit more right there, but then you want to take the shorter side and you just want to thin that out behind the ears and then, if you need to go back in with the shears and make sure that it's still cut straight. Like that same thing, with the other side - and i went in with the smaller side again with on the front - and i literally just comb through again like this - and the light is not coming off because i've already cut majority of it off, you can see. I'Ve cut a lot of this side off right here, so it's not as long and then i went and comb this down like this and get as flat as you can, and so it was a lot longer than this. It was kind of like coming to my eye lashes, and i just took my shears and cut straight across cut this little piece right here to even out and just cut that straight across and then for my sideburns. I took that thinner side again and i just kind of went through and chopped some of that hair off, so that it wasn't so thick and just make sure that each side looked even and so then i took the thinning shears and i just went through these Bangs up here and cut them upwards like this to thin them out because they were kind of thick yeah, i'm so irritated cannot believe. I just did that so like this and then i'm gon na turn around and the same thing that i just did to this front. I'M gon na do that to the back. So now you just brush through all this make sure all of the extra hairs fill out and before i do anything else, i'm about to put on my body and take a shower. So i get all this hair off of me and then i'll be back. Okay y'all, so this is the finished look i did go back in after i got the shower and chop a little bit more off the sides and i kind of stand out the front just a little bit more of those thinning shears, but other than that. That was all that i did. I am so so so in love with it. I am really feeling this color. This blue is beautiful um. I think that i cut it really well and, like i told you earlier before, i cut it, i'm not professional so um, you guys can do this as well. All you got to do is just you know, keep cutting until you feel comfortable or you get the look that you want with this hair having a pre-curl to it. Um you can do a lot of stuff with it. You know sweep it. Whichever way you want it to go, you know you can sweep it this way or sweep it this way, you just rub your fingers through it and get you know, whatever kind of look that you want, i just like to swoop mine to the side and then Kind of just kind of finger comb, those bangs down a little bit and then fluff it up a little bit. Just like that, i forgot to mention earlier that i did get this hair from my local beauty supply. It was 14.99 i'll make sure to leave a link in the description box below um to where you can find this hair online. If you guys have any questions or comments, anything that i didn't answer in this video go ahead and drop them in the comment box below. I really hope you guys enjoyed this video if you did go ahead and give me a thumbs up if you're still watching and you're not subscribed to my channel, make sure that you go ahead and do so don't forget to have the notification bell so that you Are notified first, when i post new videos also head over to instagram and follow me at simply.shine, as always. Thank you guys so much for watching. I love you all and i'll see you guys in my next video
Comments
Rhonda: Really good idea to place side burn pieces first as a guide. I’ll remember that tip for my next wig❤️
Shavon Cra: Omg I'm so glad I found this. Been waiting to do this style! So cute
Shayla Smith: Crazy... So i went and brought Literally Everything you have including the hair the color the brand the cutting comb and all. I couldn't find the right video so i looked up basically your title and im sooooo glad you did this. Its literally perfect
Allie Jussaume: You go girl. Beautiful. You just taught me to install a 27 PCs. Thank you.
nicole bonds: you are the only one that I see that really help step by step thank you so much I love the blue
GAILY GAIL: Thank you for being so detail... You did a beautiful job and that blue looks just FAB on you.
I am Prosperity: It is beautiful sis! You did an amazing job.
Allie Jussaume: Thank you for an informative video. You taught me how to install a 27 pcs. Great job. Your makeup is flawless.
Debbie Easter: You did a great job! It's beautifully blue hunnie..
Yoggie Roccs: I love how u showed us and it looks amazing
Junice Wells: Looks beautiful, great job. Thanks for sharing.
Kingdom Minded1: You did an amazing job! Looks great on you too.
Delores Edmond: Such a great job & great color on you thank you for your patience
Lashonda Williams: Simply beautiful ❤. And well done with the details. Please create more styles and videos
Sierra Jackson: So beautiful I love how you did step by step it came out so beautiful I bought some blue hair yesterday so after watching you I'm like ok got it❤️❤️
Andrea Williams: BEAUTIFUL!! You did an AWESOME job
Gwendolyn Morris: I followed your tutorial. I appreciate the details. It turned out great. Thanks
Darlene Williams-Parker: I’ve been having hair anxiety issues since my hair started thinning out. I saw this hair kit at our local hair depot and it gave me hope. I brought it home and went to YouTube to see what I could find out about me putting this on as a newbie knowing nothing!!! lol. After at least 6 tutorials and mad as ?&$#% I decided to try one more. I chose yours and I was so glad!!! You took time to show me every step from first to last. Even when you forgot to turn the camera on . I thought you were going to just close out & leave me hanging. BUT YOU DID’NT. You have given me enough confidence to do this tomorrow (after I go back & buy the glue. Thank you young lady
mschocolategoodiestl: Now I love this color and how simple you made the install and cute
YGMT: This is a very good demonstration. Buying the hair today
Carolyn Knight: Beautiful!! You did an awesome job!!
Denise GS: Beautiful ❤️ How long does a quick weave last?
Phyllis Ashley: That’s pretty I love the color ♥️❤️
Lashonda Ervin: I love your videos and energy! And you are a professional.
Sekquisha Strivers: You did itttttt !!!! This is SO BEAUTIFUL YOU DID THAAAAAAATTTTT
Anne Bernard: Great Video! Thank you so much! Also you look beautiful!
jessica cooper: Gorgeous. Really nice.
Allison Wendell: Beautiful you did amazing
W Hobson: fabulous job. Love it on you.
Nancy Rowe: Beautiful I love the color
Michelle Standford: So pretty,wish I could give you a million thumbs up.
Patricia Hogans: Gorgeous, you did that Queen
Anita Bratcher: Beautiful!!!!
Teisha Pownall: I love it
Nancy Rowe: Loving that blue
vanessa peterson: CAME OUT DOPE AS FU**!. LOVE IT!
ERICA: That’s ok baby things happen but u did a fabulous job. I learned alot from u. Thanks for sharing.
Naaee Baaee: I love it sis
Latanya Marshall: GORGEOUS!!!
Lakeshia Gibson: This is a look:)
Toni Brantley: Baby. You did your thang... It looks beautiful!!! Fiiiar!!
BLUE: You look amazing!! Where did you buy that hair! I like it, with one exception (I'll discuss with you if you will do mine!) Grl... AMAZING!! 11:11
Tasha Yvette: I am so so sorry I left The Lou now. I was in the 63114 area. I did at one time live in the 63136 area. I’m in NJ now buy baby girl if I would have found you I would have BEG you to do my hair!! Beautiful, beautiful work. Thanks for sharing ❤️.
Bright Danso: I love the video
Leesa Allmee: Cute!!!!
Sheryl Vidal: ❤❤ any recommendations on buying this exact color hair? Can't seem to find it on the internet
Ash Diamond: U are a very beautiful lady ur voice is so unique thank u for the link
Junice Wells:
Andrea Brown eyes: ❤❤❤
Je Ne Sais Quoi: LOVE
DannieBucks:
I'm Blessed: I got the same hair but my are 3,4,5, inches. So would I put 2 layers of 4” on the back first then do the rest with the 3” till it’s gone the do the 5 “ on top♀️
Kristen Nurse:
Melanie Blanks: HEY LOVE ITS MEL FROM CHURCH. I FOUND YOU ON THE DISCOVER PAGE LOVE YOU DEFINITELY SUBBED
njeri magda: Do you take it off at night ?
StylezBy ROBIN: U did good
Trippin out with Tamika:
Heather Magloire: Location?