Pixie Haircut Tutorial - Perfect Pixie Haircut | Thesalonguy
- Posted on 21 January, 2014
- Pixie
- By Anonymous
Haircut Tutorial - PERFECT Pixie Haircut | TheSalonGuy
SUBSCRIBE: http://goo.gl/aWSkjE
In this haircut tutorial, I share how to achieve the ever so popular pixie haircut. You have seen loads of celebs wearing this cut and in this video, I share my technique and method.
Mannequin provided by:
http://www.hairartproducts.com
Follow me:
http://www.twitter.com@TheSalonGuy
http://www.facebook.com/thesalonguy
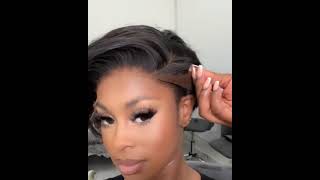
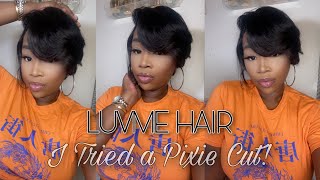
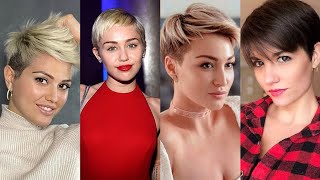
Hey everyone, I'm Stephen, a salon guy and welcome to my haircutting tutorial today. I'M gon na be showing you guys how to achieve the pixie haircut now, you've seen many many celebrities wearing the pixie haircut, such as Jennifer Lawrence Pamela, Anderson Charlize, Theron, Jennifer, Goodwin, Halle, Berry and Hathaway, Rihanna, pink and many many others. But a lot of you guys are afraid to do the pixie haircut because it's a short haircut, so the key things about pixie hair cuts is that you know what you can have fun with it. There'S no set length. There'S no set! You know this hat. This is the exact way to do a pixie haircut, because you can have fun with it. You can have ones where the front is longer. The front is shorter, there's pieces coming out to the side. I mean there's so many different variations, but it is a short haircut, so overcome that fear taking on is exciting opportunity and I'm going to show you guys how to achieve the pixie haircut now when cutting the pixie haircut, give a few different options of where you Want to start, I like to start in the back. Some people want to start right down the middle. However, I like to start now, not all the time, but this time in particular, I like to start actually right here, literally right behind the ear, because this is going to allow me to connect this part here with the sides here. So I know where I'm going to go because a lot of times people get stuck around here and they're like oh, I don't know how short to go around here. So the first section I'm going to take here is going to determine because if I cut this, this short, that means this is going to be pretty much on top around the ear here. So the first section I'm going to do is I'm going to hold it about a fingers length out from the head and I'm going to cut straight down, holding everything straight out and I'm just going to follow this down to the nape area. And this is going to be my guideline throughout the whole haircut in the back. So, as you can see here, my first section is complete, and here is the length right here now I'm going to take this and I'm going to go on diagonal sections working all the way to the back. Then I'm going to come on this side hold out fingers lengths. Do the same thing come down to the middle and then cross check everything in case you guys are having some issues and might be a little confused as to your section now, as you can see, this is coming in very very nicely when you're taking your section You'Re not over directing down this way, you're taking a section that you previously cut you're, pushing the hair that you just cut out of the way and you're combing it straight out and you'll be able to see your guide underneath. Okay, so you're not cutting hair that you shouldn't be cutting okay, so pulling it straight out. Sometimes, if you take too much hair you're going to start to cut the guide, okay and this way by pushing the hair underneath out of the way you're protecting that guide. So you're not cutting it over and over and over again creating different lengths and the haircut underneath here. So, as you can see here, as you comb it straight down, it's got a beautiful shape to it. The back is done now and now we're going to kind of go into the cross-checking phase. Just to make sure everything is on point now again, you can you can do the several ways you can come over the top. This way make sure everything is good. If you see any any longer pieces you can just you know, just get rid of it. Anything that's longer. When you're cross-checking is going to stand out - and it's going to tell you say, the hair is going to hey, hey cut me and it's gon na it's going to obviously show if there's parts that aren't even you know you can do that. You can also go back in and do like. We did before you can cut on an angle just to make sure and the hair will kind of pop out. You can also go horizontally if you wanted to to see how you're doing if everything is balanced out. If it isn't, then I would suggest just going through it and again take off what needs to come off so now that the sides are, and the back is done here - we have to you know again, connect this and then also going through the sides here. So, let's start with the side, and now what we're going to do is now that we have the length established here. Okay, we can put push this out of the way, almost creating like a side part here, and we can then start to connect the sides and the back and the best way and the simplest way to do that is to remember. We cut that piece right here. This is our guide that really helped out a lot, because now all we have to do is find that piece that we cut before and that and also from the back here, and that is going to be our guide working our way into the top. All right and it's into the sides, so we're going to hold everything straight out from that guide: okay and we're going to work our way towards the front like that all right and what that's going to do is that's going to create that softness is going to Create that pixie look now when we get around the ear everyone's hair line is different. So if you do want to leave it a little bit longer, you can you can over direct a little bit if you want to have it coming a little more longer towards the face this way, but everyone who has a you know, hair line. It comes down and through here a little bit so you're going to get those pieces in through here, okay, so here's our last piece through out the front and we'll get this little bit right here in the hair in the sideburn area and there we have it As you can see, look what we've done we've created. You know that the start of a great pixie haircut again. This is just a rare and the raw kind of form of this, because we still have to go in. We still have to blend this in with the top and texturize it a lot, but now we have a source to connect the sides. The corners throughout the top here alright - and that's in through here - is what we're going to connect everything. So it really just rounding everything out, so what I'm going to do is I'm going to do the same thing. On the other side, I'm going to connect the sides with the back here from that first section that we took, and once I'm done with this, then we'll get to the top alright, now that the sides are done here, it's time to work in through the top. Now you've seen me do this many many times what we're going to do is we're going to connect the back right here in through and you're going to let the hair drop out to where your squirt it's parallel and straight across, and then we're going to cut Going forwards, this way, you're not going to be creating any harsh lines, and it's going to naturally round out from the head shape, and that is then going to make this piece your guide, moving through to the very very front. So what I'm going to do is continue to do this when you get to the corners here, you can then cut that off all right and everything works in a continuous motion with these haircuts and with any short haircut like this, you know you want to be Pretty aggressive with it don't be intimidated because the hair is coming off anyway, so why not have you know fun and feel confident that you're get you're cutting it all right? So now we've got this here. We then move in through the very very front. This top section right here this is the top now, so we have our guide that we just cut and we're going to cut everything straight across all right again and we get through now the corners we're going to do the same thing follow the head shape and There we go round it out again continue back towards the middle work on this side now, you'll see the guy that needs to be cut in the corners and there it is so. Let'S continue working from this point all the way through the very very front and then we'll decide what we're going to do with the front section. Now, we've come to the front, so the front you've got. This is where it gets fun because you've got so many different options, and this is where your creativity comes in now again, this haircut might seem like it's done, but it's it's really not even close. I mean we're about halfway done because you still have to go in and texturize it and really piece it out and really have. You know really work the shape into a little bit more. But so the front here really depends on you. I mean a true pixie haircut. Yes, it's a lot shorter into the front here and you can do a lot more with it. So just for for sake of tradition. Let'S do this. Let'S cut the front here shorter. Alright, we're going to hold everything straight up from the head and, as you can see there, it's going to fall down like that again we're going to bring everything straight up from the head, and that is going to be our front piece. Then once that is done, we can then go in and kind of round out the corners here. Then we can go and texturize and really start to create the shape. The true shape throughout the front here. Okay, there now see you can there's the front. This could be done. You know styled a few different ways. You can, you know clip it back, you can, you know kind of wear a little bit Messier. You can go over this way, that's what happens um, so this is kind of like a traditional pixie type. Look and then you can go in and you know chip into it. If you want, you can create, you know, shorter pieces longer pieces, so this is one kind of way of doing a traditional pixie styled haircut now as far as getting a little more aggressive, alright, which I want to do when I will cut this a little bit Shorter, let's take this and let's make everything a little bit shorter throughout the front. This way we can have a little more flexibility and some more styling options, especially when you see some celebrities are wearing their hair, a little bit shorter. Alright, and now you can do that a few different ways: you can do it with the sheer or you can do it with a razor like this. So if you want to do with the razor okay just going to turn the head this way, you can take a piece section by section and just start to kind of slide in through the hair to remove the length alright, but you're doing it with the razor It gives it more of a softer, wispier type feel okay. This is also a great way to remove the length in the front instead of just taking it straight across with a pair of shears. Now everything is coming down and it looks very, very blunt, but we still have to go in and texturize everything we still haven't even done that yet, okay, so now that the front a little bit shorter, you know, as you can see, you're getting a few more Options and some softer pieces throughout the front here like this all right now, let's go in and really be aggressive, texturize this a lot more and and if we need to cut any areas a little bit sure we do that. But this is where you really have some fun: while the blow-dry is complete, the dry cutting is complete, and this has no product whatsoever. All right - and you can see here the really this type of look - the haircut really does all the work, because if you cut it really really well, the shape is going to is really going to come in. That'S where all the texture comes in. That'S where all the dry cutting the the piecing out everything you know, every every method and every technique that you go. The extra mile to do is going to be the end result of this haircut now, the styling of this really is. It really depends on you. I mean there's people that might want to wear it smooth wear down like this. This is one way you can wear it. Another way is, if you take some paste, which I'm going to do, because I do like to have things a little bit more edgy and I'm just going to now. This is where this the styling technique comes into play again put the product in your palm, and you really want to be aggressive. Once you put your palm on the scalp like this, and you rub it around see what the hair does. It basically reacts to what you're doing alright it it. The layers come out the PC the pieces come out that you cut the texture really comes out, and this is what paste really comes in, not only for women, but also for guys too alright. So you know, depending on how much texture you want, depending on how much you know you want the hair, to kind of you know, stand up or lay down. It really all depends on you, but I think this is. This is really really a cool look. It'S again, depending on the person how edgy how funky they want to go, but, as you can see it's what the pace is doing, it's allowing everything to kind of just cut really be accentuated. So I'm just going to play around this a little bit more and then we'll wrap everything up all right. Here'S the finished result here. So you know I want a little bit PC a little bit edgy, nothing too too crazy, but you can, if you want so I'm going to kind of show you throughout the back spin this around a little bit. Okay: here's how everything is kind of up like this, and you can keep spinning around there's all the textures all the layers into here. You know again. This is just one particular way that you can wear it, but the thing about a pixie cut is that you can have so much fun with it. You can really style it in many many different ways. You can push this kind of up in the front, see what that does. You can really have some fun and change your style around. So that's pretty much it. Thank you for watching guys. If you want to make another request or you have any thing, you need instructions on your help with leave in the comments below. Thank you for subscribing and all your support I'll see you guys soon.
Comments
Trista Miller: That was really nice. I was a little sad that I didn't see all the texturizing techniques you did but I'm sure you have them in some of your other videos. You always pass along good information. Thank you.
Tanya O'Brien: thanks so much you have given me so much more confidence and transformed my haircuts!
Susan Susan: Красивая стрижка.
Richard King: Thank you very much. Every time I watch your videos, I gain a little more confidence in my abilities. -R
Bridget Sherwood: Your explanations and knowlege is so good.
Barbara Leahy: I want this haircut and style it's fantastic and easy maintenance for me
Spinoza’s Necessitarianism: I have such a problem with short haircuts everytime I try to do one idk I just mess up but I try to do the best I can when watcjing your videos I really appreciate your time thank you.
Ира Углова: САМЫЙ ЛУЧШИЙ И САМЫЕ ЛУЧШИЕ РОЛИКИ-СУПЕР,СПАСИБО,МОЛОДЕЦ!!!!!!!!
Frank Meyer: gracias por todos tus videos e aprendido mucho de ti eres el mejor
Dorina rollo Parrucchieri SUPER STAR: Mi piacerebbe la traduzione n italiano...sei bravissimo e seguo tutti i tuoi tutorial
Janell Sehlbach: Thx!!! Great video!!!
Liz M: 11:22 is about how my hair looks in the morning!
Asid niljose: Thanks to your toturial now I started cutting all friend like this
peter huang: I. like it !!!
El: I like it might do it when I am older
Pam souen: Could you show us, how to cut Keith Urban New hair cut Please? Thank you
Bridget Sherwood: I have a question, Sir. Charlie Theron's and Jensen Ackles hairstyles are the same type? I think they similar, just men and women different, right? I'm doing a little research jist to be sure for my next decision of my hair change. Thanks.
Anthony Elgie Marfa: So that's the haircut of Bryan McFadden of Westlife, Ritchie of 5ive, and Kevin of the Backstreet boys way back in the 2000s after having long hair.
skoluh: PLEASE DO JUSTIN BIEBERS PLEASE MAN! FOR THE LOVE OF GOD!
Spinoza’s Necessitarianism: Are you holding the hair in about 45 degrees?
Tony Bhosle: Very talented you are but your video's are very long please make it sort.
hitansh Deepak warpe: i love haircut
El: Right now I am trying to do locks of love
BunNessa_ Art: is this haircut sort of like carey mulligans pixie? the short version, not the great gatsby one
Asid niljose: Thanks saloon guy
Monzerrat Reyes: Lo podrian traducir al es pañol
Bridget Sherwood: And it can also go into what i found that Ivy League hairstyle, it's called I think. ? Can it be go on to that?