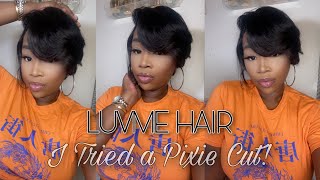
Wig Transformation: Diy Pixie Undercut Wig Tutorial Using 8In Unice Hair
- Posted on 07 December, 2019
- Pixie
- By Anonymous
What is up artists and movers!
Today I am bringing you a video specifically about my hair and how I created my signature look. Having an image that is recognizable can be really helpful when you are trying to brand yourself as an artist, and hair can be a big part of that. For me , it was important that my hairstyle match my personality but also was easy to maintain and cost effective while living in an expensive city.
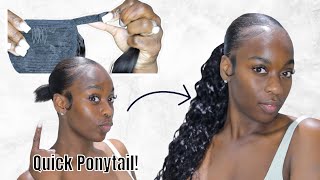
In this video I show you how I take an 8in wig unit and transform it into an undercut pixie. I wear this wig almost everyday and it it lasts me an entire year! It's suer cute, cost effective, and frees me from having to wrestle with my natural hair on a daily basis.
Let me know in the comments below if you wear wigs when you dance and what styles are your favorite. Click the link down below if you would like to see how I install the wig so it stays secure for dancing. I'll see you guys in my next video. Later!
↓ SUBSCRIBE ↓
https://www.youtube.com/channel/UCOkW1...
↓THE MORE THAN DANCE CLUB IS NOW OPEN!↓
Join a community of other dancers looking to do more fulfilling work, use more of their talents, and make more of an impact.
https://www.motionprepdance.com/more-t...
↓ WATCH ANOTHER VIDEO↓
I'll Kill You Choreo: https://youtu.be/9rb6JicHmQ0
Picking Dance Heels: https://youtu.be/k6eUz1VYnDI
15 Min Full Body Stretch: https://youtu.be/1K-TyBctOok
↓SCHEDULE A DANCE CHAT↓
Get personalized feedback from me one-on-one
https://www.motionprepdance.com/servic...
↓ DANCER TOOLS AND RESOURCES ↓
https://www.motionprepdance.com/shop
- Dance Business Expense Tracker (Prepare your dance business for Tax Season)
- 3 Pc Massage Ball Set
- Personal Development Worksheet (Create Clearer Goals With Visualization)
↓ CONNECT ↓
Instagram | @gaylyn.lareese
Motion Prep Instagram | @motionprepdance
Business Inquiries | [email protected]
↓ WHO IS GAYLYN LAREESE ↓
Hey there! My name is Gaylyn Lareese, and I am dancer living in Los Angeles. For as long as I can remember, dance has been a part of my life and has truly shaped my personality, my opinions and my life goals. I believe dancers are more than pretty performers on a stage or in a video. True dancers know that dance is how we learn and move through life. It’s the way we’ve chosen to grow to be the people we are meant to be. This is why I call us artists and movers! On my channel I make content for every aspect of dance life including dance tips, dance discussions, and dance entrepreneurship. Join me as I take my love for dance to the next level and hopefully encourage you to do the same
Sub Count:
Some links included are Amazon Affiliate links and as an Amazon Associate, I earn a small percentage from qualifying purchases.
Disclaimer: Information in the videos on this channel are not intended to help treat injury. They are only intended to provide information to help enhance dance performance. Please speak with your doctor before attempting any form of injury rehabilitation.
Halon, how do you keep your hair so straight wait. What is the artist duper's welcome back to my channel? If you are new here, my name is Galen Aries and I'm a dancer, and I live in Los Angeles, and today I'm gon na show you how I got this cute little undercut generation. This look is perfect for the holidays, hence the festive outfit, but it also was a perfect compromise for me to show my personality, while also making sure that my hair, when I dance, doesn't get thrown all over the place and I'm not suffering heat damage and I'm Not having to worry about sweating all those things that just make dancing more difficult in this video, I'm going to show you how to took an 8-inch weight unit - and I transformed it into this haircut. So, if you're ready to get cutting dance. Let'S jump into this video to do this. Of course, you're gon na need a wig. I chose to use an 8-inch lace front unit from you, nice, wigs, a wig head, a highlighter or brightly colored marker rubber bands or hair ties. Sheers for cutting the hair, a spray bottle filled with water and tea. Pins they'll also need a wig stand, but instead of using a wig stand since I didn't have one, I used my tripod that I use for my camera and I also covered the floor with garbage bags, so that cleanup in the end would be much easier. As you can see, my wig head is actually marked in orange highlighter and those markings show the circumference of where my hair stops and where my undercut begins. For me, it was roughly 5 inches on each side and 4 inches across the back and, if you're, judging it more based off of circumference, it was around 20 inches around the head, total the black lines mark how long my previous wig was just to give me An idea of how long I should cut this one, but obviously, if you don't have a wig, that's already cut into a pixie, then you're, just gon na have to put your wig on every now and then and test it in to see if the length works For you, ok now I've got to jump into cutting this wig. So this is a unit from you, nice, wigs and it is, I believe, at 13, six lace, frontal and the length of the hair is 8 inches. I always just get the shortest length. I can buy possible because I'm gon na be cutting it off anyway, if you guys are here for a whole wig review this ain't, that video, but the hair is super soft and so far I'm a fan. There hasn't been very much shedding or anything like that. The only thing I will say is that the knots are not bleached. So if I do decide to part it in the front, then I'm just gon na have to make sure that I bleach the knots later so previously to me putting the wig on the wig head. I just went ahead and washed the hair and conditioned it put in some leave-in conditioner on it, and then now I am spraying it with a little bit more water just to get it wet again, because it's much easier to cut wet hair than it is to Cut dry hair, especially when you're going to be using shears to cut it. I am also planning on wearing this wig with a cute little side part sometimes, so that's why I have the middle part pulled slightly to one side just so that when I go to style it I'll have more parting space for later. Now that I have the wig placed and adjusted how I want it, I'm going to take these two pins and I'm just going to use it to secure it to the wig head so that as I'm cutting and pulling on it, the wig isn't gon na fly Off, if you don't have T pins, a good replacement could be sewing pins that you stick into a pin, cushion just something. That'S gon na keep the lace from being able to fly off of the wig head. So now that the wig is secured on the wig head, I'm gon na go ahead and look for that. Highlighter line that I made previously on my wig head and the reason why we used a highlighter is because we need a bright color to show up under the hair, because we're trying to grab the hair. That is going to be a part of our wig and trying to leave the hair that isn't going to be a part of the wig behind, so that we can cut it. So you want to have a line, that's bright enough, so that you can follow it. All the way around the perimeter so that you know where to cut and then you're going to use either rubber bands or hair ties to tie off the hair at the top so that you can make a nice clean cut. All the way around. So now go ahead and take their down and comb it out a little bit. I totally forgot to tell you guys that you would need a comb, but hopefully you have that anyway. So go ahead and comb the hair out and then I'm actually gon na go back and wet the hair again because now we're about to cut it. So the first thing that I'm gon na do is I'm going to cut it so that the whole length is even across the bottom because, like I said before, I tilted it to one side, because I want to be able to part it on the side. But we're gon na be making some diagonal cuts, and I want to make sure that I'm getting the right length, so I'm just gon na go ahead and make that even first to make this pixie cut wig. The first side that is going to be cut is actually the back, so I'm gon na look at where I have that marker for the link that I want and I'm gon na cut just a little bit below that because, as we keep cutting we're going to Eventually make it to that line, you want to remember that you can definitely keep cutting things, but once the hair is gone, it's gone so just be patient with yourself as far as how much you're cutting at a time and as you can see after cutting it, The first time I kind of looked at it and judged it and realized that I could cut a little bit more off the back. So I went ahead and did that so now for the sides I'm going to cut diagonally toward the face so that the hair increases in length and to do this, I'm falling from the length of the hair in the back down the jawline. Just to make sure that I have the right angle: that's going to connect both of those areas. So the next part of the week that I'm going to cut is the bangs now to cut the bangs you're going to take the hair from the center. In the middle at the top of the head, I think that's called the crown and you're going to comb the hair forward so that it falls in front of the face. This is the hair. That'S going to become the bang with the bang. You want to make sure that the center point, meaning the hair that falls over the nose, is going to be the longest length of hair and then progressively, as you get closer toward the ear, the hair is going to get shorter. I'Ve gone ahead and marked on my wig head on the nose where the hair fell. Last time on the wig that I made but, like I said before, I'm going to keep some extra length because we are going to go back in and cut layers. And I want to make sure that I have enough hair to work with later then we're gon na connect the length from beside the ear to the back of the head that we cut before. So that's gon na take off that extra little tail of hair that she see that's between those two lengths and that way, it'll make a nice diagonal cut all the way from in front of the nose beside the ear around to the back of the head. Now go ahead and do it on the other side now it's time to cut some layers, so this is what's gon na give the pixi those cute little diagonal layers on the side and in the back, so it doesn't just look like a bowl cut yeah. So to do this, you're gon na grab a vertical section of hair in the back and you're, going to grab it and pull it directly away from the head so that the hair is pulled straight. Then, to get the link that you want you're gon na pull the hair down and look at where either you're marking is on your wig head or just judge based off of where you think it will land on your head. Then you will pull it back straight and make a cut from the bottom all the way to the top you're going to do this repeatedly around the back and sides of the hair, and every time you go to grab a new section of hair. You want to make sure that you're grabbing some of the previous section before that way, you're using it as a guide, so you know how long you want that hair to be, and it's going to be consistent around the entire head. This is the part that honestly takes the longest, and it's just completely judged on how you want the finished product to look so for me, this process typically takes about thirty minutes to an hour, so really take your time and make sure that you're getting the layers Exactly how you want them to be, because once you cut the hair off it's gone, and if you look really closely, you can kind of tell when I'm pulling the hair away, that some parts are shorter than others. Those shorter parts are the guide and that kind of tells you where to cut the longer lengths of hair. So every time I'm pulling away, I'm looking at which part is longer which part is shorter and then cutting off that end of the longer strips of hair. The most important thing is you want to make sure that you don't cut the back too short or the sides too short, because those areas are where your braid is going to be, and that's how you attach the whole unit to your head. So if the hair is too short there, then it's going to show the braid and then the jig is up. The ruse is up, people know with the wig, so just make sure you're being cautious of how short you are cutting those links as you're going around the perimeter of the head and then once I've done. Some layers are on the sides of the head. I can go ahead and do the hair at the top and take a little bit of length off of there and then finish off by doing the bangs. And it's going to be the same situation. Taking a vertical piece of hair and cutting it straight up. And then, once I finished cutting all of those layers, I go back in on the side and make diagonal cuts toward the face again. And this is just because so that when I brush my hair forward on the sides, you can really see those layers. And I just like the look of it, I like showing the different layers on the side. That'S just my personal preference. So that's what I'm gon na do next and then. Finally, I can go in and thin out the bangs a little bit and then out the side. I don't really show that in the video just because that's a process that I kind of do over the course of the next day or two. I just wear the hair and I see where it looks a little bit too full when it's on my actual head and then from there I just go in and then the hair out. So you guys, this is the final look once it's been installed, like, I said, be sure to check out this video up here. If you want to see exactly how I customize the cap construction and actually install the wig, but after I did the initial cut that I showed you guys, I went back and just kind of thinned out the front a little bit and the sides that it tapers Closely to my head and that's gon na be different for every person just based off of your head shape and how you like your hair, to look. Let me know in the comments, if you wear wigs, when you dance, if you have a pixie cut or if you've won a pixie cut weight before, if you enjoyed this video, be sure to hit that like button. If you think this is a look and if you think you would possibly wear either to dance class or just for the holidays until next time later, you
Comments
Latosca Cole: Love this! I recently started making my own toppers & I'm always looking for new inspo. I workout heavy so I totally understand your plight. I love the "issa wig ."
Stephanie C: Great I wear a pixie and I’m natural and this is my go to style! I recently tried texture yaki hair and looking forward to try any kinky straight texture but I must say wavy hair makes life easier since it requires no styling in term of maintenance; it’s been my signature style and I workout a lot . I do my hair every Sunday . You are a beautiful woman . Blessings for sharing your craft !
Natalie: OMG! This was scary but super helpful! I’ve actually never worn a wig so I’ll probably have to start with synthetic first and as I get better, graduate to human hair.
Jennifer Hunter: Nice. Just the other day I was looking for a tutorial on how to make a wig my own
Gaylyn Lareese: Do you guys wear wigs when you dance? Do you like to try different looks or are you like me and wear the same style 365 days of the year? lol
Nickie Austin: Do you think i can do this with a short cut wig?