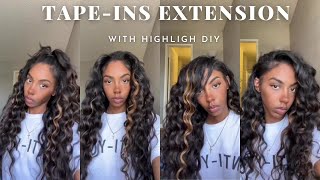
Faux Highlights Custom Oreo Color Tape In Extensions| Placement & Blending Tips |Ywigs Hair
- Posted on 21 September, 2022
- Ponytail Hairstyles
- By Anonymous
Link to the Natural Color Silky Straight Tape-in Hair Extensions:
Link to the #613 Platinum Blonde Tape-in Hair Extensions:
Link to the Kinky Straight Tape-in Hair extensions:
https://www.ywigs.com/collections/tape...
Ywigs Tape-in Hair Extensions:
https://www.ywigs.com/products/natural...
Ywigs Time Saving I Tip Microlinks hair extensions:
https://www.ywigs.com/collections/i-ti...
Ywigs official website: https://www.ywigs.com
Ywigs Clip-ins Hair Extensions:
https://www.ywigs.com/collections/clip...
Ywigs U-Part Wigs:
https://www.ywigs.com/collections/u-pa...
Ywigs HD Clear Lace 13x6 Lace Front Wigs:
https://www.ywigs.com/collections/13x6...
Connect with Ywigs:
http://www.instagram.com/ywigs_officia...
https://www.facebook.com/Ywigstore/
Snapchat: Ywigs Hair
Welcome to My Channel
Be sure to SUBSCRIBE & TURN ON YOUR ALERTS
HAIR CHANNEL @iambeautifulhustlertv
——————————————————
MY PERSONAL YOUTUBE CHANNEL : @Life with ShaeTV
https://www.youtube.com/channel/UCB9xX...
——————————————————
Follow My Socials:
PERSONAL
@iambeautifulhustler
BUSINESS
Instagram:_Beautifulhustler
@thebhslay
@girlsniteoutapparel
Twitter:_Beautifulhustl
YouTube :IAmBeautifulHustlerTV
✨For Sponsorships ,Reviews,& Questions
Email:[email protected]
786-571-1313
To Purchase Hair & Products Www.ibhslays.com
Allow 3-14 Business Days For All Orders
#miamihairstylist,#miamihair,
#browardhair,#browardhairstylist, #Atlanta #atlantahair,#atlantahairstylist #reels, #explore #trending #tiktok #viral #miamimakeup #miamimua #miaminails
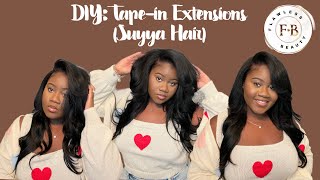
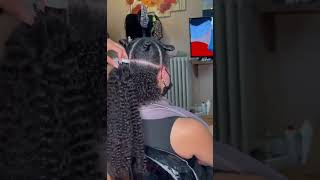
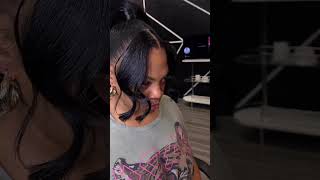
Thank you what they did to you in the past. My thing that I love to live by is I never number one. I never go back to what hurt me and number two anytime. The past is calling they ain't, never got nothing new to say ever. Stop letting people show you who they are twice three times four times the first time. Somebody shows you who they are believe them and don't look back, you don't need closure. You don't even need an apology from them. God said, the closure was the things that I exposed to you about who they were while they were in your presence, hey Beauties and welcome back to. I am beautiful husband TV today we are back with a new video and it will be a taping video, but today's taping video is going to be super super dope. Okay, why wig sent me over some natural Brown and 613 okay, taping extension, so y'all know? What'S about to go down Oreo color, okay period, so today we will be using my big sis Nika for our tape men's model. I went ahead and dyed Nikki hair jet black um gave her a nice cut and trim because she had a lot of dead hair. Y'All but the hair is back alive and at some period so she has been washed blow dried flat iron. You know what I'm saying a little moisturized, but not too much, because the hair is really not supposed to be oily when you do no tapings y'all, but I don't like to just blow dry super super dry, especially if the people here already be a little on The you know kind of sad, okay, but nevertheless this is our prep hair is clean, blown out trimmed. All of that so now. The first thing we're going to do is: go ahead and section off um all of the leave out area now, y'all know when it comes to tape ends. There are several different methods to taping the hair. You can tape in the hair to do a full, ponytail middle part. Both side parts or some people might just want to do a tape in middle part and ponytail. Only or some people might want half of half down plus size, plot plus middle parts. All of that, but to be honest, y'all half of these clients ain't even going to switch their hair up like that. I don't know why we they be trying to tell us, like. Oh, I'm gon na wear a middle part and a side part in the this and this and that be for real, like we. They really not doing all that. Okay, they don't even really know how to manage their own hair y'all. So I said Mika. I know how you is girl. I know your hair get frizzy and all of that, so what we're gon na do is: do you a ponytail and middle part, tape and style, so she would be able to securely wear her a super super flat natural high ponytail love ponytail, whichever ponytail she prefer And, of course, her bust down the middle, which would be our finishing look for today, but first things, foremost um. We have to get these sections squared away. Okay, so when um you are trying to secure your sections and making sure that they cover well, they will cover the tape ends perfectly. What you need to do is pull down a section and you want to place your rat tail comb right in that parting space and flip the hair over the comb. If you can see your comb through um after flipping the hair over it, then you need to pull down more hair, because if you can see the comb, that means you will see the tape when you flip the hair up in a ponytail. So right here um, as you can see when I flipped it, I didn't see any hair there. But when I try to get more towards the middle part, I did still kind of see the cone. So, that's why I add a little bit more in that section and I'm going to add a little bit more towards the front, just to make sure that it is super super seamless when we lift up the ponytail plus, because we are doing the Oreo color today. We really want to make sure that it covers everything, because we don't want to be pulling her hair up until you see a spike of blonde taping and you like hold on wait a minute something ain't right. Okay, so make sure you are taking your rat tail comb, placing it in that part right on the scalp and look their hair up to make sure that that comb is not going to be showing or your taping will not show to secure a nice seamless, install. But once I go ahead and get all these sections squared away and making sure that the tape ends will be covered, I will go ahead and plant them and rubber band them that way they do not get in our way foreign foreign, foreign, foreign foreign. So, as you can see, I went ahead and created all the sections all around and I pulled out um the section to cover the tracks for her bust down the middle. So everything that you see me I'm putting in a um ponytail right now will be all where the tape ends will sit. Okay and I feel, like I add, a little bit too much on this section. That'S why I just went back in y'all and pulled that out and I'm going to put that back up and put the rubber band back on it, but nevertheless um yeah. So everything that's in that ponytail right there will be taped, so we're gon na go ahead and jump straight into it. Now what I forgot to mention you guys these are 22 inch. Tape ends. Okay, so they sent me um. Four bundles of the natural color type ends and they sent me two bundles um or like two little packs of these. 613 tape ends. Okay, so the key to create the Oreo color is you you know you pretty much want to use a majority of your natural color tape is, but you want to throw, and I mean when I say, throw you really got ta, throw those blonde tracks in there To really give off a nice, Blended, Oreo color effect, and I thought this would be super super dope to bring to the channel to show you guys that, yes, you can create, highlights yourself with your tape ins, so you don't have to necessarily go in, and you Know bleach: your tape ends to get highlights. No, you can literally just buy your natural color tape ends and then the splash of colors that you want to do to create your highlights, but um. This is my what third taping video, but I'm going to show you this. For the first time, I'm going to show you how to create the highlighted, Oreo color effect, and this will work with any color, not necessarily just the Oreo color, but just how to create highlights in your tapings period. This is the perfect video for you. So if you want to see that then stay tuned and if you don't still stay tuned because you're gon na learn something anyway and that's some period so nevertheless, as you know, when it comes to tapings, your goal is to sandwich the hair in between um, your Natural hair, so right now, what I'm doing is I'm starting off um, just pulling down little thin sections and I'm just fitting tapes where I feel like they belong like in that first section. I only added one tape and you know what you do to do. The tape. Is you uh peel the uh tape? You stick it a few centimeters. I think I'm using the right measurement here, a few centimeters down from the scalp, and you want to place that tape. Then you want to flip it up comb down any hairs that did not attach to that tape band, and you want to take your second tape in and sandwich that uh tape in that second tape in with the first one, and that's how you get like a Few strands between your two tape ends and that's how you create your tape and sandwich, and you want to give it a nice firm press now, if you are fancy like my like my baby, Jordan, you got that tool yeah. If you can get you that little um taping tool and sandwich and really smash those tapings together to really secure it or if you Army strong, like I am smash it between your fingers or if you want to do a little extra security and don't want to Use your hands: you can also go in with your flat iron and just give it a quick little firm press, okay, but don't let it sit on there. Just a quick little firm press all right and I'm just going to continue to add in tape ends and when the part gets good. When we add the highlights, we would get into that: okay, foreign, okay, y'all. So now it's definitely highlight time period. So we're going to take the 613 blonde track and we're going to do the same exact thing sandwich sandwich place that first tape in flip it up, pull down any hair says detached from your tape. In take your second tape in Sandwich, it tape and secure firm press, a tool, press or flat iron press either way. It must be pressed okay to be secure, so press it really good and voila, and you can literally just throw these 613 tape ends wherever you. Please either way it goes as long as you are adding your natural black, throwing in your splashes of color, everything will blend beautifully, it will highlight beautifully, and it's just like great A's, of course, the board. Okay, like I really had a good time doing this install now another key thing to tape. Ins. Is your tape in placement? Now it's so crazy because it took me like the second half of this install because um this is my third time doing. Tape ends y'all and honestly, every time I continue to do more tape ins, I kind of teach myself something new and that's why I will be adding tape, ends to my booking site soon, but I just want to make sure I really like Master this skill when It comes to placement because, when you um master your placement skills, you give yourself that opportunity to know how to add as many bundles as possible and to make the hair super super full. Okay. So with the technique that I am doing now, as you can see, I first started off going like kind of like in the line, but once I got towards the top and I'm like wait a minute, I don't have to be so organized when it comes to Applying the tapes I can literally just grab sections and I'm gon na, say this grab sections at an angle, because you want the hair to fall towards the face as well, and if you just tape everything straight down like towards the back. None of that hair will really frame the face, so, as you can see, as I get towards the top, I will be angling. My tape ends kind of like I don't want to say in a triangular motion, but I will basically lay them the way I want them to fall if that kind of makes sense. So, of course, for the back tape is you know you lay it straight to the back, but once I got to the side, I angle them to fall sideways at an angle towards the face that way when you pull it up, everything is also seamless as well And you don't have any tapes sticking out out the side or anything like that and of course, y'all know. Once again, we are going in without splashes of color um with that 613, so be very mindful of how you place the tracks when you get towards the front where it's time to find a frame in the face, make sure you lay them at an angle. I will give you more of a close-up when I get you know to that part as well, so you get a better understanding of what I'm saying. But yes, when it comes to tape-ins placement is key. Once you are secured, your um leave out to be seamless with the um. You know rat tail comb method and, if you place them tracks exactly how you need to place it - and you add, as many tapings as the hair can take, I'm telling y'all bomb bomb bomb results and that's just some period, foreign foreign, foreign foreign. Thank you, foreign and y'all. Please excuse the dial over my hands. Y'All know how to be when you're done. Jeff like yes, I wore gloves, because I know I never wear gloves when it comes to color but of course the little splashes and splishes, and you know all I got on my hands so this ain't about my hands, though y'all it's about the tape ends now, When I mentioned uh placement earlier, this is exactly what I'm talking about. So you guys see how just pretty much let go of my uniform routine and now I'm going to place uh the tracks kind of like freestyle, if that makes sense like just placing them where I feel they should go versus being organized with my placement and when I say to frame The Face Place them at an angle, especially towards the front, because, if you think about it, when you place those tracks at an angle and you go to pull your hair to a high ponytail, they will fall diagonally like the same direction. Where you want your high ponytail to fall or to like go, that's exactly how it was smoothly, just align and fall into place when it's time to do your high ponytail. So that's why I'm making these like more diagonal parting areas and I'm applying my tapes that way and then once you lay it down, where is it falling directly towards the face which will give you a more Fuller appearance towards the top? So I like, I said I Let Go That Uniforms, oh straight across around about uh technique and I just said I'm going in for the kill and I'm just gon na grab paste and go grab paste and go so here I am adding um. You know another tape in here and I'm just going to pull and because I feel like it's a little dark over here now. It'S time to add in that splash of highlight of that 613 and I really loved this color y'all like y'all, know. Oreo color is a big thing. That'S popping these days, just any highlights period, but to be able to just see the Magic in creating this look without dying tracks. It'S just like why nobody thought it is sooner. You know what I mean, so it's just like um, I'm just gon na go in like y'all. I'M just really excited about this. Install I'm just gon na go in and just add as many tapes as I can um 613 here natural color there and oh what I forgot to mention y'all. I did dye her natural hair jet black and I did dye uh. The natural color bundles black, as well using the just five dollars same die that I used to dye her hair but um anyways back into the sandwiches um. Putting those highlights together and just placing them where I see fit to create that fall to the face. Look and to add more tape, ins and make it super full foreign, foreign, foreign, foreign, foreign, foreign foreign guys. I just continue to do this all the way till we got to leave out part, and this is all of the tapings up in a ponytail. This is why I say placement is key because now that it's time to unloosen and unravel all the leave out area - and just you know quickly, because you know it was planted up, so we got to press it out real, quick, just like the ends, but when You go to lay your ponytail. It will lay super flat like do y'all see how easily laid those tapings are by itself like super flat, and it looks super full in the middle okay and when you just really go with the flow. So that means the next time I do a taking video y'all. I would literally just instead of that whole straight line. Nonsense. I was doing imma just grab and snap grab and snap grab and snap, and I watch how much Fuller your tables would be. I wish I would have realized that moment that method before I started, but it's okay, we live and we learn and, like I said y'all before I add this crap to my site, we're perfecting so I'm just going to go ahead and, like I said and um Flat iron, all the leave out really quick everything I plotted out the way and I'm going to show y'all how sleek, okay and how seamless this ponytail is, and the ponytail is so pretty with the highlights. Let'S just give a round Applause for this sleigh that we did for today, because I definitely did my big one with this. One definitely did definitely did, and I just love to see the progress in these videos, so yay me clap it up, clap it up, clap it up, drop some hands in the comments, if you feeling it feeling it. But yes, let's go ahead and get this ponytail sleep up, I'm just going to comb it into place! Take that um scrunchie back down! That'S in the middle and just really put the whole thing up in a ponytail foreign foreign and do y'all see how flat and seamless this is like. It'S super super flat exactly what I wanted. A lot of tape ends in the middle and still a super flat. Seamless saw come on now stop playing okay, and this is a quick look, how it looks when she lets her hair down and just a quick look. You know middle part and how the color just Blends so beautiful in the back. Yes, y'all love the Highlight. Look? Okay! Yes! Yes! Yes! Yes! Yes, yes! So now it is time to style, so the style I decided to do today was a little body. Curls middle part and y'all y'all see that Nika Hair is very blunt in the front because, like I said, we did go in and get this hair healthy because it was giving very thin stringy like where's the rest of it. You know, and it's very important that you take care of your natural hair, like I cannot stress this enough to my clients. Y'All see my natural hair full long pretty, and I just encourage y'all to do the same like if you have the opportunity. You know, excuse excusing those who have, like you, know, hair conditions and stuff like that. But if you have the opportunity to really just grow full beautiful, hair y'all just take care of your natural hair and honestly for those who do have alopecia cases or things like that. Um I've been hearing a lot about from my alopecia clients that they do have certain tools and things that they use to um that has been working for them to grow back their hair. So I will share that with you guys in another video, I'm just like to talk about it and show you what my clients, my alopecia clients, recommend, but aside from those type of things and cancer, and whatever like that, if you do have the opportunity y'all, please Take care of your hair and for the tapings look, as you can see like I mentioned Nika Hair is a little blunt. So what I'm going to do is create layers in the front to kind of blend that bluntness out um. I didn't create any layers in the back um, simply because y'all um, I was tired. Just me, just being really honest. Y'All, like we literally been working on this style all day from washing coloring blow drying, cutting and dying the hair and then blow drying like it's. A long lengthy process y'all, so I was just like you know what we're gon na add a little layers to the front and frame the face to frame her face and just to blend in um that bluntness up top, but the bluntness everywhere else, just Blended automatically, Because guess what we filled, that hair up as many tables as we can and out of the six pack of tape ends only had a few strands of blonde left and only one little bundle of the natural colors. So out of six, you can say we use about four and a half four and a half of those. You know tape, ins. So that's really really good that mean I did better this time using way more tape ends, which means I'm improving on my taping installs, but I'm just taking my baby's iron and just quickly curling, the hair back no pin curls like I really would have wanted to Like I said, y'all was getting late and we have been doing this for a while. So I just focused on the most important, but nevertheless I'm just taking my BaByliss iron curling, everything back holding it in my hand for a little bit and then we're going to drop it on down and I'm going to curl up the whole thing and then we're Going to comb it out and finish the look so stay tuned, y'all foreign foreign, foreign, foreign, foreign, everything out calmed it out a little bit. You know finger combed it and now I'm just touching up the top layer. Nika Hair is very like she doesn't have a person there as soon as she walk outside she gon na puff up, and you know really, when you do the tape ends, you don't want to add too too much product in her hair, but definitely when I go In for her touch up, I will add: wax sticks to the top, because you know with that wax stick and then pressing the hair out. It gives you that Sleek shiny hold, but also kind of firms the hair together. If you know what I mean like it gives it like, it makes it stick in a way. So when I do her touch up today - and we do have our family reunion this weekend, so she will be rocking a tape and look um. I will definitely, you know, apply wax stick on the top of her leave out to really make sure it sticks and blend, but just going in with that babyless iron and just curling up until I get a desired look coming it through playing with it, and I See how that cut of Nikka natural hair also gave a nice little layer look towards the top, so I'm feeling that period and um. This is the finishing look. I hope you guys enjoyed this video Nika loved it. She didn't even know what she looked like at this point y'all. So I was just recording but hope y'all enjoyed this video and thank y'all for watching
Comments
lene robotham: I love your videos so informative thanks girl ❤
SimplyAtia91: Yes! You slayed those tape ins!!❤
#MadeInDesignzSlay: Love it. Oreo any combo with black is a WIN WIN!!
Lifesizebarbiestacy: Two videos in one day,what did we do to deserve this
Michele Acea: That’s Great job!
Therealbigmamas: Girl that first part was very much needed love you
QUEEN OF BEAU TV: Omg so cute. I want to try this
Asia Williams: Love this. Can we get a how to take your tape ins out video?
Shica Lovely: How many grams did u use to achieve this amazing look
AngelicDesigns: You definitely snapped!!
Destiny Green: Super cute and the technique is getting better and better
Michele Acea: How long do they last in the hair
Therealbigmamas: yes you definitely did your big one sis
Keisha J: Come through as usual sis. The GOAT
Alisha Shelton: YES MA'AM BEAUTIFUL HUSTLER I LOVE IT POO . THIS IS
Alisha Shelton: This is why you're my favorite
Michele Acea: How many tapes in did u use, was it more than 40 pieces or packs, Bc I would love to order them
Kimberly Smith: Y’all ready let’s go u know our girl shay finna slay sis come to Vegas
Sammy Da Goat: Second Comment Lovely Thumbnail Bomb Hair
ADoseOfKiyaa:
Lucas Lima: Slaay
ADoseOfKiyaa: