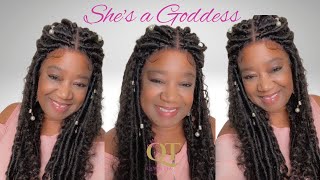
I'M So Shook!! $3 Braided Wig / Zig Zag Conrow Braid / No Frontal Needed
- Posted on 21 September, 2022
- Ponytail Hairstyles
- By Anonymous
Hello Lovelies, in this video is how to make a Zig Zag Conrow Braided Wig using Expression Braid Extension, no Closure wig, no frontal needed .
If you find this video helpful do SUBSCRIBE, LIKE and Comment.
#crochet #braidedwig #braids #ghanabraids #zigzag #realisticbraid
Braided Wig, Crochet Wig Expression Braiding Hair Expression Braiding Extension Braids No Closure Wig Realistic Braided Wig braided wig review Knotless Braided Wig
braided wig, braided wig tutorial, braided wig without closure, braided wig with closure, braided wig with frontal, braided wig styles, braided wig cap, braided wig tutorial with frontal, braided wig cap tutorial, braided wig without lace closure
Wow $2 Distressed Butterfly Locs Using Brazilian Wool
Watch the video to the end to understand every detail..
Don't forget to Subscribe , Like this video and comment..
#passiontwist #distressedlocs #butterflylocs
#curlyhair, #curlycrochet, #curlycrochethair, #lowcutwig, #naturallowcutwig, #kinkyhair, #naturalhair, #4chair, #howtomake, #beauty, #hairhacks, #bangs, #naturallowcutwig, #howtomakelowcutwig, #mizsandy, #multiwig, #kinkycurls, #curlyhairstyles
check out my other videos:
Sleek Long Braided Low Ponytail / Easy Protective Hairstyle:
DIY Curly Crochet Hair using Expression Braiding Hair // Game Changer#braids
I'm So Shook !! $2 Spring Twist using Brazilian Wool for Passion Twist / Distressed Locs
HOW TO MAKE CURLY CROCHET WIG USING BRAZILIAN WOOL / Curly Hair
how to take kinky curls using crochet braids extensions, diy crochet distressed locs, diy distressed faux locs crochet, diy crochet distressed faux locs, diy distressed faux locs no conrows, diy crochet distressed locs with xpression hair, diy distressed locs with braiding hair, how to distressed locs with kanekalon hair, how to crochet distressed locs, Miz Sandy passion twists, how to crochet distressed locs with kanekalon hair , How to make crochets curls from xpression attachments with flexi rods, How to make crochet curls, cheap crochet curls, using xpression attachments to make crochet curls, xpression attachments, How to Curl Xpression Attachment for Crochet Braids and Wig, how to make your own crochet curls using super star or xpression attachement, how to make your own crochet braids using super star or xpression attachments, how to, how to make crochet curls with xpression attachement, crochet braids
-~-~~-~~~-~~-~-
Please watch: "DIY Ponytail Extension without Sewing Machine // Ponytail Wig // Clip in Extensions"
https://www.youtube.com/watch?v=75GuGe...
-~-~~-~~~-~~-~-
Found the dust I was born, hello, lovelies, welcome back to my channel. She got me Sandy and today's video, I'm gon na, be showing you how to achieve this zigzag all back. Full lace, cornrow wig all by yourself, without um, using any form of without ventilating, any um closure, or should I say, full lace Nest like you, don't have to waste like two weeks to ventilate um, the full lace net in order to cornrow eat. I'M gon na be showing you this step by step metal, because this really helps me. I didn't have to experience all those um back pains and all of that when ventilating. This is the simplest and easiest way to achieve a six.com rule. I call this a low budget week, especially for those that can't really afford a fancy, because I can't really afford to buy the full lace net, so this is for you. This is something that you love to watch so make sure to hit the notification Bell. So, let's get updated when I post new videos, so what I'm basically doing here is taking out the measurements that I needed because, as you know, there are different types of zigzag. They have the tiny ones that they have the big ones. So I'm actually doing the big one actually so because I want my zigzag to be in the middle and then one at the left side and one at the right side. I'M basically just you know, taking my measurements and making sure that it is same with the other parts it just. It all depends on what you really want. So that's it's very important for you to know what you really want and then you can take your measurements. Just make sure that whatever measurement you're taking you're slanting it all the way back like the Arduino cuff section so overall, this is what I was able to do using this method like this really didn't really take me time at all, so I'm gon na be showing You in a bit how I was able to achieve this so just keep on watching, while I give you a run through so the first thing you need to do is um just to ventilate, like so so you're just going to take out little portions like two Strands of um hair, I'm actually using an attachment for this, because I, like I said in the previous, like I said earlier on, this is a low budget week, so this is for those that currently afford they're very expensive kind of weak. So it's going to ventilate like so like in a straight line just like so and then this is just so that you can have that um natural hairline kind of look from the start so yeah. I know you might be asking like um, because I had to weave it all the way back. This is just so that I can have my cornrows in place before adding and before adding the braid to it, so I'm just going to ventilate and then weave it. Just like, when you want to do your box braids and then you cut, you will ventilate it and then you hold it in place. That'S basically what I'm doing for this one also I'm also ventilating, and then after that, I'm gon na weave it in place and when I'm ready to um attach the the braiding extension to it. I would lose it and then stab it and start weaving all the way through like that. So that's reason why I was weaving the other parts like you can see so yeah. You just want to do like a box kind of braid like a boss kind of um pattern for this, because this is a zigzag, but the only difference is that this is actually longer compared to the box braids. So you just want to do a box pattern. Like so and then afterwards, we are going to to be filling the inner parts with just few strands of hair like very, very easy, just few strands away, and you should be so surprised that, at the end of the day, the hair will be looking as though You spent like hours and hours of of time. Ventilation just be sure that if you want to sell this, do make sure that your clients are aware that this is not fully ventilated and, like I said I call it a low budget week. So you need to make sure that they actually know what they are buying like don't sell this to somebody and then claim that this is a full lace. Well, ventilated, no make sure that you tell them okay. This is just a low budget, wig not fully ventilated and also it um it's made with attachment so that your customer can actually be aware of what they are buying, because this is business and you don't want to just ruin your business just because you want to Make money that's great, so yeah! This is basically what I did so you'll be so surprised you can see from the standard video how they turn out. Look like so yeah just follow this mentored and be sure that you already have a pattern. That is why I was taking my measurements and because I know the pattern that I wanted, so I make sure that I took my measurements and I use pencil to just draw out the lines. So when you do your box kind of pattern, you just fill out the inner part, we just few strands of hair and she will act good to go if this is something that you found very interesting, do make sure to give this video a huge thumbs up, Because if this helps my video to get um out there to a lot of people, that would be needing it so do make sure to give this video a huge Thumbs Up And subscribe. If you haven't subscribed and yeah I'm just gon na, let you guys keep watching this video and let me know what you think at the end of this video and yeah guys just keep on watching. So for the other kind of pattern, which is the old back. You just want to do like three lines, one at the left and one at the middle and then one at the right like so so that is basically what I did over here. So after that, you just weave it all the way down and yeah very, very easy, so yeah, I'm just going to um comb it first before weaving. It'S all the way back, so just keep on watching guys. I feel like this method is actually quite easy and um. Then it makes it easy to like rock any kind of hairstyle without having to stress or without having to go through. Much of should, I say, pain because it's really not easy. Ventilating, I'm gon na be honest with you all. It'S not easy. Paints lazy, but the end result is always super super amazing. So we tend to do these hairstyles, even if it is stressful, so yeah. This is basically what I am doing for the old back, like I said, like a box kind of section, but then um, it's not really a boss kind of section but you're just using that strategy. So that's why I'm still seeing that word box kind of pattern. So that you can basically understand how to do this, so I'm just going to do that all the way back before we've been like, you can see how this is already looking like very, very nice, so yeah, let me just let you guys to keep on watching. I Will Survive found the dust I was born to the dirt. I shall return when my eyes are closed in the shadows, but so now that we are done, I'm gon na be using a super braid um expression for this color one for this and then I um inside. We have um two strands. Two should I say, two strands yeah two packs inside I don't even understand, but those are actually cutting into fabric know what I mean. So you don't just want to take one part and divide into two and then I cut one part into four and the other part into into three just and then I did that for the second part of the braiding extension so yeah. Before doing this, I use the shea butter on my hand, just so that my hand can be silky while I am leaving it. So I'm just gon na bring out the sections that I need for this um braid and then I'm gon na read the first side. First, like as though I'm doing a kind of now, even the first part, and then I'm adding the extension, but though this is not the kind of even method um. This is just like a feeding, I'm using a feeding method for this braids. So I'm just like weaving it and then adding extensions to it like so if it was a Ghana weaving, I wouldn't have to take this. The other part like so to this side. So that is why I call it a feeding method. So this is the method. I'M using for this pattern, so I'm just going to do this for every other um braid section, so guys just keep on watching foreign, my soul rise from the darkness, I'm afraid like this, I was born into the dirt. I shall return when my eyes are closed. In the shadows, my enemies will think they won, but I'm here to stay Destiny will overcome, though, are you not afraid my soul rise from the darkness but I'm afraid all the pain, all the hurt, all the lessons, I'm here to stay Destiny you will overcome so Overall, this is how the hair is looking, so I'm just gon na braid the other parts of the cornrow, so that you can see the final result so guys just keep on watching. Oh yeah. This is named, look see how beautiful this is looking as though it was fully ventilated, so this is a tracheal. This is the trick. I hope you guys love this video. If you found this, video very helpful do make sure to give it a huge thumbs up, because this helps me a lot honestly so do give it a huge Thumbs Up And subscribe if you haven't subscribed so that you can get updated when I post new videos. So I went ahead to add in some baby hairs with human hair and just to make sure that this looks very natural. So I'm really not gon na wear this because I made this for Earth clients, so I'm not gon na wear this so yeah um. Thank you guys for watching this video, so I'm just gon na put this in my other mannequin, so that you can actually see the real Beauty, because this is amazing - and this fits very well trust me. It fits very well so yeah. This is how it's looking like this hair is above. This is how it is looking and I'm super excited for this result, and that is all for this video. Thank you guys for watching up. To this extent, you guys are super amazing. Thank you so so much and I'll see you in my next video and trust me do give this video a huge thumbs up and hit the notification Bells get updated because I'm gon na be bringing you guys more and more videos. Thank you guys. Bye,

Comments
Eureca Tv: Beautiful
Maria Akamu: Beautiful well done like it