Diy How To Make Curly Ponytail Wig Using Expression Hair
- Posted on 16 April, 2021
- Ponytail Hairstyles
- By Anonymous
DIY how to make curly ponytail wig using expression hair #ponytailwig #expression #wigs #diywig
Hello guys, hope you all enjoy the video, please subscribe,comment, thumbs up, drop down your questions and contribution in the comments section
Material used
Wig cap
Crochet hook big
Expression hair
Scissors
Brush
Mannequin head
Thanks for watching
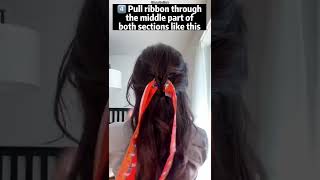
Me all right guys, welcome again today, we'll be doing a diy drugstore ponytail week, yeah, that's as the next i'll be using it's gon na, be my recap for the day: yeah! That'S how it's looking. It has big her hole. This is my crochet hook and um. I'M just putting on kind of replacing on the net on my monkey head. As you can see here, that's how the neck is looking on the head. I won't be needing all the excess, but i'm needing just the center part, as you can see here. That'S what i'm doing so yeah this is the attachment i'll be using and i'm i already did the attachment of camera, so i'm just starting to crochet round and round and round to get the bonito look. Oh yeah! That'S how i crochet. If you check my previous video, you see that it was well, it was well explained about the color, but i'll be showing you guys here as well. So just tell me and keep watching how i crochet first on first, you pass the hook. Then you put in your attachment, then you pass it out close it. After closing the hook you pass it out, then you remove the hook before i remove the hook, then put in your two finger and then tie it just like this. You pass the hook put in your attachment, close draw out and tie so yeah. This is what i've been doing. I'M gon na repeat the game. You pass the hook put in your attachment, close the hook, pull out, use your two fingers and tie to secure it down. So it's just that easy. If you can do this, you can do a lot of it so yeah. This is how you keep doing. Keep going on and on pass it between your attachments, close the hook, remove it put in your two fingers and then tie just squash. It see i'm just going round and round and round just to get the center part. As you can see, it's already looking food. I don't want it to be really really full. I just want something light because i've been using a lot of full uh full weeks on my head lately, so this time around, i just want to go for something light, so yeah, i'm just adding and adding, and i think we use all the attachments - though i Just use a half um half part of it, so yeah just going round and round crocheting and tying round around crocheting and dying. That'S what i've been doing until you get to my desired um desired my desired way: the desired way. I want it so yeah and then i brush it. I brush out the excess, the tangle part i just brush it out, so it's gon na help me like split braid it down. This is another style. Another way of achieving my core is, i don't know. I got this one uh watercolors, i don't know about you, but yeah. There'S another way of achieving my curries i brush out. I cut out a little bit quantity from i cut it into three parts, and then i braid it down for those that are looking forward to learning how to braid you cut it out in the tree pad you hold one on your right hold one on your Left then you pass the one on your right to your left. You bring the one, oh i don't know how to explain it. Hopefully just make sure you pay attention to the video it's going to help. You learn so yeah, i'm just bringing it down down down down. Actually, this is not attack, it's not a loose braid. It is a very, very tight braid to get my desired coils after i put it into the hot water. It'S going to lose me so yeah. It'S just going to flick it to be very, very tight and not straight yeah. You plate it down so that length of the attachment yeah. This length is okay for me because i'm not packing, i'm not doing my gear, even if i want to pack it up or put it down. The length is just going to be a moderate and i leave it away. It'S not gon na lose because i already did my attachment in a proper way. I want to show you a closer look on how i braid for those beginnings. Looking for how to break this is a closer look on how i do mine first of all. Oh, i passed the left one to the right hand. Then i hold the right hand the left eye. Oh my god, i don't know how to sleep. This, please just be attention to the video. Don'T worry me, i'm not the youtuber just pay attention to the video. Please yeah: that's how you're gon na keep passing and keep passing and you're going down. Please pay attention yeah. I have to bring you more closer look, you're, passing and passing and breathing keep braiding. As you can see, the braid is looking tight, really really tight, because you can see all my veins are all coming out on my head, so yeah you're gon na keep braiding it tight yeah and look at how neat it's looking hold the hair tight to achieve This kind of braid, simple, i don't try, make i got the money every i want to touch anybody. Your package then go call you honey, china, you don't see your baby, make your shake in your back me yeah guys. This is uh. Already five of the braid. I did and i'm gon na make the last one i didn't make it too big. I didn't make it too small. I just made it. I didn't meet you at the video size. It says that i want you to like have it on. I know hard to. I don't know what to say anyway. I just made it an immediate side, so it's going to have its own coins like because it's going to be much more. I mean it's too big that nikoi is going to come a bit big like bigger coins, but yeah. This is this is the way i want it to be to actually give you that good point we just keep on breathing. This is the last one to make it we are done. This is my braid yeah. That is so now you get a boy hot water. You put in your conditioner, put your boiled water into your bowl into your bucket anything that makes you it's okay, for you anything you have yeah! You pour it into your bucket mix, the hot sugar together, don't yeah! You can leave it for at least 20 to 30 seconds yeah keep stirring it. You don't want my and then when it's okay for 20 to 30 minutes, you lift it up. You dry. First of all, you dry the excess water using your towel, and then you dry, it with your hand dryer or you use your sun, nothing else so after which it dried mine wasn't fully dried though, but after which it's like you can now lose in there. Doesn'T the kois so yeah losing the cards as you can see here, it's really looking good yeah. You separate the brush from each other you're losing your braid. That'S pretty neat yay! Oh my god! I'M loving it! I love it loving it! I'M loving it so yeah! You just keep on listening. Let'S look loose, let's move! Oh look at my braid now you can see right. My bread is ready. Oh don't mind me, my bread is already um loose. You can still take the video backwards, just check out my braid, the braid. That was tightened before so yeah. This is how my voice is looking what's happening secretly forget a fuller choice. It'S just what i wanted to look like so yeah you guys thank you so much for staying with me the end of this video anyway. It'S not ended yet so yeah, let's have a look and now and now to um get the um ribbon on the robot to help that was gon na help me like hold my head together. I just had to cut out this rubber from the cap and then fold pick up together like the excess part. I fold it in and then cause that point yeah. This is going to help me hold my ponytail and you start fixing it excess space on the cab and then bringing it out, fixing it and you're going to do it around keep going fixing the robot. This is just an easy way to achieve that. Really! Wait. Look at this is the space your hair is gon na go into so yeah. This is how i do mine. So thank you guys for watching. I hope you learned something from it. Please don't forget to subscribe like and share my next video bye,


Comments
Mizz NitaBoo & Lyfe N' Stuff: This is beautiful and creative sis!
Local Barbie: We keep learning thanks ma'am
Ami's Tv: Beautiful work done ✔
Nora Danvas: Yeah ✌✌ another hack thanks ma, please how long does it last ?
HAIRSTYLES TREND: Nice job Queen, God bless ur hands
Alex Eze: This is another best @mimi nice