How To: Low Braidless Crochet Ponytail | Freetress Water Wave | Crochet Styles
- Posted on 24 December, 2020
- Ponytail Hairstyles
- By Anonymous
Welcome Back FRObaes! #crochetpony #braidlesscrocnet #vlogmas
We are back with another Christmas holiday hairstyle. I wanted to give you guys some thing that would be quick and still cute. This ponytail was done in about 45 minutes. But, I’m going to walk you through making a ponytail, and creating the entire world. Thank you so much for your support and let’s get to 1K! Also, have a very very very merry Christmas and happy new year!
This video is NOT sponsored.
Here’s the Amazon link: https://www.amazon.com/Passion-Bohemia...
Feel free to follow me on Instagram! @itsfrostrated
_____________________________________________________________________
New to FROstrated? Catch up HERE:⤵️⤵️⤵️
WELCOME TO YOUTUBE : https://youtu.be/lnScfPZjaLo
DIY POROSITY TEST:https://youtu.be/Ybzro-Mhdks
GET TO KNOW ME: https://youtu.be/jiF7fbvuL2o
WASH DAY: https://youtu.be/wBap2g0YUtA
_____________________________________________________________________
Follow the FRObae for the latest!! ⤵️⤵️⤵️
IG: https://www.instagram.com/itsfrostrate...
TWITTER: https://mobile.twitter.com/Itsfrostrat...
GMAIL: [email protected]
_________________________________________________________________
Make sure you SUBSCRIBE, FOLLOW AND JOIN THE FROSTRATED FAM!!
For collabs/inquiries, contact:
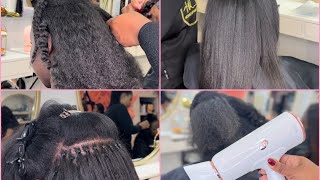
Welcome back to the channel, if you are new here hi my name is tyler. This is frustrated the channel now back to business um. I am here to give you guys a quick or semi-quick hairstyle for the holidays. That, i think, will be perfect for your last minute, like holiday photos or a christmas party, or something cute, that you want to be quick, but not do too much. This is a perfect hairstyle for that. I am actually going to do this in reverse, so i'm going to do the ponytail first, because i think that is going to be uh, the main star of the show and then we're going to actually style my hair and add the ponytail. After so for your ingredients or products and tools that you're going to use for this style for hair, i am using the freetress water wave, braiding, hair, crochet and latch hook. That'S very important because there are two different types: i'm using this one um. That makes it a little bit easier for you to crochet in this case we're not using a crochet needle at all, but um you can use either or i think it's just easier in terms of actually taking the hair. Apart with the crochet and latch hook, water wave, hair versus the one, that's not if that makes sense, um you're gon na need some scissors grab yourself, some scissors, just in case you're, looking for a tease, look or uh even look at on your ends, of course, To take all the tags and stuff off of the crochet hair or whatever hair you're using um and of course, i always recommend um a bow for your crochet hair ponytail, something that's very, very stretchy. That'S going to stretch beyond your hair, but we'll get to that. In a minute me go ahead and grab those and come back and then we're gon na get started. Okay, now that we have everything, i am going to show you guys how i actually create this. So what you do take your non-dominant hand. For me, it's going to be my right hand, because i am a lefty shout out to the lefties out there. Um and you're gon na place your hand out, like you, are serving food or asking for money. Um take a a piece of your hair, whatever hair that you're wanting to use and if you're new to this, do it one at a time until you get the gist or the flow of things, but literally lay the hair right on top of your palm and Allow the hair to kind of dangle on your arm. This essentially is going to be the ponytail. This is going to be where you're going to place your bow, but we'll get to that in a minute so again hand out, like you're um, asking for something or saying come here and allow the hair, whatever hair, that you're using to kind of cradle. On top of your palm and what you're going to actually do is add hair, just like this to your palm, the bet, the bigger the hair, the harder it might be, or you might need a bigger bow, the smaller the hair, the better in terms of covering Up your actual ponytail that you're going to use with your hair so again um with my hair, it's a little tangly! So forgive me all, but take the crochet hair and place it right over your palm. That way, whatever um hair is left is dangling just do that until you get the uh the consistency or the thickness or fullness of whatever ponytail that you're using or you're doing. For me, i want this to be big, so i'm going to use as much hair as i can. You can also use less hair and fluff it out if you do if you decide to, but i like big hair, so this is gon na, be a big ponytail for me, but that's what i'm gon na do until i get to the point where i feel Like it's enough hair for me to cover whatever ponytail, we decide to do, okay guys, so this is uh how much hair i'm deciding to use um for this ponytail, keep in mind guys. It'S still in my palm and i'm kind of um doing my hand like this, because i'm kind of prepping it for it to kind of come together for the ponytail that we're about to do here is a little trick. Um, when you flip your hands like this, you can kind of see what your ponytail is going to look like in terms of how thick is going to be how big is going to be, and if you feel like it's not thick enough or is too thick, You can just take away or add two, but this next step is the most important step. If you don't do this next step, you are not doing the ponytail so um. It'S important, like i said now where in the world is my hole, please i find it funny that every time i try to do something my bow decides to fall on the floor, but anyway, um you're, going to take your bow, i'm going to turn this way. So y'all can see it. Take your bow and tuck it underneath your ponytail. That way it's like sitting on the opposite side. You have some of the ponytail holder here and some of it here i'll wait. So y'all can do it, i'm gon na. Do it again? Take this don't do anything to it, yet all i need you to do is put it underneath your hair that you have in your palm scoot it under need the palm of your hair right, so just tuck it and then leave a piece of the ponytail holder On each end of the crochet crochet, the crochet hair, that you have in your hand, once you do that, i want you to take your dominant hand, the one that you don't know how to do anything. Do everything with um and connect or bring both ends of the ponytail holder together and then take this hand and pull down right, pull it down so that your ponytail holder or your ponytail bow whatever you want to call it, and your crochet hair are separating like So, oh my arm. Okay, so i'm switch hands um, but you want to make sure that you have room between your crochet hair and the ponytail holder or bow um whatever one you want to go now that you have done that your ponytail should start to come together. What you want to do is take either side the left or the right of the ponytail holder and go underneath and do that again underneath, like so underneath the ponytail holder and pull it up so go underneath, grab the inside like so and pull up pull up. So that the right side, in my case or whatever you tucked under, is placed right on top of the crochet hair, and this is going to be your bow that you add on to your ponytail, to create the crochet pony. If you did not get that, i asked that you just you, know rewind it about 30 seconds, because at this point i don't think i can undo it and that's just me to be honest. This is the crochet pony now it's time to do to do this part, so it looks clean like this part, all right guys, let's jump right in okay, so uh as you can tell. I also want to come on here and tell you guys. My hair is blow-dried and it's sort of semi-straight. If you watch my revlon one styler dryer brush review, you saw that i like clearly blow dried, my hair and it was washed and everything. So this is. This style is coming from a blow dried, um style, hair. Whatever so i'm gon na take this down, i am trying not to add too much product to it, because i literally just washed it, so i don't want to stack on all these products if i don't necessarily have to i'm gon na walk you guys through this Um process as well, i said i was gon na. Do a voiceover but um yeah i'd be noticing i'd be sounding. Like barry white, i sound like barry white anyway, but um. I just know the voice change, be scaring some people because it'd be scaring me. Sometimes yeah guys um. Oh, i don't like that. My hair a little crusty crazy that the moment i take my hair down. My lighting changed like it was crazy but um. I actually prefer this lighting, so i am going to show you guys, the ponytail so that you can kind of see um the color on my hair right and then you can see like a little hint of the brown, which is obviously not my color. But i had to make it work. I am showing you guys this again, because the lighting literally changed when i took my hair down. So this is what it's going to look like in terms of color. Okay, so guys, if y'all have ever seen me see me attempt to do a middle part. Y'All already know how this goes. I usually start from the nose, and i work my way up and it's usually never straight so um do what's best for you do what works for you because my middle part be looking like a driveway and it's okay. It'S all right because guess what um the hairstyle be cute at the end of the day to me, you know what i'm saying talking about as soon as i get to the middle, that's when they start to go both ways like it's a median or something, and I just be one all right. No, that's not straight. Let me let me try it again. Oh y'all thought i wasn't gon na show y'all the many attempts. Please like people don't be doing this. That'S why i'm doing it because the middle part don't be right. The first time you gon na need to do it about five six, seven twelve times, that's just the t um, but y'all ready for the holidays. I mean, let's talk. Let me let's, let's talk since we're here since since y'all, looking at the middle of my head, y'all might as well: okay, okay, so um! I'M gon na fly by this a little bit guys because this process took a lot longer than it should have. But i'm going to be adding water gel a couple of brushes and some clips, because i cannot do both sides at a time. I have to do one at a time. This ponytail will not be perfect. Why? Because it's for demonstration purposes, but i do want y'all to get the gist of how i get my hair back and being that the ponytail that i'm putting on is kind of big. It makes sense for my hair to be big, so i'm not trying to do like all the way to the scalp. That makes sense so, as you can see, i kind of made my hair sort of tolerable for this ponytail. It'S still humpty dumpty, but i'm totally. Okay with that, you don't have to do that. Just of course, brush a little bit harder apply a little bit more product. Do whatever works for you to get that real, real slick slick back. Look i'm not trying to do that! I'M just trying to get my hair into a ponytail to make this look as natural as possible. So here's what i do to make sure that my hair is sort of not visible in the back being that my hair so thick. I have found that me putting my hair into two or three smaller braids and then kind of wrapping them around into a bun makes my hair a little bit smaller versus kind of just twisting it as if i were doing a bantu knot. So that's what you see me doing here. I am just making two braids. Yes, the braids are big, but the bun ends up being a little bit smaller than a regular bun that i would do without adding braids or twists. So once i braid my hair all the way down, this does not have to be a tight braid. You do need to make sure it's tight enough so that it does not unravel while your ponytail sits on top. I'M just going to circle, not circle, but you know rotate my braids around, so that i formulate a bun and then put a bow around that just to secure it all right. Let'S tap back in okay, so i'm giving y'all very much gi, jane right now! Um! Oh yeah, so you take ponytail right and you put it on right. That'S why it's important for the ponytail holder to stretch, because you want to stretch it turn. It add it on and then flip it around. So now you essentially have a ponytail right, but most people will go okay. Well, that's just a ponytail attached to your hair. Well, you can do two things you can go around and make sure that it's completely covered and what i do is add or take either a piece of the hair. I probably won't do that, but take a piece of the hair that you have attached and wrap it around, so that the hair is secure and it also shows the continuation of the style. If i was to throw it on this side, she covered right, throw it on this side boom she covered again. You can see a little bit underneath but, like i said you rotate the ponytail until it's completely covered and if you want it to stay in that certain place where everything in terms of your bun is not seen, you add a bow where it sits. That way, you can still move the bottom half, but the top half might be a little stationary. If that's what you prefer, this is how long it is guys like i said i haven't fluffed this out all the way like i want to yet because of course, my hair is um like semi-straight, and then this hair is like super curly, so i'm gon na Flip it out to my liking, you'll see it obviously um when we either start the video or, if i close it out or whatever else i have to do it. Oh guys. This is the look for right now. I'M gon na give y'all makeup and i'll. Let y'all know how i do um i'm gon na give y'all a visual, but this is how we looking right now, all right guys. I mean i hope i um i'm gon na close out this video actually, but i hope i helped y'all. Also when you pull your hair to the side, please make sure that the hair is still covering, which is why i said it's probably best to add. Like a ponytail holder or a piece of the hair that you're using around the base of the ponytail, so that when you move it to the side, um the middle slash end of the ponytail will cover the bun. Even when you pull it to the side see, i would normally wear it like this right, but if somebody is walking from behind you, they gon na see your bun with this ponytail on the side, so just make sure that it's covered in a way where it Looks like it's coming from your head, but honestly guys who looking at clothes and, if they're, looking that close, just give them a little elbow all right, y'all um! Let me fluff this out. Let me give y'all some visuals and then um yeah period. All right, i told y'all i'm giving y'all visuals. Okay, hello lighting had to be fixed, because why we don't we do not need to miss when it comes to giving visuals no seriously um. Thank you guys so much for watching um. This is the final look and visual if you guys enjoyed this video, give me a thumbs up and let me know how you feel about it in the comments. If you want to see more hairstyles like this or give me some suggestions, even for the rest of this month, as you guys know, my goal is to have a thousand subscribers by january 1.. I'M not there yet, but we are well on our way. Um and like i said guys, i appreciate you guys so much for watching give me a thumbs up. Let me know what you think in the comments and, of course, i will see you guys in the next vlogmas video happy holidays enjoy
Comments
TClarke Lubrun: That came out too cute. I will definitely be trying this. Love how you braided your hair 1st before you put it on.
Shatoya Mariee: Okay! This method is way easier than trying to wrap wefts
ShaniceAlisha: Yesssss ponytail Girl, you had me hollering between Barry White and that middle part being a driveway
NaturallyLaceyE: Girl it came out cute
Sahara Smith: Come through Ponyiana!!
LaRonn Jackson: That lion's mane!!
Emily C: Yes, G.I. Jane!!