Indique Hair Review: Remix Blow-Out Clip-Ins + Remix Organic Curl Ponytail | Styling Guide
- Posted on 22 January, 2021
- Ponytail Hairstyles
- By Anonymous
#indique #clipinextensions #hairextensions
Indique Virgin Hair Extensions sent me the Remix Blow-Out Clip-Ins and the Remix Organic Curl Ponytail Extension to review! I love how quick and easy to use both of these are! I'm showing you how to prepare the Remix Blow-Out Clip-Ins and Remix Organic Curl Ponytail for installation and a few easy styles to try! These are definitely going to be in heavy rotation for me! Full details on these products are on the blog:
https://www.vanessaherring.com/indique...
https://www.vanessaherring.com/indique...
ARE YOU SUBSCRIBED? BE A PART OF THIS BEAUTY COMMUNITY... YOU'LL LOVE IT HERE : http://bit.ly/36ZF4m3
⭐SOCIAL⭐
Instagram: https://bit.ly/3jAalBd
Facebook: http://bit.ly/3q5EQkY
Twitter: https://bit.ly/2NfMhHS
Blog: http://bit.ly/3pZUaiZ
0:00 Start
0:21 Remix is Indique's Most Affordable Collection
1:51 Unboxing + First Impressions
5:20 Preparing Indique Remix Extensions for Installation
8:38 Five Ways to Style Indique Remix Blow-Out Clip-In Extensions
14:45 Three Ways to Style the Remix Organic Curl Ponytail
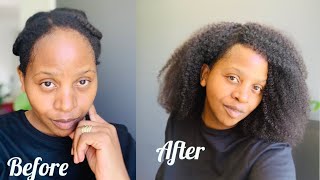
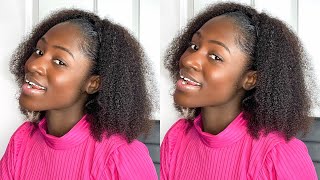
Hey there welcome back to my channel this video is brought to you by antique virgin hair extensions and they were kind enough to send me some two new products from their remix collection to review. So they sent me the 22 inch blowout clip-ins and the 22-inch organic curl ponytail. First, i'm going to tell you a little bit about the remix collection and explain why the price point is lower than some of indic's other collections. So for indeed's other collections, the hair is hand drawn, which means piece by piece. Someone is making sure that all of the hair is facing the same direction. Any piece that's out of place is set aside now for the remix line. All of that hair. That has been set aside is run through a machine that machine makes sure that all of those strands are facing the same direction. So it places them in the right order to prevent tangling. So because a machine is used and the hair, that's in the bundles has been repurposed. The bundles are dyed to a 1b color, so it's still human hair, but the labor process is less intensive. So therefore, and able to offer this collection at a lower price point. One thing to keep in mind because the hair is dyed to that 1b color. It is going to be a little bit darker than their virgin lines, which is not dyed at all and because the hair is dyed and does not recommend dyeing this hair at home. I know i could not lift color and lighten it on my own without it being a disaster, so uh unless you're a professional, and you know how to do that - then have at it. But if it's not something that you're used to doing, then you probably should leave it to a professional. So now we're gon na go back in time to a day earlier, when i received the package at home, so you can see how it looked when it first arrived. So i just blow dry, my hair and if you haven't seen that video make sure that you check that one out and my indeed package arrived. So this could have come at a better time and i wanted to show you what it looks like straight out of the pouch. I haven't opened it yet. So this is the remix clip in in the blowout texture and it comes in a little hair net with a little tag on it. That tells you exactly what's inside and here it is, and i can already tell like with this texture, it's going to blend nicely. Now the color is a little different, but i'm not too concerned about that, but the texture it seems spot on. So it's tied with a ribbon and you can see the clips are all here to keep it all nice and neat, always with any extensions before i put them in i wash them. So i am going to wash these and we'll see how that goes, but i'm not expecting any issues and there's also a zip tie here which is going to keep it nice and neat. So i'm going to leave the zip tie on when i wash just to keep everything together, but here's how it looks and so far i'm really loving this length. I think it's going to give some nice drama. Let me come up a little bit, but you can see how long oh, we're gon na get a little fancy. Okay and also we have got in the second package, the organic curl ponytail in 22 inches. This one also is inside of a hair net. So i'm going to take it out of the net, i'm opening the wrong part of the net, here's the opening of the net okay. So let's get it out of this hair net and here's what it looks like fresh out, there's a little paper in here. I think just to keep everything you know nice when you get it, there's a comb and then this is a drawstring. So we've got this drawstring part here. So that's how you're going to secure it with the comb and the drawstring and again a nice little tag telling you what this is. This is a 22 inch ponytail and i'm just gon na brush this out, so i'm using just a paddle brush instead of starting it at the top. I'M going to start the ends like i do with my own hair and brush it out. Then i'm just going to take my fingers. I don't want to brush it out too much because i don't want the curls to be like too too brushed out. So now. I'M just going to take my fingers and continue separating and, of course you can do this to your liking. So far, though, i mean there's a tiny bit of tangling, but i think that's to be expected with any curly hair. But it's not like looking wow. It'S not shedding a whole lot. It'S not like. I can't run my fingers through it so so far, so good here is how the organic curl ponytail looks now that i have fluffed it and separated the curls. So one note about this hair, as you saw a day earlier, i started to finger comb it that is not the best method to fluff this hair i've used index pure curly before and that method works well for that hair. But this hair is different, of course, so it needs a little bit different love. If you need to wear this straight out of the package right away, i would recommend pulling the curls apart one by one. I know it seems like a lot, but that's going to be the best way to minimize any shedding. So what i mean, is you see here how the curls are just pulling them apart? So taking it with your finger and separating it like that, i usually don't wash ponytails just because they're, not co-mingling with my hair and they're, you know meant to be kind of like a quick and easy style, but this hair actually loves water. So after i separated it a bit, i thought hmm, it looks a little frizzy, so i sprayed it down with some water and it was much easier to run my fingers through when it was wet. So if you're able to wait a couple hours, i think the drying time was about two and a half to three hours: go ahead and spray it down and then separate the curls with your fingers and then let it dry. So i think that would be the best method if you really really want to minimize the shedding. But if you don't have the time to wet it and wait for it to dry, then going through piece by piece should work. Another tip as you separate the curls. If you are doing it, you know kind of piece by piece, because this hair is dyed. Some of that dye can transfer to your fingers. So if you've got a manicure that you want to save, you might want to put on some gloves or protect your fingertips in some way to prevent messing up your manicure. I just want to let you know. I do think it looks really great now that it's fluffed up it has a really nice amount of volume and bounce, and so i can't wait to show you how to install this. I did wash the clip-ins because they are going to co-mingle with my hair and, as you can see, some of that dye does wash out a bit when you are washing them for the first time the clip-ins come in ten pieces and you get five different sizes. So you get two pieces of each size and here's how they look after they've been washed and dried, and with this hair i did not notice really any shedding. So this one she had a lot less shedding than the curly ponytail, which i think is to be expected. I think anytime, i get curly hair, there's some shedding it's inevitable, so i would expect some shedding with curly and minimal. Shedding was straight and that's exactly what i got and these wefts are pretty thin. You can see like how thin and flexible they are and they are sewn onto kind of a lace here, so you can see the lace going across where the clip is so. I think that they're going to blend really really nicely and camouflage well into my hair, because these clippings are 22 inches. They have 5.3 ounces of hair. If you choose to get 14 inch, clip ins they're going to have 4.5 ounces of hair. So now we're going to get into the styling, i'm going to show you five different ways to style these clip-ins. Our first style is half up half down start by using a comb to part your hair into two sections, secure the top section with a clip and then using a comb separate a small section near the bottom. Leave it out and secure the rest of the bottom section with a clip you want to use a clip in that fits the width of that section and snap. It into place repeat the process until the bottom section is finished and then secure that section with a clip or ponytail holder, now repeat that process for the top section and when the top is complete, gather the hair into a ponytail. Take a small section and wrap it around the ponytail holder for a really sleek look. I think that these blend really really nicely with my hair. Like you see, i didn't put any heat in my hair and you can't really tell the only difference really for me is the color, but i think they blend pretty well. Like i'm pretty impressed, i used all but one of the clip-in pieces for this style just because i couldn't really fit it in my head, but i mean if you can fit it in your head, be my guest but yeah first style. So far i'm impressed - and you can see that was pretty simple, especially given that i didn't have to do anything to my hair to make it blend with this hair to switch this up for a top knot. Leave the clip-ins in the front alone secure that section with a ponytail holder or a clip install the clip-ins on the bottom section facing the opposite direction. This is going to help the hair lay flat when you pull it into a high ponytail, secure the ponytail and then twist the hair around tightly to create a top knot, secure the ends with bobby pins. So this is the second style again pretty easy to do. I left the clip-ins that were in the front exactly as they were and in the back of course, as you saw, i just changed the direction and a top knot is a great casual style. I don't think the top knot trend is going anywhere and you can see in the back just how seamless these clip-ins are. You can't even tell that there's anything there now, of course, if i was actually going to wear this out, i would kind of slick down my hair, a little more and probably hairspray this little piece at the top, but because we're switching up a lot of different Styles today, i'm not going to do that, but you get the idea. Our third style is super easy we're going to leave the hair in that high ponytail and then braid it that's it who doesn't love a good braid, and it's really easy to do, and this hair, of course, tapers nicely into the end of the braid, because it Is meant to be, you know, tapered versus when you try to use braiding hair. Sometimes if you don't get it pre-stretched and even when you do get a pre-stretch, it can be a hassle. But this is nice and easy and i even just wrapped a little hair around the base just to spice it up a bit and again, of course you know if you want to layer, edges - and you know make it all nice and smooth. Of course, you would do that, but for the sake of this video, we're not doing that today, part your hair down the center for our fourth style, secure one half with a clip or ponytail holder using the top knot method, install the clip-ins since we're working with A shorter width, i only used three clip ins on each side, gather the hair into a ponytail holder and secure it and then wrap the hair around loosely to create a bun and repeat on the other side. So double buns, of course, are really fun style to try out nice to switch up and add something a little different into your potential styles and, as you can see again, these are really easy to camouflage. You can't even tell that they're there and i only used a few of the clip-ins for this, since i don't personally, like my buns to be too big. But of course, if you did want your buns to be larger, you could add more hair. So now we're going to do some heat styling, so i have all of the clip-ins in right now and i'm going to spray some heat protectant, i'm using the willa thermal image, heat protectant and you want to use heat protectant to protect your own hair, but also The clip-ins, because they are human hair, i'm just giving this a little spray through i'm using the babyliss pro prima 3000 and i have it on the 380 degree setting. I love this flat iron because it heats up on the outside. So it's great for curling and usually when i curl, i kind of like to separate my hair, like this, so over one shoulder over the other and then pick out the sections that i want to curl. So this is the test to see how this hair holds a curl. So i'm going to start with this front section: oh okay, okay, i'm not mad at it, i'm not mad at it all right, let's curl the rest. Let'S comb these curls out and see what we've got, and i am loving this. This texture is really nice. I like that it has still some texture to it, but it's also got like some nice bounce and curl. Oh okay, i'm gon na do the other side and then come back with the last final look and here are the curls. I think that this hair curled really really nicely, and i like that - it's still you know, like i said, has some texture to it, but it still has some good bounce and movement, so i'm really impressed. So i think that for the price of these they're 249 dollars and that's around what i would pay for sew-in, however, with a sew-in you're kind of locked into one style, but as you can see with the clip-ins, you can kind of tailor them to whatever look That you want at the moment - and you can do it at home - you don't have to go to a salon. You can just do it right here in your own beauty space. So now we're going to move on to the ponytail. So you can see how that looks on those curls were just so pretty that i could not brush them out right away, so we are here a day later to do the ponytail, i'm going to show you a way to install this first, if you don't want To wet your hair, usually if i'm wearing a curly, ponytail i'll wet my hair a little bit, so it has a little bit of wave and texture to it so that it blends well with the extensions. But in a pinch you can try this first decide if you want a part and where you want to place the ponytail then gather your hair and secure it with a ponytail holder. Your hair needs to fit inside the drawstring pouch, so you may need to braid it and twist it into a little bun and then secure that with a bobby pin to make that easier for this style, i'm going to use the comb in this drawstring ponytail in The back and the drawstring in the front, so i'm going to put it over my little bun i've inserted the comb, i'm going to flip it over and then just pull the drawstring until it's secure and i'm just going to wrap that cord around and tuck it. In so i'm just going to take it and fold it to create a little curly, faux bang and take a bobby pin and just pin the end. So now i've got my bang going and my ponytail going and i'm going to take a scarf and use that to camouflage this area. You want to use a scarf, that's long enough to wrap around a few times. So you can see. This is a pretty long scarf, so i'm gon na start by placing it where i really want it to camouflage. Then i'm gon na go around and of course you can tighten this to your liking. It depends really on you know the amount of tension you want and how you know your head feels. Sometimes, if i have a scarf on this too tight, i get a headache. So i get you if that's you i'm going to twist it now after i've gone through once and bring it back around and tie it, and here you can make a bow. You can go back around again if you just want it to be like a little. You know scarf tail hanging out here. I think i'm just gon na make like a little bow and, of course, tuck the tag in and then reach in and grab any areas that you may have caught in the scarf and if there's any areas that you feel like you can see any tracks, you Can just go ahead and fluff those or adjust the scarf if needed, but it's pretty simple you can see in the back. You can't even tell you know that your hair isn't waved properly or on the sides really because there isn't much out and the bang. Of course camouflages the front, so this is a really easy style if you just need to throw it together really quickly and you don't have time to match textures. If that's an issue for you now, if i want some more texture around my ponytail, i just take a spray bottle with water and spray, my hair. Until it's damp, i don't want it dripping wet it's just a little damp. So right now it's basically damp and i'm just running my fingers through just to make sure that water is going through all of it. Now i'm going to go in with a little leave-in moisturizer this one's by carol's daughter and that helps my hair wave up a little more it just it's not going to be super wavy, no matter what i do, but it helps it kind of have a little More texture and then i go in with some gel and i'm using the ecostyler gel gel gel. I don't use gel all that often so, like a bottle will last me like years um, but if i'm doing a really like sleek ponytail. If i wanted to look really pulled together, then i go in with the gel. I'M gon na do two styles. So first i'm gon na go with a mid-level ponytail and i'm gon na switch it up real quick for you guys so that the gel doesn't set too much and we'll do the whole setting process. So we can be snatched okay, so i'm pulling it to that. Like mid level ponytail - and this is just going to be a real quick ponytail to give you an idea of how it looks at this level and for this level, i'm going to use the comb in the front. So the drawstring, of course, is in the back and then i'm just going to take a piece of hair and just wrap it around the base to camouflage the drawstring and secure it with a ponytail holder or a bobby pin and here's how it looks. And you can see you can't even really tell where the drawstring is and my hair is starting to wave a bit, so the texture is starting to match, but it's so full and bouncy that i love just the way. It even looks like almost like your hair is down and pulled back, so i'm loving this okay. Now we're going to go to the last style for this style. We'Re going back to the high ponytail position, take about half the hair and gently twist. It then gently wrap it to create a bun shape and secure the end with a bobby pin, repeat the process, with the other section of hair tie a scarf around the base of the ponytail to help smooth your hair and leave that scarf on for about 15. To 20 minutes so now you see how laying it down with the scarf gives at least my hair. If your hair is similar to my hair type, you'll get some more texture which is going to help it blend a little more, and i just love like a big high, full bun. I think it looks put together but also casual. It'S one of my favorite styles, and also, if you want to spice it up, you can take a little hair clip and just clip it in the back to add something. A little extra and the great thing about this ponytail is, it doesn't feel heavy at all. Even with it all up here on the top, it still doesn't feel like it's weighing me down and it feels secure, which is important. I mean you, don't want your ponytail flying off everywhere. I really really hope that you enjoyed this indeed review and styling guide. Let me know if you're going to try out these in deek remix pieces, don't forget to like this video and subscribe. I have a new video every single tuesday and friday, and hit that notification bell. So you can be first to know when there is a new video and i'll see y'all next time, bye,


Comments
Vanessa Herring: What's your favorite style in this video?
Simply Taneica Dionne: Hi Vanessa.. I am so glad you did this video because I have been looking to get kinky curly type texture ponytail. I have already ordered some clip ins so this video helped me with that too. Never tried clip ins either. Awesome tips on the hair. Great demo, the styles are all so perfect and great for anytime.
Jasmine B.: I am not happy with the remix at all. And Indique is all I use. But so far it's been 2 weeks and I've had extreme shedding and bunching. You can't use anything in this hair at all. I'm good ill go back to what I'm used to. Pure and Sea are good enough for me. One thing I can say about remix is at first sight it is very pretty. But it's a hard Nope! For me
jus Londa: Very nice