How To Do A Sleek High Ponytail On 4C Natural Hair| Extended Ponytail| No Waves |Detailed Tutorial
- Posted on 12 December, 2018
- Ponytail Hairstyles
- By Anonymous
HEY REVAMPED DOLLS: TOLAREVAMPS|| HOW TO DO A SLEEK PONYTAIL ON 4C NATURAL HAIR Don't forget to Subscribe ⊹LIKE + SHARE + FAVORITE THIS VIDEO!⊹
EXPAND FOR DETAILS!
PRODUCTS USED:
Needle
Brown Thread
Got2b Glued Gel
Loc Twist Wave Edge Gel https://bit.ly/2QPipSy
Sabastian Hair Spray https://amzn.to/2Qr3Gy2
Pump It Up Styling Spritz https://amzn.to/2PykWvU
Rat Tail Comb
Hair Band
Murray's Beeswax
Shine Spray or Oil Sheen
Argon Oil by One N' Only Available at Sallys or amazon https://amzn.to/2Qr4v9V
bobby pins
It's a 10 miracle leave-in plus keratin https://amzn.to/2LcGsWz
____________________________________________________________________
Tools
H2Pro Mini Flat Iron https://amzn.to/2C5DWOB
H2Pro Titanium Flat Iron
Remington Curling Wand
Yellow Bird Hair Dryer https://bit.ly/2UBOiNG
____________________________________________________________________
Hair Details:
(1) Bundle of 18" Body Wave
Small piece of 16" Body Wave Bundle
____________________________________________________________________
FOLLOW ME:
INSTAGRAM: RevampedStudioSalon
FACEBOOK: RevampedStudioSalon
SNAPCHAT: TolaIsShe
BUSINESS - for all business Inquiries and Hair/Products Reviews Email - [email protected]
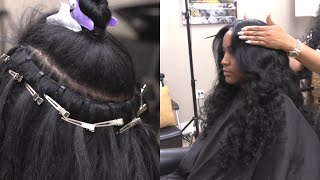
What'S up beautiful people that should girl see back at you in the video? This is on this leaked high ponytail, I'm going to show you how to go from a 4c texture to the sweet ponytail in this video. No, it's got to be blown out straight and then suppressed very two important things that have to be done before putting it into a sleek ponytail, I'm using the main choice, spray, the it's a 10 miracle leave-in spray, and they have many benefits, including heat protection. Within that spray, so that's a popping spray and then influence oil is just done oils to put into the hair moisturizer. But this is key. The one, and only are the oil treatment is what you need to have it's weak and lay the way you want it to lay like that treatment right there, and you only need a dime sized amount, I'm going in enough to detangle the hair all over. I did all four sections that you can go on four sections, and now I'm gon na go in and below try all four sections straight with my yogurt. The details below will have all the products I use. So don't fret, if you can't figure out what i'm using i'm going for everything education market below, but I've absolutely loved. This yellow bird so go ahead and blow your hair with your blow dryer. But now it's time to suppress this hair and when I say that are the world gives it that nice oily moisturize Sheen, if not dry, like that argan oil is popping and I only use a dime size amount and it just works. So well now, I'm using h2o flat iron. Those the little kind of finds I love H to Pro, is what I rock with it's my titanium flat iron and I was coming in to press each cuticle strength of each strand straight now. I take small sections depending on how you know. Wavy your hair is or depending on the texture of your hair, would dictate the size sections you take. Our hair is very tight. Her coils are very tight, so I'm just taking more time and taking small sections repeat the same process throughout the entire head, I'm taking small sections, I'm running it through with my H, to pull flat ironing. Now, like I said, I used to get 210 leave-in treatment and so that already had its eighth protection spray, so don't get on the ladies. It has heat protection spray also within that treatment, and I'm just going to go ahead and look at that. Silky moisturized. It'S shiny, it has Sheen it's ready for that dog ponytail, but before I go ahead and do the ponytail, I just want to show y'all how sleek this looks without putting it into the opponent's out. That'S what you want if you want a sleek ponytail now, I'm going in to children's I mean come on, I haven't touched her head in about a year, so she doesn't go to nobody, but me, and so I had to just you know, take care of my Little sister and trim her, and so now what I'm gon na go ahead and do is put some braids in the center for a nice jazzy. Look, I'm gon na show y'all how I do this. It'S gon na be the crisscross method, like these styles have been done way back in high school, I'm using the lock twist wave edge, gel or I'm doing the braids, and I also use these for my edges. This thing is bomb okay, it's 16 ounces of edge control, y'all 16 hours, and it's only $ 28. Like I don't know what I was talking about this thing, but it's the bomb.com. So I use this all the time. I'Ll put the information below on how you can get yours, but you go ahead and do cornrows going straight back for the first braid. Then you go ahead and part out a section and leave it alone. Then you pop another section and do Cuomo's going straight back and I'm always adding the be an edge potential thing to the front of the has I'm braiding now my nails are super super long. Well, you know what I got my nails done and they have grown out so much. I just got done with my finals. I'Ve been in school, I got clients back-to-back y'all, but I've been busy. Okay, if y'all know how it was put its head to get the nursing program, you know you got ta get straight A's and you cannot play no game. So, look I've been in the books and do my clients, hair. I haven't had time for sale, but you go ahead and do bristling straight back, leaving hair out by each section. Now it's going to crisscross method, you're going to go ahead and add these four sections here, one two: three four and we're going to go ahead and take the first section, I'm showing you all the numbers and braid it back. Okay and when you break this I get let me go ahead and go over the grade that you braided straight back, so I'm grading over here go braiding over to breathe already straight back for the crisscross look, and so you continue to braid. You can add some of that edge control as you're braiding. It'S really useful unlocks, but I just love it for my edges and braiding like it's the bottom. I love it and then just continue to braid. That'S part of your crisp right now we're going to hit the next section, but these two sections right here, I'm going to add that edge control to the front a little bit make sure your baby hairs out. Come you haven't mess with that jet and go ahead and begin braiding. My braids are kind of janky here, I'm not feeling like to you, but I cannot break it alone. Nails I don't know that got long to y'all, but I just don't braid with nails period. There I need to be short, but you know it's all good and so keep my braid and put it over and bring to the other side, and there goes your crisscross and you braid that all the way back super super easy. I thought I was so cute and fun up until it is type of style, since I was in high school, okay yeah, so you get your other two sections. I had to add that section to do a crisscross here and of course, you part it in the center make sure it aligns with the other crisscrossing. And so then, when you do that to go ahead and break that first, one going straight back crossing over these braids to the other side and don't worry y'all, I got my nails done after this video was complete, so don't get on me. Okay, I showed me. I shall make time for myself and got these nails to get there. Oh, but child, you know they say. Stylus ain't never put together, he's always take care of everybody else before ourselves and I didn't believe it. So I became a stylist and that's true, like you. Just don't have time if I didn't have that wig on, I would have been looking at mad crazy, bagels, the first part of your criss cross and it's pretty much self-explanatory. Honestly, just looking, you know looking to learn because it's not nothing spectacular, but I'm always leaving out the baby hair, as you see, keep those out, because those are what you want to do. Use to you know create your little swirls and swoops. So I'm bringing that straight back and I'm going to go right over that braid, going straight back towards my next side and as you're braiding your kind of braiding on top of the braid with nothing there. That makes sense as you go as you do in that crisscross and you braid that straight back like so now, I did add on another criss cross on the left side of her head as you see, because it wasn't. Even the cameras is in front of her and I can't stand in front of her, so I really can't see too well until after I step back and look at everything. So I did add the two criss cross on the left side. But now it's time to put out these points out and as you see, if you do a proper sub breath, your hair will lay sleep without too much product already. But we're gon na go in and add some beeswax to pool dollar looks like three dollars, but he's put his beads back and I'm putting it through each section of her head. Now you want to use this product generously. I do say that, and so I'm section it out and I'm just adding some of that thing you know putting on my head now. You can use some heat to soften it up because it does get kind of thick and hard, though so, if you wan na soften up that blue sweats, it's not that your blow-dryer and get it smooth. So you can easily apply it. So I like to use heat with the beeswax as I'm using it, because it helps the process. You know become a lot smoother, so you know I have it on medium heat and I'm into our hair and, as you see I'm using my comb to smooth it in and I'm using my hand as extra body heat so moisten it up and get it going. All right so now that that side is done, we're going to go ahead, move on to the next side and your intersection out just in all sections as your wax target. That'S the mo watch wax on the front and back part and continue this process. So you get to the top part of your front section and just comb it through. I wonder: what's going to a two ponytail method like when your hair is super super dense, it's easier to just to create some ponytail to put it into a ponytail than just doing one. That way, it's really really really really secure and sleek, and tight and firm, like it's sleek, it's a type of itself. It'S ideal for those with super super dense hair, but I didn't like it with any kind of hair guys to be honest because it's so it works so well. Some reason is once again at the back and because I've already added heat. So it's easy to manipulate and apply and I'm applying the wax into each section working my way up to the top of the ponytail in every wondering why she is not to use gel eco styler gel brown gel well, I can't use it because it's water-based and Her hair is natural, so there's any water-based product it will curl up now I am going to use some got to be blue gel later, but that's because I've already seated down with the wax and so it doesn't curl up - is easy. For the most part, your product does not need to be water-based, and so this wax does the job really really well, in my opinion. So that's my next part of my opponents and I'm putting up and as you see you can't tell that great two ponytails within one and you just add it together and there you go now, I'm going to fix the back later right now I want to get To the edges, I'm using my lock twist wave edge gel to do these edges and, like I said it's an amazing product depending on your hair texture. You can use this gel with this edge control by itself, or you can apply just a little bit of got to be glued rail. On top of this, to really lock it in place, and maybe just a little bit flaky, you add a little bit of oil sheen or some kind of oil to combat the white flakes. I forgot to add a little bit but got to be blue gel on here, but I did it off camera. I went back. I reapplied some of that got to be so that way it would stay, because her hair is so natural that it likes to curl back up when she sleeps because she's wet. So I have to use the got to do glue job with this product and run for it to stay and no it does not flake up and if I do see a little bit of white specks oil, sheen or hair spray. So I'm kind of oil just running very straight away: it's not a problem now. If we use too much got to glue each other, there might be a problem. Maybe hairs is and art people say, but honestly just finger waves. Okay, if you can do fingers, you can do baby hair, you just loop, it left and right left and right and you use your hands to manipulate the the curl okay. So it's time for the opposite side, I'm doing the same thing. I'M hiring my edge control to the end of the clip to beat baby hair section, but make sure you add your got typically gel on top of that just a little bit before creating these waves. If you do so what I might like my little sister, otherwise honey yeah, it's going to be a big old Bush on the next day, like you need something to lock it in place, whether it's confident sprit hairspray, I don't know what that pump. It up. Spritz gets flaky for me, so I don't like using that, but I got to be you Joe doesn't get flaky like that, and then you have a little bit of place. The ocean always gets rid of it. So I prefer that process, but you know, is trial and error. You throw what's for you and make it pop. I also heard that gorillas not works pretty good too, depending on your hair texture. So you know you've got options play around and see what works for your hair type, but this is what works for us. So I'm going to go ahead and mold that up like so and that's what my edges looking right, you know a little. Oh some fun ain't like a rager, I'm not about the baby hair. It gets the job done. Okay, so now it's time for the ponytail itself, so you can either make your points how long about iron braiding hair to this or keep it. It'S left that it is right now, I'm keeping it this left, because we're using an 18 inch bundle. So I don't need the extra one. But if you have like a 10 inch, podcast 12 inch back hair and you want it to be longer then definitely make your braids longer and add some braiding hair to this, the longer the longer the braid, the longer the ponytail okay. So now I'm using needle and thread to make this style, and so I'm locking it in pace stitching at one time and I'm going to travel my needle up the braid like so and just about like an inch above and leave it up there and then wrap. My bundles, who I reach my string or whatever thread so I'm wrapping it all the way. Up until I reach the thread and then I go ahead and pull that and you go through that West and lock it in place, then I shall the needle up the braid again. So it's basically traveling up stitch in traveling up stitching. So now I'm wrapping it up again wrap the weft up the braid up back up, so you reach the thread and then you basically basically stitch it in place again stitch it in place, lock it in and travel it up. I prefer this method under bobby pins. I just hate bobby pins, I'm not in frying pan, but it's so easy. So you know you know, doing works for you. What about bobby fantasy? Well, pins people like this puppet? Do this method? It'S whatever? If you want to glue it, you can glue it. There are three options you have so decide which one works for you, but you know I prefer no glue, no bobby pins, just needle and thread honey. It'S quick and easy and there's no mess so yep ducking in place. Travel it up, wrap, wrap, wrap, wrap, wrap. Tuck into the thread, and then I lock it in place and travel up simple process just watching see that's a major. So here my 18 inch bundle was finished and I'm moving on to my 16 inch bundle that I have and I'm just applying that right here and then continuing the same process. So I get to the top. And then we get something like this: a pony tail hunting and it was only 18 inches, but it looks like the whole 13 ponytail or whatever, like yes, and that thing is a late honey and that's just a wax baby. Now we got our braided hair. This one I'm gon na use to wrap around trap, ponytail and some bobby pins. Now you can easily braid your ponytail and wrap it around, but I feel like this is so much easier like it's already braided like and a bit of time. For that I save time okay, so I just want to have use my hobby pin to lock it in my ponytail and I'm wrapping it around my break. Now, when you add the ponies, when you add the body, pin put it within your actual braided ponytail. That way, you're not stabbing the clients head and it locks in place really easy. I promise you that's what I'm doing here. Alright, so here's our next braid I'm doing two braids. There are 20 inches long. I think yeah 20 inches long they're, pre braided and I have another tutorial on how to create a style with these frames so stay tuned for that. But you just wrap it in place like so and I'll pin it down. So now I'm going to go ahead and curl it with my wand. I'M just trying create some loose body waves. This is body wave hair, but it's lost its color. I don't so I'm trying to get it defined again. So I'm just my reverence and curling on, of course, I'll have the information and subscription box below that's the way you can find one and I'm using the pump it up. Styling strips there's two kinds: there's a gold one and then the styling it's bricks. This doesn't spritzes for styling and the gold one is for like breathing their hair in place, I'm using a styling spritz to go ahead and define these curls. Now I always know it's holding and scrunch it in place to cool the curl down before letting go that just helps mold this curl in place and cools it down into that curl definition. So that's why I do that there are some of the spritz on the top right here, those flyaways and we're done so here I'm using that got to be blue gel. I was telling you to just get better all just stuff down here. All this baby hair. The kitchen, whatever it is, we want to breathe it in place the edge control like I said, it's not gon na work not for her she sweats at night, so I got to use it got to be blue gel and the black tube to lay this down. I can't use puppet up brick because that slicks up to like I don't know inflate, so it's not working for me. So I've noticed that the type of gel is the most forgiving when it comes to not flaking up as much as long as you don't put too much. As you know, as I put a sparing amount on the back of her hair and I'm going to go ahead and spray, my Sebastian holding spray to put everything in place, not pump it up sprit but the Sebastian holding spray and that does not get as pervy. So now I'm just molding these part down with my next strips Naja just earlier when I'm ordered have her whole head down, but yeah you know things happen. I forgot about it, I'm hanging with it now. Okay, so that's it get moving it down. I'M going to use a blow dryer to dry it up, and I'm gon na show you what it looks like when I shake it off. Okay, well uh, as you see, is lay down and it's a little bit white just a little bit, but my shine spray or oil sheen takes care of that. You don't have nothing to other once you sprayed that shine spray and I put the gun to Gugu gel on top of her edge control stuff and it's not flaking either. So it does work. You just can't use too much, but yeah we're done a high ponytail and it's week


Comments
destiny jenkinsss: all this time i been wondering why after straightening my hair as soon as i try and sleek it up in a ponytail it gets right back curly but you explained the water based thinggg!! imma have to use that beeswax and i think i will finally have it figured out lol
Antonia K: Girlllll I’m so glad I found your video again !!! That’s how you know this video is very helpful !! thank youuu !
LA: Great video, very detailed
angelface123ish: How long does this last ?
12miscellaneous: Beautiful! How long did this take?
Chyrlie Roberts: Love your videos. Your voice is so calming
Yohamamoha C: Hi, would you be so nice and send me an info about those grey head bands that you are using 20:29?What is that? Thank you! Great video!
Sammy K: PLEASE can you clarify if you used holding spray or spritz or got to be spray on the hair BEFORE you wrapped it with the black strips?? Or did you lay it with JUST the strips?
Niy Imani: can you do a low sleep bun with a deep swoop
Elle A.: What happened to the other sleek ponytail videos? Wanted to use for reference
Connie Brown🌺: ❤
She'Myia Malone: I can't braid do you think twist would look good too?