Easy Drawstring Ponytail With Two Bangs Tutorial | Diy | Iamyeychi
- Posted on 31 March, 2022
- Ponytail Hairstyles
- By Anonymous
Hey loves! In this video I shared a DIY tutorial on how I achieved a two bangs ponytail and made a drawstring ponytail using Lush hair.
Lush hair: https://www.instagram.com/lushhairnige...
Book a Consultation here - https://www.iamyeychi.com/brand-consul...
Shop my Presets- http://www.iamyeychi.com/shop/
Email Address: [email protected]
Website: https://www.iamyeychi.com/
Instagram: https://www.instagram.com/iamyeychii/
Twitter: https://twitter.com/iamyeychii
Important Uploads
Room Tour- https://www.youtube.com/watch?v=5JNS6v...
Gears I use- https://www.youtube.com/watch?v=bSARHb...
Skincare Routine- https://www.youtube.com/watch?v=jt4ELs...
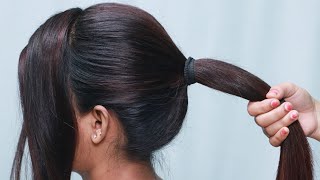
Hi everyone welcome to my youtube channel if you're returning subscriber well hello. If this is your first time on my channel hi, my name is oniye and i'm a lagos based content creator great. So today's video we have some hair talk. Okay, the hair is given. You know so i'm gon na be walking you guys through how i achieve this look. So this is like um, a ponytail. Okay, it's a drawstring, ponytail um put my hair up to the back. Normally i would do a low ponytail. Like that's the kind of person. I am i just love to do low ponytails, but i said to do something different this time. I also have two bangs to the front. I'Ve been seeing this hairstyle really trending online, like people are not doing putting together like the bangs to the front. So i'm, okay, let me try this. Let me try this. Let me try it and, of course, i made a whole tutorial for you guys to see this particular video took me over a day to make one day for the ponytail another day. For me to like get my hair together great, so i really hope you find this video helpful. This video is sponsored by lush hair and i use the kinky hair royale, okay from lush hair, to create this look. So this is what the hair pack looks like. I absolutely love this and guys. I ended up using just two bundles here: okay, so there's three in a pack, i ended up using two. If i was going to do like um half up and leave some, you know weave sewing some at the back of my hair um. I would use like the whole pack, but for me one pack like this is value for your money, and the texture is really really good. Okay, i experienced little or no tangling with this okay, and i like the length too. It'S quite a length is just by the side of my boobs here, so i absolutely love it. I feel like this is such an affordable way to slay your hair. Okay. So most of the things that i use are things around you very affordable that you can get in like a local hair salon, hair supermarket like a store, you can buy it okay, so i'm gon na go into the tutorial. How i achieved this hair, i'm so proud of myself, like i didn't, think it to come out this nice, but i'm very impressed with how it came out. Okay, so let's get into the tutorial okay! So let's go over what you mean? You need a pack of hair. This is the kinky royale from lush hair. It'S just comes in three bundles super straights, bundles. Okay, you would also need some thread. You will need t-pins you're gon na need um a needle yeah. That'S a needle you're gon na need a weak head. Mine is in a size, 22 inches eco styler, gel black gel bonding glue, that's hair, mousse edge control and the nets for the ponytail. So i'm going to secure the ponytail cap to the weak head. So i'm just going to use the t pieces here. This is going to help you a lot with sewing. It so make sure you put it maybe at least four or five places. Now i'm opening up the bundle, so just how your normal weaves come. You want to brush as you open up just so it's smoother for you, so this is like a full length what it looks like so i'm going to fold it into two here - and this is what the full length looks like now, i'm going to secure the Bundle to the wig cap and then the weak hair, so this is going to help me a lot with sewing, ensure that i'm on track, because i'm not an expert when it comes to sewing so i'm going to secure it. I secured it in four places. In total, yes - and we are going to begin sewing so for sewing, you literally just take the just like how you sew, like your clothes you just take, i just take it underneath the through the wefts and then under the weak cap. Take it through about two holes on the weak cap, two or three holes, and then i wrap it around the needle and then i pull out. So that's how i sew i'm just going to keep on doing this till i go around. You want to remove the t pins when you get to the point where you've secured it and you want to sew on it. So you simply just take out the t, pin there so keep on going around with the the same procedure for the top part as well. So this is a closer look, so i'm taking i've taken you through the weft. Now i'm taking in two two to three holes and i wrap the thread around the needle and then i pull through this is to help it be very, very secure. Once you're done going around, you want to start going in step, so use your t-pin to secure it. This is very good if you're not a pro with sewing, and you want it to be neat then same procedure that i did before just keep on sewing and show that it's tight at every spot by wrapping the thread around the needle that way, you're not going To be bothered if your wig is going to loosen during the process or when you're wearing it on your head, because you're sure that it is going to be secure. So when you get to the end of each layer, i want to tighten it. The more now go up another layer, okay, so this is what one bundle did for me. I think i'm like halfway through at this point, but this is what a full bundle looks like now. We are back at it, so just going in and sewing the new bundle once you get to layer of course use your t-pin secure it then you can start sewing so just keep on going with it. It'S very easy to do. After a while, it gets easier to be honest now, once you get to the end, what i do is i wrap the thread around the needle a couple of times. Let'S say like two three times and then i pull through and i repeat it till it's firm enough now we are done so i'm going to cut off the remaining thread and also the remaining hair. So i'm just going to use a simple razor to cut it off, so i almost used exactly two bundles um, the hair that i'm cutting off. I'M still going to use it, so it's not a waste, i'm still going to use it. Yes, i'm just going to remove the t, pins here and then put the head to the back um. This is literally the tutorial. It'S it's really easy. It did take me a couple of hours to do. To be honest, it's not as quick as it looks in this video okay, so i'm just going to comb through! You want to come through very well because there are some hair strands that got into like the sewing, so you want to pull it out so that you don't have um tangling when you put the ponytail on your head. So you just want to comb through. Quite well, so this is the full length of the ponytail. It'S quite full. I would say i love, you know how little went a long way. If you don't want yours to be this full. You can easily just space out your bundles and then you'll be using less hair. So i'm going to take it off my wig cap, so i can show you the full beauty of it. It is amazing, so you can see that it has a drawstring. So i just have to pull it together when i want to put it on my hair yeah. Now we are day two of this tutorial time to get the head down. My hair is a mess and yes, i don't have a lot of front hair, but we move so i'm gon na section the front part of my hair. Just this is going to be the parts that would be the um the base, the bangs in front. So i'm going to just put that aside, weave it and tuck it underneath now, i'm going to pack my hair with um a simple black hair packer just to get all of my hair together as much as i can get, i'm going in with eco styler gel. My glasses is on because i literally could not see when i started this thing, so i had to like put it on yes, so i'm just going to use the gel and comb through some people use a brush. I prefer to use this particular comb. I feel like it gets the product into the hair and does a better job when it comes to the grip. So i'm going around. This is me doing the back of my hair, so just put the gel and then comb me through and then press it down with my hair, going in with black gel. This is totally optional. My hair is not black black black and the extensions are black. So i want it to match, so that's why i'm going in with the black gel. I dyed my hair. If you guys haven't seen that feature, i'm going to let it pop up on the screen, so you can see how i dyed my hair at home. At least how my sister did it? Yes, i'm just going in with the black gel to make the hair look more uniform and also the black gel has a very good grip. Trust me. It does a better job than eco styler gel. So now i'm going to pack my hair again, but this time i'm going to make it tighter than the first time to secure you know what was not secured um the first time i packed my hair. Yes, so this is the look. I look so weird. I, like your rhino with that thing in front, so i'm going to comb the ponytail again just to make sure everything is together off camera. I added this comb that comes with wigs. I got it from one of my old wigs and i just decided to sew it on to help with um the ponytail be more secure, so i'm gon na fix it in pull the drawstring very firmly okay. So it doesn't come off all right and i'm just gon na take it over yep and we have secured our ponytail. This is literally so so easy to do. Um i mean it's gon na save me a lot of time in the morning. So this is how the ponytail looks. I actually like how it looks this way. It'S super simple and i'm going to take that draw string because it was hanging at the back of my head and i didn't like that. I'M going to wrap it around wrap it right on just find a way to tuck it underneath. So it's neat now to finish up the ponytail. I'M going to take a section out of the ponytail, i'm going to use my got to be glue to spray it. So i'm going to spray on the hair, so this is going to make it more secure when i wrap it around. So i'm going to wrap this around. You want to wrap this around quite tight. You want to also make sure that is neat. So if you need to comb again, you might have to take up your comb and combat intervals, but what i was doing was that when i take it around, i would spray again with my glue and wrap again, so i kept on doing that until i got To the end of the hair, so you want to spray spray. Take it around spray. Take your and alternative would be to use bobby pins, but i didn't feel like that would do the job yeah. So once i was done with this, i had to spray on the whole thing just to make sure that whole part is firm and secure. This is optional. I liked how the ponytail looked before wrapping this round. This is just you know, giving it some extra neatness to me now, let's get to the bangs in front, i'm going to take out the hair that i packed up and then i am going to comb through and then i'm going to section it. So just the way section is there now i'm going to go in with some eyeshadows, so the thing is the hair i'm going to be using is very black. My hair has like brown highlights and it won't really blend with the hair. Well, so i'm just going to use some eyeshadow, i would have used mascara, but i felt like that would make my hair very hard. So i said to use eyeshadow and i think you know just to basically tint the brown parts black. You can see the little difference there. Now i'm going to take the weft i'm going to fold it into two. I wanted to have a little bit of thickness and i'm going to go in with the glue gon na put some glue on it. I'M going to glue it together then put some glue to glue it on my hair. So i'm going to place this literally on my scalp. I wasn't even sure if i was doing the right thing at this point, but it stayed so. I think that's the right thing to do so. I'M going to put my hair over that and i'm going to do that to the second side, you want to make sure that the top section has more hair than the bottom section. Yes, so this is literally how to do the bangs now to make my hair flat i'm going to go in with some hair wax. I use this for my wigs, but i'm gon na be using on my hair today, so i'm gon na take it just put it on my hair top and bottom, and i'm gon na go in with my straightener just to straighten my hair to the weave. So i'm going to go in, you don't want to put your shirt down very high heat. The hair is not human hair with human hair. Please, you know knock yourself out, so this is the complete look. I am impressed. I had a little issue blending my hair with the extensions in front, but with some hair mousse, it became better after a while yeah all right guys. This is the final look. I absolutely love it. The feel is so great. This hair, i hundred percent, recommend it's lightweight too okay, and even when i use the straight now and it's nice, if you fry it, i didn't use straightener like on very high heat, but it was still able to like hold some heat for me to straighten my Hair to the to the weave there, so this is super super good. I can easily take it off at night and then the following morning, all i'll have to do is go in with some got to be when i'm trying to secure it or i can secure it using bobby pins. I don't have bobby pins with me, so i decided to use glue here, but i feel like another day. I can decide to use bobby pins if i'm just you know, trying to rush and leave the house yeah. So this is a very, very nice and affordable sleeve. So i use the kinky royale hair from lush hair, and this is so amazing, like i know that they do like um extensions for braids, really well and also like crochet. But this weave, like it's actually giving, and this also comes in other colors. I know it comes in gray and i know it comes in like color 30 27 like brown. Yes, so if you have like colored hair or you want to try something like different from the color of your hair, then you can decide to try out. You know this same extension, but in a different color great. I hope you guys found this video helpful. Let me know if you're going to be trying out this tutorial. Let me know if you did okay, i don't even mind you guys spamming me with your pictures, maybe on instagram, when you try out this particular tutorial guys this day is so affordable. I feel like i would have spent so much money if i did this in like a salon, but you know i did this at home. Simply just you know, walk down the street got a pack of the hair and you know got a couple of beauty tools, supplies that some i had before some. I had to get just to put this look together, but i did not go overboard. Okay, so if you're looking for how to quickly fix your hair for a wedding, an event or just want to look good to work or to school, guys, it's an affordable way to do that. Okay, hope, you guys found this helpful like share, comment subscribe. Okay and i'll see you guys in my next video bye,


Comments
DebbieTheMediaGirl: I’m interested in seeing how you achieved this makeup look
Jennifer Ugada: soo beautiful, i admire women who can make their hair themselves. That's a superpower
A.enniee - The Elegant Woman: I love this hair. Will try it when my hair grows. Saving for later
Oluchi Enemuo: You really make it look easy Yeychi....
IAMOYINKANJOHNSON: Love the total look
Perebogha Favour: This is really nice I love it Definitely trying this I love ponytails Can you make a tutorial on your makeup too
The Sunshine Oluoha: Definitely trying this out!!
Princess Yoryor: Content Queen ❤️ love it
IAMNEYENWA: Totally learnt something new today
Naz Okoli: Wow you even Wigging it yourself that good
Okolo Eliora: You look beautiful
Mayglow TV: I love the quality of your videos
Cynthia Unamka: Lifesaver much? Thanks for this wonderful tutorial, will be trying it soon and tagging you.
Bright Okpoh: I love it❤️❤️❤️, but I have 4c virgin hair so I'm not so sure if I can pull it off
Ellapinkette: Hey b. This is so pretty. Please where did you get the drawstring net from though?
Moments with Confi: making this next❤❤
IAMNEYENWA: Please, what store did you get your canva head from ???
Christiana Beture: Such a pretty goddess
Candace Oyeniran: How did you get the comb for the net and how did you attach it,just in case I don't want to remove the one from a wig
Henrietta Kimberly Itepu: I’m like the 10th and that’s okay
Naz Okoli: Please am second ooo since there’s 3 first already lol
Tochi Anozie: First hereeee