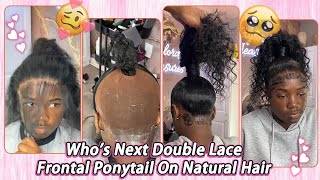
Braided Frontal Ponytail
- Posted on 02 July, 2021
- Ponytail Hairstyles
- By Anonymous
Omg, she always think that she's a [ __ ], i'm that [ __ ] no counterfeit. When i walk through better sleep, i'm so pretty [, __, ], hair and makeup done by lilly, [ __ ], not so thick, but your [ __ ], not a city. Chick hey y'all, it's your girl, presidential lilly, your favorite lily, and we are back with another video, so my first frontal ponytail video literally, is doing awesome. It'S doing amazing right now and i've really been craving to do another frontal ponytail. So my client hit me up with this um braided frontal ponytail look. I was so excited and i knew that i had to record this for you guys, so you know, let's just go ahead and get to this video. This is what she was looking like when she came into the chair. The first thing i did was: i went ahead and started to plug her frontal and get it all nice, and you know you know looking natural. So this is what the frontal look like before. I customized it or did anything to it now. Y'All know i love showing the process of everything that i do throughout my hair videos. So here i'm just going to show you guys me plucking, i've been using like a new method of plugging i've been using like the skipping pluck and then i'll go back through and kind of thin out. My boxes that i created it is super quick, super nice super simple super easy. If you guys want a video on how i do it and what i have any tips or what i recommend to help. You guys learn this please. Let me know down in the comment section below, but yes, i'm just using the skip and plug method, and i'm just plucking to get the frontal to look nice and natural for this install, and do you guys see how natural that is? I did go back through and plug just a tad bit more at the very edge, but that's all i did now, i'm taking my ion um 40 divali volume developer and my ion lighting powder and i'm just mixing those two up and beginning to release the knots. I only bleached the edge knots like the front half of the knots. I didn't bleach the whole thing just because it was a ponytail look and you know you don't really have to always bleach the whole entire frontal for you to get the desired and natural. Look that you are going for or you're trying to achieve. So i just sat there and i applied my bleach mixture to the edges of the frontal and then i just turned it on it's laced down to the lace down, and then i just make sure i get any hair. That'S laying in the bleach out - and i'm just going to let that sit for about 30 minutes to an hour now. Let'S just go ahead and move on to the hair, so i take a little bit of my fantasia's um oil and i'll just begin parting. The hair off in thin sections and just silk pressing the hair. I did one pass of the flat iron on my client's hair. My flat iron was on 400 degrees and i did one pass. Okay, one pass: that's all it takes one pass all right using the chase method: okay, okay, okay, no heat damage; ladies no heat damage so real quickly. While i am flat ironing my client's hair. I just want you guys to take a look at my shirt. I got you guys will see it throughout the video. This is my clarity over closure shirt. This is my younger cousin's business. Her brand her brand is to advocate for the healing of sexual assault survivors and also just aid with help of mental health. So if you guys like this shirt, she has many different colors and many different styles and she also has two pieces. So if you guys like what you see, please go ahead and click the link down below in my description bar, so you can go ahead and purchase you submerge. Now that all the hair is dry, i'm going to take my edge control use whatever products of your preference. If you're going to try this on someone else, but this is just what works for me, because my method is for proof. So this is what i'm going to do, i'm taking small sections, i'm spraying a little bit of pump it up and then i'm taking a little bit of the edge control and laying it right next to the root. I do not put apply edge control on the outside of the hair. Like um, you guys will see what i mean. I can explain to you in a second, but i only put it like inside of the pump base of the ponytail i don't put on the outside, where the hair can actually revert or put it on. You know from root to tip. I don't do that. The pump it up really is what i use to like mold and hold the hair in place. The edge control is just so that it can help me flat, flatten the hair and give this um as sleek as i possibly wanted, and needed um. So right now, what you guys see me doing is just getting the getting that um mold together, excuse me and then i'm just taking the ponytail and i'm just going to secure it. This is just me holding in place. Okay, i'm just beginning to apply products. I apply a lot of product, especially pump it up. When i do my ponytails, because this will help is what helps them last. It helps them from revert gum, the hair, reverting going back, curly or anything like that. It is just literally you guys will see what i mean okay, so this is what i'm doing, i'm just prepping my ponytail, getting how i want to get in the spot and just lightly loosely placing the ponytail in the position that i needed and wanted to go In once, i got the ponytail positioned and just in the place that i needed to and all the hair molded back, i began to go ahead and place the frontal on her head and i went ahead and cut off a little bit of those ear tabs her Ear tabs off so that the frontal could fit perfectly on her head or to the width of her head. So once i finished um cutting off those ear tabs, i went ahead and sewed the frontal down in the back and now i'm going to go ahead and take my 91 alcohol and clean her skin off really good, and i'm also going to take my walker's tape. Skin protectant to go ahead and do that as well, and now you guys just see me starting to apply my first layer of glue. I applied four layers of glue for this look. I did not use a cap. I didn't use a cap on my first frontal. Ponytail myself, so i decided not to do the same thing with this one. It still looks the same. It'S still going to look just as natural, so that's what i went ahead and did, and i just feel like it's also too much for the ponytail look. I feel like having that cap right there. It just makes it and it's hot outside. I just thought it was gon na make it too hot and hurt wanting to lift it up or scratch it back or anything like that too early. So i just went ahead and did not use a cap like i did on myself once i got all those layers of glue applied down. I went ahead and took her lace in my comb and i used the back of my comb to press the lace into the glue, really really good, really really hard. I don't press too hard because you don't want to bother your client, but i do press. I do use a good amount of pressure just so that the lace can actually get into the glue, i'm taking my lot of body, styling, mousse or styling foam and two silk strips or wax strips whatever you want to call them, and i have her holding her Frontal down first off and then i take those styling strips and i tie her edges down and i let her go sit under the dryer for about 10 to 15 minutes just depends on how much mousse i apply sometimes or what i feel like, but for today's Look in installment, we did 15 minutes once she is out of the dryer. I'M gon na go ahead and begin to cut off the excess lace at the edges, making sure that i use a jagged motion when i'm using my uh cutting the lace off with my scissors. I prefer scissors. I use these really tiny, pointy swan scissors. I got from sally's, they are amazing, i love them so much. These are. This is that i used to cut the lace and what i've been doing a lot lately with all my lace. Installs is once i get them glued down and i get them outside the dryer. I take my pointy tweezers um and i begin to like plug off hairs just at the very edge of the lace i feel like it just gives me more of a melted natural. Look so that's what i did and now i'm gon na get into molding down her frontal and getting styled into the look that we wanted to. So i'm gon na go ahead and do my middle part for the ponytail, because she wanted a low middle part. Ponytail and what i did was um part off the hair for the back to go into the back of the ponytail. I did have to reform my ponytail in with her real hair in the back, but that was fine, because that was the whole thing of the the whole point of the process of just softly. Getting a prep style or prep base for my ponytail with her real hair, so all i did was just comb that out get it combed in the direction that i wanted it and needed it to go. It was already pretty much moldable, so i didn't have to do too much or put too much effort into switching it to how i needed it to go, and then i'm going to take that little slither of the frontal that i added to the back. For that. To blend seamlessly - and i take my wax strip for the slither in the back on the frontal, i take my wax strip and i just hot comb that back really flat to be. You know seamless with her real hair and i just mowed that all into a ponytail in the back of her the neighbor her neck and then i go ahead and take my pump it up and i mowed her sides down really so for her real hair. I used edge control and i also used um pump it up to mode the real hair when it comes to frontal, hair or weave. Hairspray is really all you need for it to actually like stick and freeze. I did go in with a little bit of black gel in some areas, but i mean it was a tiny, tiny bit. I always do a little bit of gel just so it can like really secure the look, but the hairspray is really all you need for the frontal to actually stay molded for the longest and just to look nice and neat. So i just used my pump it up when i molded the front half the front two sections of the ponytail and then i'll come back to you guys once i get there so so so do my the baby hairs and the ponytail is fully molded. I'M going to begin to do my braid. I did a feed-in braid. It took me a long time to get here guys. I cannot teach you or explain begin to explain how to do the feed-in braid, because this is actually my first time actually doing a freedom. Braid on a client and on another person, but it came out perfect, really tight, really nice and neat and she loved it. She wanted this ponytail really long. So that's what i gave it gave her. My client is actually really tall. So the point the ponytail itself is actually really really long and i flexi ride the ends of the punt of the braid. For it to be curly - and here is the final look. She wanted me to freestyle on her baby hairs. So this is what i came up with: it's really nice and neat and sleek very natural. Looking the braid is everything guys like the ponytail. This was uh. I just had so much fun doing this. I hope you guys enjoyed this frontal ponytail. Look that i brought to you guys, there's any questions or any video ideas that you guys would like to put in the comment section down below. Please do please give this video a like and uh thumbs up and please subscribe and thank you guys so much for watching and sticking by your girl. If you are on my pretty still [ __ ] didn't have to blow a bag on my pretty girlfriend. Had your daddy drop, it off heard you do a little fit hello omg. She always think that [ __ ] of [ __ ]
Comments
kynadi: so talented, looks so good
Sasha Fierce: I’m sorry but this looks a mess. You can tell her real hair from the frontal
Sasha Fierce: Wtf