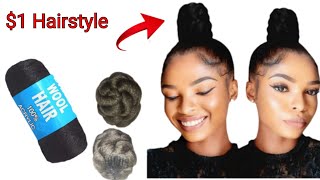
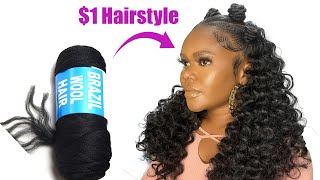
How To Make Dreadlocks Ponytail Using Yarn (Brazilian Wool)/ 30Inches Loc Ponytail
- Posted on 29 June, 2022
- Ponytail Hairstyles
- By Anonymous
HELLO, AMAZING PEOPLE....
#woolhairstyle
#latestdreadlocks
#Yarnlocs
How to make local EXTENSION pony tail using yarn (brazilian wool ) in this video I showed a simple way you can achieve locs using yarn.... You can make crochet locs, dread LOC EXTENSION, and any kind of looks using the steps introduced in this video..
#locs
#locextension
#Latestdreadlocks
#Dreadlocks
Braid less crochet using this hair https://youtu.be/ZoUfOYT7nIE
hair review https://youtu.be/li0_kJje2iU
////////SUBSCRIBE TO MY CHANNEL PLEASE .... IT WILL REALLY HELP MY CHANNEL.....
how to get updo using brazillian wool https://youtu.be/Z6ZcRPXDQKM
.....GET TO KNOW ME...
AM MEKNEX, I put out content WEDNESDAYS AT 3PM AND IT WILL DO ME GOOD IF WE CAN BE FRIENDS
FACEBOOK-@ MEKNEX NATURAL HAIR
INSTAGRAM-@MEKNEX_NATURAL_HAIR
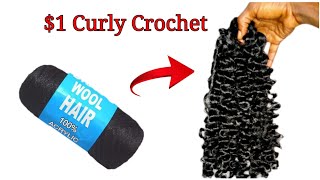
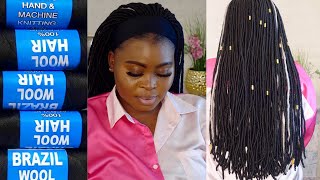
Hello, my amazing family, welcome back to my channel, so today we're going to be doing woo ponytail. So if you're an oj in this channel, you know we love so much so this tutorial is going to be in seven parts and the first part is prepping. Your wool so the way i prep my wool is, i will just get a piece of the wool fold it into two. Until i get the length i want, then i measure out the length i want. So this tutorial i'm going to be using 30 inches of this wool folded. So if i braid it, it's just going to come out 30 inches. So then, when i get the one i've measured, i just put it together with other rules and food. So when you do this you're just going to get the length you want for the brazilian room, so all of it is just going to be seamlent. So, if you're an oj on this channel, you know we have something like this on our channel, but not this long, and this is going to be a ponytail, but that was a not less um crotchets on our hair. So what i'm just trying to do is to get the exact length i measured out and when i'm done doing this, i'm just going to get these scissors and cut it out. So the next thing, or the second step here, is to prep for the hair. So the first prepping is counting out the exact numbers of hair you need and setting that out. Then the second prepping is tying your thread or whatever you want to use to the place. You want to use it. So the second step here is to start tying out your hairs on the chair on the thread you tied on the chair or your stick, whatever you just use. So when you tie these the fourth step, or should i see the first step? Yes, it's going to be to stop trading to start braiding. So the first thing you do when you braid is you read the beginning tightly and then you go loose. So when i do this type of um braiding or when i tie this way, i usually i usually use it for crotchet. So when you tie this way and you bring it out from this thread, it's going to have a space where you can crochet it to your hair. But just i have to do this this way, because this is not a crotchet and this is going to be merged together later. So, if you are planning to use this hair as a crotchet, i'm going to leave a link of the video where i use it. As a cop crotchets in my description box, please try and click and watch so that video is from like a year ago, but this one we are doing is easy, going ponytail for your hair. So if you don't smoothing out this room, you're going to get a lot of tangles, especially when is this this long? So what i usually do when i make this type of hair, because this is not the first time we are making this kind of a - is to brush out the wool. And when you brush out the wool is going to look like your natural hair and when it looks like your natural hair, you make this kind of braid. Then it looks like dread. But this wool is really long trying to brush it out. We only cross problem and make it tangle, so this one i'm just going to try making it without brushing it out and see what it comes out like and at the end of this video, i'm going to show you the one i make about. I made about a year ago how is looking today, so i'm done with the logs. This is the fourth stage done and dusted, so the other thing i just want to do is to smoothen out the ends and make sure that it is um properly clean. So i'm just going to braid the ones that were not braided properly um. You may decide to trim at this point or you wait. You are done maybe when you are done with the hair and you can trim out the excess part. So i like sharing the wool into two. This makes the who you using treading very tiny and when it's tiny, it doesn't unwrap that easily. But if this was brushed out, it's just going to be easy to just splash it down. That would be all for it, but i just want to tie it because i will use bead at the end of the day so, but if i just wanted to leave the ends like that, just smoothly at the ends will be the best. So the fifth step on this hair is twisting the braids you've made the loose braids you've made so twisting this braid. You may want to leave it for a longer period of time, because the longer you leave this twist, the juicier, the coils are going to be so we're just going to twist. Two together, you may want to bridge these, like three together put two together, will give you that defined coins that you need for the same locks. So when i'm done with this, i just tied a bit - it's not so hard just so it doesn't unwrap on unwrap because it's strong. So the sixth step here now is to dip into hot water. So while you dip into hot soda, it's not like this hot soda is going to do much, but it's just going to make it koi faster. You can just treat like that and leave it, but when you put in the hot water and let it dry for a longer period of time, you're going to get a marvelous coil, but this one i did not let it dry for a longer period of time. I only left it for like morning till evening, then i continued so what i wanted to do here before unwrapping this. This is the seventh step before unwrapping this hair is to use these crochets to pass more thread through the hair, so it becomes stronger because we are going for a wrap, ponytail and wig sorry era. Ponytail um look, but this and crotchet beam was not giving me what i wanted, so i had to use a needle. So if you see what i'm trying to get here, i'm trying to make this one look stronger and not um as a open as it was before so the thread i used, i used it with the tread needle. I couldn't use it because who was very difficult to pass through need to so this is like what i basically did just bringing them together, but you can decide to losing this twist. First, before you um, you can try to lose this twist before you do this, and this seventh step i just like to do it first, so the hair can be drying while i do other jobs. So now i'm just going to losing it we're almost very important step to take, but you may just want to decide to use one of the hairs, so i just prefer to get another because i have more left tie it. You may decide to braid or just leave it like that, i'm going to show you guys what this is for at the end of the video. It is really important. You may decide to add its mid side, not to add it. So this step is not really important, but i just feel the need to have it there not to come and spoil my cause all right, guys i'll just put in these ties the way i feel like it's, it will stay like do. I feel like it's going to be to my test: tie down, use my needle to sew it down a little and then remove to the next step. So now we're going to start accessorizing the hair, but the most important accessories to add to this hair is the comb all these are paparazzi. If you don't have a comb attached to this, so the comb i'm talking about is this smokehome usually find in your wig. So i got this one from one of my wig, i ordered from china, so i just removed one of its and that's what i'm going to be using just using needle sew it down downward, and we are done so here is how it looks like at the Back of the hair - and we are done with this hair so guys this is the end result of the hair. Uh, look what it looks like so this is our wrap. Look ponytail easy to use easy to throw on easy to wear. So this is like a tutorial of how you would use it just wrap it around your head around your ponytail and then you tie with the the wool we made last. This is how it dangles, so it's so beautiful, so beautiful. So if you haven't seen the video of where i use this for all my hair, please click go down to my description, box and you're going to see it. So i'm going to be trying this showing you how to use this on this lovely, be here. So the first thing to do is to use the comb and pin. Oh sorry, the first thing to do is to slick down your hair, so this is not like slick slit down just because of this tutorial. Then you put your comb. You wrap this around your ponytail and then you tie that's basically what you do so this is the easiest thing you can do for your hair. I used six piece of the wool. Each of this will give me four minimum of four maximum of six um braids, because it's 30 inches. If i was making a shorter inches of this hair, i could use this is to make a full hair off this hair, so guys disclaimer. If this hair doesn't last long after you put hot water, if the twist doesn't last long, it is going to lose the coils very fast, but it's definitely going to look like locks. So this is what it looks like on this hair. It just looks so beautiful. Very beautiful and this 30 inches is mad for tall people for those people that are really tall. So taking down this, you just open up to wrap and wrap it and bring out this hair. So the next thing i'm going to be showing you guys is some of you will say how do i know it's a last. I already have one of this hair and this is the one i use i did last this one was a tighter braid bow. It was, it has been over a year now. I just made it into a ponytail with a stockings, and i put a comb to it. This is like 12 inches of hair and the only way you wear this is just put your comb and it looks like you already have your ponytail ready. Then you may decide to want to wrap the hair and that's it so guys. It'S been long. I made a hair tutorial and i hope you guys enjoyed this video. So if you enjoyed this video, please don't forget to subscribe to this channel, don't forget to give this video a thumbs up and don't forget to leave a comment in the comment section. Thank you. So much for coming back to my channel. Thank you so much for watching and thank you so much for supporting this channel. I love you all bye! You
Comments
OGOM’S SERIES: Looks beautiful and thanks for the tutorial