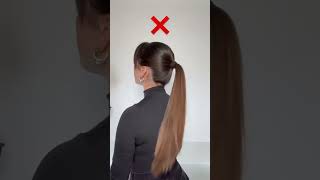
Tutorial | 30Inch Extended Ponytail On Type 4 Natural Hair
- Posted on 14 September, 2020
- Ponytail Hairstyles
- By Anonymous
30 inch extended ponytail on type 4 natural hair tutorial!
#extendedponytail #sleekponytail #type4hair
Products Used:
-shake n go organique breezy wave 30inch bundles (2)
-Spritz Spray
-Argon Oil Eco-Styler
-Göt2b glued blasting freeze spray
-Edge Booster
-Scrunchies
-long & short Bobbi pins
-hard & soft bristle brush
-rubber bands
-edge brush
-detangling & parting comb
-silk scarf
http://Instagram.com/kassidigenea
Snapchat
https://www.snapchat.com/add/kassidi.k...
Contact Info:
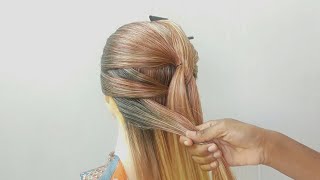
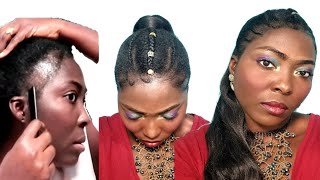
Hey guys welcome back to my channel today, i'm going to be showing you guys how i did this extended. 30 inch ponytail. So if you want to see how i do it keep watching okay, so i am starting off on blow-dried hair, so you should do the same, and the products i'm going to be using today is got to be glue. Freeze spray. Of course, i'm going to be using some spritz this just like holds it down more. You don't really need it. Eco styler edge booster, a scarf, i'm also going to be using some scrunchies some clips, a hard bristle brush a soft bristle brush a detangling comb and an edge brush and you're also going to need a comb departure here. But i don't have that picture. Some bobby pins and then, of course, the bundles and the bundles i'm going to be using today, are from the beauty, supply they're, the breezy wave in 30 inch 1b and they're literally only ten dollars a bundle at the beauty supply, but it is synthetic. So you can't like keep using it over time, so you're going to go ahead and part your hair. So this is my part, i'm doing a middle part, but you can do a side part as well. The steps are going to be the same. So once you finish parting, your hair, we can move on to the actual slicking okay, so i did try and part my hair off a little bit just to get it like more sleek. So i'm trying to do like little sections and i'm using the eco styler and as you can see like the sections, don't want to work out for me at all. But i'm going in with eco styler first and then i'm going to get my hard bristle brush and i'm just going to start sleeping it down. Don'T forget to slip down the like bottom part of your hair underneath as well, because sometimes i forget to do that, and i don't notice it until i get in the mirror, which is kind of what i forgot to do today. I didn't slick it down as well, so you'll see like i didn't. Do it as well, but trust me, i fixed it later, but yeah just start off by using eco styler slicking it down and then you're gon na go ahead and get your edge booster and put that on and then you can also use a hard bristle brush. But sometimes i use a soft bristle brush, but right here, i'm using a hard bristle brush first, so i'm just going to continue doing the steps of eco styler, then edge booster and then got to be glue, free spray, and i'm also going to be switching between Hard and soft bristle brushes because i'm not using a flat iron, i'm just trying to get it as slick as possible to get that. Sleek. Look because i'm not using a flat iron, and i really really want this to match the pattern of the ponytail hair. So if your part ends up getting a little crooked in the midst of you slicking down the rest of your hair, you can go ahead and fix it once you get to the front, it's not a big deal and then just continue those steps until you finish Slicking your entire head down. I do want to mention that when i get to the front of my head, when i'm sleeping it down, i just brush it like straight down. I don't really do a curve, but i just kind of like brush it around my ear. When i do get to my ear - and you kind of want to remember to kind of pull your edges out before, you actually start sticking this down just so it's easier to get them out, because if you get them stuck underneath the hair, when you're sleeping it Down it'll be really really hard to do your edges, so don't forget to pull those out but yeah just brush like straight down and just kind of work it around your ear. So i'm now using my scrunchie to go ahead and secure it into the ponytail holder and you can kind of see in the back where, like i miss brushing that with some gel, it's not a big deal. I did fix it later, but you will see that here in the video but yeah that's pretty much it and then we're going to go ahead and get to attaching the hair. So once you get a stick down and in the ponytail holder you do want to go ahead and try and comb out or detangle any naps that are in that ponytail because you are going to have to braid it down. So you want it to be kind of like a smooth braid. You don't want the braid to be puffy, you don't want it to be sticking out, because this is going to be the base for your ponytail you're, just going to start braiding your hair down like normal, and you want it to be nice and flat because once Again, this is the base of your ponytail, so just make sure there's no like naps in it just make sure it's like really really really really smooth in the smallest. You can get it because, once again, this is the base of the ponytail. This is also what i was talking about when i said to make sure you're pulling out your edges before you actually stick your hair down because it'll make it like a lot harder when you're doing your edges, and it doesn't even have to be that hard. But right now i'm doing my edges with some edge booster and eventually i'm going to like finish them off camera, because i was having a lot of trouble getting them the way i wanted it, but yeah just do your edges with your favorite edge control, minus edge Booster and then we can move on to the next step. So this is how my edges turned out. They really weren't my fav, but i decided to just go with it and i'm spraying some got to be glue free spray over the hair now and brushing it down. One more time before i put on my silk scarf to lay everything down, so you can leave your braid just like this, but i wanted mine shorter. So i'm going to bend mine in half a little bit and use a scrunchie to kind of secure it and make it really really firm and then i'm going to go ahead and open up. The hair like this is my favorite hair to use for ponytails, because you don't have to spend a lot of money on bundles for ponytails because most of the time people keep ponytails in for a couple of days, and this is good for a couple of days. But after that, you do need to toss it because it's gon na get tangled, because this is not like real human brazilian bundles, nothing like that, but it does the job for what it needs to do. So i'm just taking all of the like wrapping. They have on these bundles off and then i'm going to go ahead and attach to the hair and as you can see, that's the curl pattern. It'S a really really nice pattern. This is my favorite one. Actually they do have like other options. They have straight deep wave body wave anyway, french wave water wave. They have all of that, and the exact name of this hair will be in the description box, because i cannot remember it off my off the top of my head right now, but yeah once you get the bundle all the way untangled unraveled, whatever you want to Call it you're going to go ahead and start at the very bottom of your ponytail and you're going to go ahead and attach it with a bobby pin. We will not be using any glue in this tutorial or anything we're going to go ahead and attach it at the bottom, with a bobby pin. It might not work out at first, but just keep moving it around to see where it fits in. You might have to really push it in and you're gon na tightly pull the bundle around and just keep wrapping it until you get to the top really really tight. I did use two bundles because i like a really full ponytail, but one bundle may work just fine for you, but i like the look of two bundles but, as you can see, i'm wrapping it very very tight. I cannot stress this enough when you're not using any like sewing, method or glue method. You really really need to wrap tight and kind of just add in bobby pins along the way. I didn't add in that many because i don't like that many in, but you can add in about five bobby pins throughout the whole ponytail and you'll be good. Now this hair may get tangled along the way, because once again it is synthetic but just kind of like finger detangle it and the tangles will come out pretty easily. So i'm going to go ahead and open up. My second bundle for the rest of my hair that i have left at the top when i'm attaching it. I just do it the same way. I did it before. I just put it on top of the braid and i then get a bobby pin put that in and then i'm going to tightly wrap it around until i get to the top of the ponytail and once again, if you have a little difficulty getting the bobby Pin in just kind of move it around and try out different angles, and then it should go in once you finish like the entire ponytail, like attaching it you're going to take out a piece from the bottom you're going to detangle that piece completely, so that it's Fully straight and you're going to start tightly wrapping that around because it's going to be your base, where you can see that track like at the very very top of this um ponytail, that's gon na get cover as i'm wrapping it. So, like any flaws, you have at the very top of your ponytail, will get covered with this wrapping method. So don't worry but just make sure you're wrapping this really really tight and you're going to add some got to be glues, free spray to secure it, because if you don't do it very tight, it may come a loose and that's not going to look that good. I didn't wrap mine that tight this time, but just make sure you're doing it really really tight. So i'm now spraying my got to be glue free spray to secure it. You can put as much of this as you need it because it needs to be secure. So that it does not come off because once again we did secure this with bobby pins, so just make sure it's really secure with that got to be glue, free spray and that's pretty much how this style turned out for me. Now i'm getting some spritz and i'm just gon na spray that over my hair to just make sure everything is laid down and nice and now i have my 30 inch extended ponytail with no glue no sewing and no flat iron, so yeah. I hope you guys enjoyed this style. Okay, so that's going to wrap this video. I hope you guys enjoyed it and found it helpful. Don'T forget to like comment and subscribe hit the bell - and i will see you guys next time - bye, guys

Comments
Raya’s World: the back to back uploads, we love it❣️❣️
Raheal Mensah: You slayed it girl
T B: You should do a braid next ☺️
Neya Royal: Yass new subscriber
quiet girl: You are so cute