Invisible Ponytail Tutorial: 30 Sec Hair Bond | Iam_Nettamonroe
- Posted on 30 November, 2017
- Ponytail Hairstyles
- By Anonymous
READ ME!!!
Products used:
Salon Pro 30 sec Molding Gel ( www.salonpro30sec.com)
Salon Pro 30 sec Super Hair Bond Glue (www.salonpro30sec.com)
Ashtae Curl Wax
Beeswax
Sassy Braiding hair
CHI flat iron
Fraddish hair (amazon definitely wouldn't recommend)
Business
www.instagram.com/iam_nettamonroe
sc: iam_nettamonroe
FTC: Sponsored by Universal Beauty Products Inc.. I only recommend products or services I use personally and believe will be good for my viewers. I am disclosing this in accordance with the Federal Trade Commission guidelines concerning the use of endorsements and testimonials in advertising.
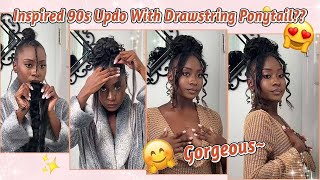
Hey y'all, listen, uh, tamaroa, welcome back to my channel, so my voice does sound different, I'm coming out of a cold, so my voice is returning, but I had to get this video film so today, I'm coming at shot with a hair tutorial featuring salon Pro 30-second Products I actually use these products on a regular basis. What I do quick, weaves and invisible ponytails on clients, so I wanted to come to y'all with the hair tutorial on how to do and in this ponytail on yourself. So would you like to see how I achieved this look then stay tuned, so the first thing I'm doing is adding some ash take curl wax to my perimeter of my hair. I pressed on my hair last week, but I need it to be a little bit of a smoother finish. So I'm just using that in my flat iron just around the perimeter to smooth out everything. So it could be a little bit more polished and then I'm going to go ahead and take the beeswax and add that to my perimeter to add some shine and then I'm taking the 30 second molding gel and I'm gon na. Add that as well and then I'm gon na brush it all together and secure my ponytail and you can position your ponytail wherever you want to. Of course, I'm doing my right at the top, but you can do yours or lower or you can even do it or like the really low back ponytail. You can also do a side ponytail. Whatever you want, you can do just make sure that you secure the ponytail, nice and tight, and I'm just gon na tie a bandana around my perimeter just to smooth it out, while I'm creating this invisible Pony. So I'm taking sassy braiding hair, the braiding hair, comes with a rubber band already on it. So I'm going to use that to help secure the hair to my real hair and then I am going to just go ahead and braid my hair up. I did it like this because I wasn't sure of how long I was gon na keep this and I didn't want to have to shampoo it out. So I went over head and braided my hair down and then I'm gon na take the braiding hair and I'm going to flat wrap that around my hair kind of like when you do the faux locs. So I'm just going to flat wrap the sassy braiding hair around my hair, just to protect it from glue and to also like I said, if I wanted to take this out really fast I'd be able to without having to worry about glue removal. So I'm just wrapping around and, as you saw when I ran out of hell when I was close to running out of hair, I just grabbed another piece of the braiding hair and started wrapping again. You can see I'm about to do again grabbing a new piece and wrapping it around I'm gon na. Do this all the way until I get to the end of my hair and then once I get there, I'm going to go ahead and braid. You are definitely more than welcome to just braid all the way down just try to tuck your hair as best as possible into the braiding hair, but I didn't want to have to take the time to do that. I wanted to show you guys a quick way to do an invisible ponytail, so this is the way that I did it so at the end of the braid, I'm just gon na secure it with the other rubber band that came in the pack and now, let's Go ahead and get this 30 second hair bond glue popping. So I'm gon na take these two bundles of 10 inch from Fred hair. I got this from Amazon and I'm going to put the glue on the weft and then I'm gon na start to wrap right around the bottom of the braid and when I start out at the bottom, I do like to hold the hair there. Just for a little bit just to you know, make sure that it's secure make sure that it's not going anywhere, but the rest of the braid is a breeze. So now I'm just going to wrap the weft around the braid and then once we run out of glue, that's already on the weft, we're just gon na add some more see see were adding more glue and then we're just gon na continue to wrap. And now, since the bottom over, the braid with the weft is secure and the goo is already dry, everything else is going to be lightened. It'S gon na be so fast, so yep just keep on adding the glue and then wrapping it around. You want to make sure that you're careful, though not to get the glue on the hair, especially not the ends of the hair, because you wanted to be free-flowing, but this is a really easy process, definitely cute for, if you're going out - and you know you need Something fast and something that's going to make a statement, but yet still simple, so now we're at the end and I'm just going to wrap it around as close to the ponytail as possible and I'm gon na hold it there. Just like I did at the end of the braid and then I'm gon na take a little piece of hair and just wrap it around to cover up the ponytail holder. So now, I'm just gon na take my edges brush that I got from the beauty. Supply store and xxxii molding gel and lay my baby hair, exactly where I want it to be. I feel like baby hair is really important for this. Look because it kind of finishes it off and makes it a little bit more. You know gives it a little go more provides a little bit more after. I lay my baby here, exactly how I want it to be. I just tie it down with a bandanna until that dries and that's it here is the finished. Look. I hope you guys enjoyed it make sure you check out the description box for all of the products that I used in this video. As always, thank you guys for watching make sure that you like comment and subscribe and I'll see you next time in my next video
Comments
Heart To Soul: This look is so quick and cute! Thanks for sharing!
Life as Aisha // Sole of Kicks: Glad you’re back! Another great style! Makes you look super young! Great technique for the ponytail! I’ve always wanted one but even after straightening my hair I don’t think I could get it flat enough lol! You’re natural hair is beautiful & cute outfit you have on!
Mariela Merino: Your hair is beautiful. Love how simple this is. I wish I had longer hair
Erica LeighXO94: This really looks so pretty! I always say this, but I love your hair and makeup vids xo!
Joy Marie: This is such a good technique!! You look gorgeous with that long ponytail :D
Nerdy Girl Makeup: What a cool technique! The long ponytail looks badass on you!
Liftlikeagirl: I have recently started using hair wax and it is so useful!!! Love this look gurrrl.
Jeanet Henning: Cool look and trick, thanks for the tutorial.
Trish Chanda: Thanks for sharing I i didn't think of doing it this way!
K D: girl you got all that hair! I'm jelly ♡♡
FᎾᎾᎠNᎬᏙᎬᎡYᎢᎻᏆNᏩᎬᏞᏚᎬ: Wow that was pretty neat...I am stuck on your lip color...whats the brand & name ?
Makeup by Marisol: Holy crap! That’s fucking genius!!!!!
Brianna Denice: You have a lot of hair
Clueless Mama DIY: Hope you’re feeling better. Do you have a baby edge vid I need to do those
K D: I had to comment again. girl you turned that 10 Inch hair into rapunzel inches! yass
StylezBy ROBIN: Yessss