How To: Diy Tape Ins| Best Technique For Fine Hair + Thin Edges|Easy+Quick| Gorgeous Color| Ft.Ywigs
- Posted on 19 October, 2022
- Ponytail Hairstyles
- By Anonymous
Thank you for watching how I install these beautiful highlighted tape ins on my fine hair/thin edges. I hope this video is helpful! Below are all the items I used to achieve this look:
Direct link to the 22 inch Natural Black Mixed Chestnut Brown Tape-in Hair Extensions:
Direct link to the 22 inch Natural Color Silky Straight Tape-in Hair Extensions:
More Tape-in Hair Extensions:
https://www.ywigs.com/collections/tape...
Ywigs Clip-ins Hair Extensions:
https://www.ywigs.com/collections/clip...
Ywigs Micro Links Hair Extensions:
https://www.ywigs.com/collections/i-ti...
Ywigs U-Part Wigs:
https://www.ywigs.com/collections/u-pa...
Ywigs HD Clear Lace 13x6 Lace Front Wigs:
https://www.ywigs.com/collections/13x6...
Ywigs official website: https://www.ywigs.com
Connect with Ywigs:
http://www.instagram.com/ywigs_officia...
https://www.facebook.com/Ywigstore/
Snapchat: Ywigs Hair
THANK YOU FOR WATCHING! Like, comment and SUBSCRIBE! IG: @ChakaVanessaD https://www.instagram.com/chakavanessa...
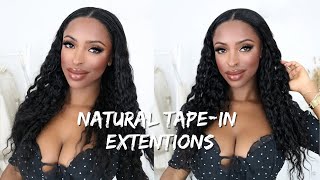
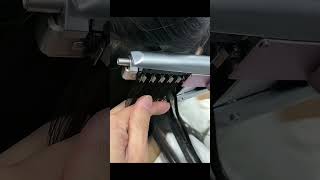
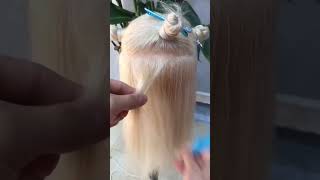
Foreign, thank you so much for clicking on this video. If you are new here, I make videos on lifestyle, Beauty and Home Decor. So if those are the type of videos you like to watch subscribe to my channel, if you're already subscribed thanks Boos for coming back and thank you so much for the love. So I'm excited for this video because I came up with a technique that was like way easier than what I did the first couple times I tried taping, so I am excited to share this with y'all um, as you can see, we're jumping right into this video. I'M starting off with a silk press: nice, clean hair, nice and straight and silky to match this silky texture, I'm using three bundles of tape-in extensions from y bags. Everything will be linked in the description box. Make sure you check it out. So what I'm doing that is different is, I am parting straight across I'm putting these tape ends upside down and I'm flipping them over and then adding the second adhesive to sandwich the hair together. So you will see me doing this a few times um, the back. I'M just going to keep it real. I can't see the back, so the back is not as neat but because I parted straight across and I just line those extensions. I just line those pieces across it made it super easy, as opposed to doing it. One piece at a time so here I've started with my bundle of black hair. I had one bundle of black hair and two bundles of the highlighted hair because I did want it to blend and I wanted to have more of a highlighted effect. As you can see, this row is looking much neater practice makes perfect. I started to get more comfortable with this technique and I just line those tapes straight across that part. This is cool because when you flip it over, you instantly know. If you put that tape too close to your scalp, because I'm starting with the bottom tape, I know it's going to be comfortable. If I want to flip it up and put it in a ponytail, I know it's going to be flexible and the key is to part very thin layers of hair in between. So you can still see the tapes which help me when I'm trying to like put the tape on top and secure it together. Don'T want to have a lot of hair in between, because you really want to make sure the adhesives are sticking together and not hanging on your hair. That'S what makes the style comfortable! That'S what makes this style versatile! That'S what makes the style last is you don't want to have a lot of hair in between, and I know that is scary because it might feel - or it might like, seem like it's going to be too heavy, but this is not heavy. These pieces are so light. This is like my third or fourth time. Trying tape ends and this technique is absolutely the best is the fastest. It'S the easiest and I stamp it is - is a hack. I wish I was doing this from jump, so here you can see it is flat. I can pull it up in a ponytail. I wouldn't just because my hair is really fine, so yeah um here is me doing the sides. This is really important, because I want you to notice that I did it and kind of like a diagonal. I didn't go just straight across when I came to the front. I wanted to make sure these tapes were falling toward my face. I have super thin edges. I have really fine hair, so placement in the front was really important so that these tapes didn't show, and so they were comfortable. If I wanted to pull them up or pull them back or you know whatever the first time, I did it, I went ear to ear and that wasn't the best technique. So I would highly highly suggest, even if you don't have thin edges, to lay your tapes in the front diagonal. I also would suggest, starting with the bottom tape that way, you can feel if it's going to be flexible when you flip it over. So I did the same thing on the other side and I'm just showing you how those tapes are super flat. I can flip them up. I can do a middle part. I can do a side part. I can even do a half up half down um. I probably won't just because my edges are really thin and I don't want to pull my hair back, but if that's not the case for you, this style, you can do so so much um. I love the way that this came out. This texture was really really beautiful. So if your hair texture is similar to mine, the silky straight well, probably work really well for you. They also have a really gorgeous curl pattern. One I have a video, I use their curl pattern. Well, I use their curly hair before for tapins, and that was my favorite. This color is absolutely gorgeous y'all here, I'm just cutting some layers. I kind of wanted more of a curtain, bang effect. So that's what you see me doing here, just layering from where my real hair starts and just bringing those scissors down, then I'm using my flat iron to make sure that my curls are going to fall. The way I want to I'm going to finesse my edges with some of this brown gel, it's not like it's not an edge control, so it's not like super shiny. It doesn't have like a crazy hold, but it does what I needed to do. This is what it looks like y'all, I'm pulling it back. I wear it in a ponytail. It was really pretty really flat, really natural, looking y'all. This is a look. Super easy go ahead and try to DIY this, because the style in the salon is so expensive. This beautiful scrunchie, I'm wearing is from ellenyork.com it's a black owned small business and the DMV. I will leave the link in the description box. I absolutely love it. It is such high quality. I get compliments all the time. I hope you enjoyed this video if you liked it go ahead and show me some love in the comment section give this video a like if you want to see more like this subscribe to my channel and check out some of my other videos right here. Thank you so so much for watching, and I will see you in the next one come on.
Comments
Victoria Santana: Hi I’ve been watching ur technique on DIY Tape ins and love it! I’ve never done tape ins or a sew in, which of the two do u prefer more for thin hair? And which last longer? Thank you ❤
Fanci Nails: Very Pretty I really want to try tape-ins but my hair is thin across the front
Velvet Monroe: I came rushing lol The ladies with fine hair got our own struggle. If you got a technique , I'm here for it. what solution do you use to remove it? I can't afford to lose any strands
veronica miles: New here,I to all my life suffered with embarrassing bald sides,I have never done on hair,,no way can do full head, just want to do ponytail with Ideas of covering sides.