Do This To Secure Hand-Tied Weft Hair Extensions #Handtiedextensions #Hairextensions
- Posted on 31 October, 2022
- Ponytail Hairstyles
- By Anonymous
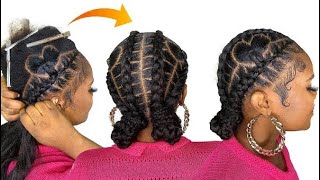
I'M going to show you how to start the stitch for a hand-tied weft extension install first you're, going to focus on the first three pockets of those two front. Beads make sure that your weft is securely placed with enough Clips you're going to start on the third pocket in and loopy double threaded needle right on through it and make sure to do a lock stitch by looping that needle right between the two threads. And now your weft is started, so we're going to move towards the exterior, taking the needle and thread to the second pocket and stitching it the exact same way and then finally, going to the very first pocket looping it through. And this is where you're going to double Loop it by starting three pockets in and then working towards the exterior and then working back in allows us to create an anchor Stitch and a lock stitch. So that way, this weft is not going anywhere. Let me know down below if this video helped and be sure to share it with a friend


Comments
Mirella Manelli: Learn how I end the stitch here: How I end the stitch for a handtied weft extensions install #hairextensions https://youtube.com/shorts/yrM8ORNjoVM?feature=share
Amanda Tanner: looks great!
Courtney Clark: How do we remove them? Like the right way? I’m in cosmetology school and I wanna practice
Izora Iza: I had a friend do this on a doll using doll hair wefts. She made the Barbie doll have some pink in it but she figured out how to do this so it can be undone later when her sister may not want the doll anymore.
Azariah Ammishaddai: ❤❤❤
~Blue Sky~: oooo