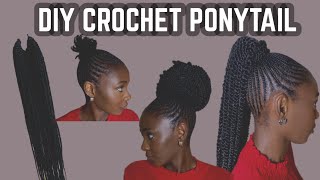
Diy $12 Drawstring Crochet Ponytail For Natural Hair W/ Braiding Hair
- Posted on 01 December, 2018
- Ponytail Hairstyles
- By Anonymous
Here's a DIY $12 drawstring crochet ponytail for natural hair w/ braiding hair. This crochet ponytail is a great for low maintenance.
BECOME A CURLFRIEND & SUBSCRIBE! http://bit.ly/1m1H57j
::::::::::::::::SHOP:::::::::::::::
➜ FreeTress Synthetic Braids – Beach Curl 18" http://bit.ly/2PKvz2Z
*I used 1.5 - 2 packs in the Color: OT30
➜ Jane Carter Solution Revitalizing Leave-In Conditioner http://amzn.to/2bj6CI8
➜ Eco Styler Olive Oil Styling Gel https://amzn.to/2QtmM5v
➜ Curls Creme Brule Whipped Curl Cream https://amzn.to/2KKUOwP
➜ Goody Ouchless Women's Braided Elastic Thick https://amzn.to/2U33cvX
➜ Rat Tail Comb https://amzn.to/2SpeXeO
➜ Shop my Kinky Curly Natural Hair Clip Ins & Save https://naturalbosslady.com/discount/C...
::::::::::::::SOCIAL::::::::::::::
+ BLOG: http://www.Rayann410.com
+ FACEBOOK: https://www.facebook.com/Rayann410
+ INSTAGRAM: http://www.instagram.com/Rayann410
+ SNAPCHAT: @Rayann410 www.snapchat.com/add/Rayann410
+ DAILY VLOGS: https://www.youtube.com/user/Rayann410...
::::::::::::::TECH::::::::::::::
Canon EOS Rebel T5 http://go.magik.ly/r/rayann/a0dc/
View Finder via Laptop http://amzn.to/1N9OxJ6
2015 Apple 15.4" MacBook Pro Retina http://go.magik.ly/ml/lb4/
SanDisk Extreme PRO 32GB Memory Card http://amzn.to/1GLsTWe
CowboyStudio Umbrella Lighting Kit http://amzn.to/1CoSleu
Neewer 18" RING LIGHT Dimmable Camera Photo/Video 75W(equivalent to 600W) Fluorescent (Light Only) http://amzn.to/2pcRDme
Neewer 18 inches Collapsible Photography Video Light Softbox Diffuser for 75W(600W Equivalent) Ring Fluorescent Light Flash Light http://amzn.to/2pLmSrq
Neewer 75"/6 Feet/190CM Photography Light Stands for Relfectors, Softboxes, Lights, Umbrellas, Backgrounds http://amzn.to/2pLatDU
Neewer Mini Ball Head with Lock and Hot Shoe Adapter Camera Cradle http://amzn.to/2pcSYtj
::::::::::::::MUSIC::::::::::::::
Production music by www.epidemicsound.com
*This Video is not Sponsored. Some links may be affiliate links!
Brands & PR inquires ONLY [email protected]
I'Ve shown you guys how to create this DIY drawstring ponytail under $ 10 today, we're doing it under $ 1, using a dollar store, hair, scrunchie, hey conference and welcome back to another natural hair tutorial today. We'Re creating this low sleek crochet drawstring ponytail, using a some free trust, hair sent over from a diva trust, calm. They did go ahead and sponsor today's video. So if you guys are interested in any of the products or hair that I'm using in today's video go ahead and check the description box for all of the links, I'm just using a little bit of hair gel to base my little ponytail. I need to create this low sleek ponytail, you guys know. I used this little trick when it comes down to my naturally thick hair. I start off with the back of my head and I just go ahead and create a ponytail at the back of my head and I'll. Just pull the hair at the front towards that back, ponytail, basically creating two ponytails making it a lot more easier to manipulate than just trying to get all of this hair into one large ponytail. So that's what I'm doing here! I went ahead and washed and conditioned my hair. The night before I used some creme brulee from a curls, as well as the Jane Carter solution, leave-in conditioner, to create these four large plaits the night before I let it air dry. So now today my hair is nice and moisturized, and putting this gel on will go on extremely a seamless. It won't be super hard and crunchy, because my hair is moisturized underneath just but I'm pretty much doing here. I went ahead and created a middle part, but you can go for whatever kind of part you want to go for. I always like middle parts, because I have a big forehead. I don't like to pull all of my hair back and I feel like it's a little bit more of a low tension hairstyle when you go ahead and create that middle part versus pulling everything backwards. So I'm just going to go ahead and brush everything into place. Bring all of that hair in the front towards that lower ponytail at the back of the nape of my head, and I'm just going to gel everything in place and create that a low ponytail. Now that our ponytail is in place, I'm gon na go back in. Look some more Joe just to make sure that my hair is nice and molded and sculpted down. I'M gon na get all of the flyaways to lay down nice and flat. I'M just going to go ahead and use my paddle brush to comb out the curls. On my ends in my hair, so I can create this little plat. That'S gon na make my bun lay down nice and flat, I'm going back in with my edge control on my edges. You guys know this is my little edge control trick. This is the only way that I can get edge, control to work for my own natural hair and actually stay. I actually have this hairstyle in my head. Still to this day, it's been about three days and my hair is still pretty much laid. So I love this trick. I go in with Joe and then I top it off with the edge control last and I just base my entire hair line, with the edge control get my little swoops and stuff. However, you like to lay your own edges. I like the suit, but this is my base down ponytail I'm gon na allow that to dry while we go ahead and work on our drawstring ponytail, so I'm just using my little hair scarf and I'm going to make sure that everything is nice and flat I'll. Let that sit for about 30 minutes or so while we go ahead and work on that ponytail, I'm using hair from diva trust calm. You guys can use whatever you like, but for this ponytail we're using this $ 1 hair scrunchie from the dollar store. So I'm using the beach curl collection from free trust as the crochet braiding hair from diva trust, calm. I'M gon na go ahead and pretty much just tie all of the crochet hair strands on to this hair tie and the hair tie is going to act as the drawstring for this ponytail. It'S really really simple and easy concept, I'm just showing you guys kind of the technique that I went ahead and did because I'm by myself doing this, I don't really have anything to hold on to. But you can easily put this hair tie onto you like a door knob and have it hold it while you go ahead and tie the hairs, I separated my hairs to go ahead and get a fuller look and I'm just pretty much just tying the hair onto The hair elastic before step-by-step breakdown, I'm pretty much just taking one strand of the crochet braiding hair separating it for a fuller, look wrap it around my finger, wrap that through the hair elastic and just bring the hair through that loop two times, which is pretty much Creating a knot on to the hair elastic, like I said, if it's much easier for you to do just for like filming purposes, this was a lot easier for me to go ahead and just drop it on my wrist and tie all the hairs on my bracelet. You guys can see really well, but you could easily put this hair elastic onto a doorknob and just tie all of the hairs on for your purchasing reference. This is what one-and-a-half packs. It looks like two packs and altogether I used, maybe about a pack and a half to two packs total. I literally had a half a pack left from my last hairstyle and I just went ahead and trimmed off all the excess hairs. So at this point my hair is pretty much dry. I took about 45 minutes or so to create the entire ponytail, make it as full and thick as I wanted it, and I'm just gon na go ahead and wrap my plat at the back of my head to create a low bun. This bun can be as small as you can get it to be. This is a small guy can get mine. To being is my hair is super thick and I'm just going to wrap the hair elastic around my bun, leaving the actual crochet hair on the top of the bun. I want it to pretty much waterfall over the bun itself that way it covers and hides the button. Now you want to make sure your hair is super thick and fold. The ponytail itself is super thick and full that way it actually covers that bun and it doesn't end up showing I separated the hair before installing, but I wanted it much more. Fuller. Look to make sure that I'm able to hide that. But in the back of my head and I'm going back in with bobby pins, just to pin this entire ponytail into place, focusing on hiding that entire bun in the back of my head, so the hair is pretty far. This time is gon na keep on teasing. The hair trying to make it as big and fluffy as possible as ages and age is very, very well and natural. I went ahead and took it off each night which allowed the hair to last me a much much longer time, and this is the completed look. So I really hope that you guys enjoyed it. I love you guys, loving the love in your natural hair,

Comments
GRAYCYLYN: This is so beautiful and easy, definitely trying this
S G36: This should have so many more views than it does, I've literally watched 100s of these d.i.y ponytail videos and this is hands down the prettiest and simplest by a mile
Jessica Cain: This is a great video!!! My beauty supply store doesn't have a lot of options as far as ponytail but they do for crochets lol...thank you stay beautiful!!!
Alyssa Smith: Love this look on you. So beautiful!!
M Nicole: Omg Genius!! Will do this ..I wanted this ponytail look for my birthday
Diana Isabel: I loved the way u made this ponytail. It looks so natural ✨ Get it girl !
Beautiful Natural Curls: This is so beautiful on you!
admoore1974: Thanks for sharing this!
Deidre Rilry: Girl i love it beautiful
Aishah Gumbs: Very cutee !
Unique Flowers: Do you still use ors hair pudding to slick ponytail or gel is better
MomofTwins Mcintosh: I want one
embrace.Godliness: