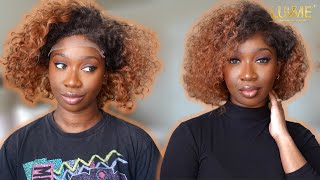
Flat Twist Tutorial!! - Front Flat Twist With Curly Ponytail Style!!
- Posted on 20 March, 2016
- Ponytail Hairstyles
- By Anonymous
Flat twists are perfect to use as a style OR as a way to set natural hair into nice, frizz- free loose curls.
Here's a quick tutorial on how to do a flat twist using a front section that frames your face. Please remember - learning how to flat twist TAKES TIME and PRACTICE!!! It's not something you can perfect after watching one time, and there different techniques that work best for everyone. I tried to slow down some of the more difficult parts to master but, please rewind go back as necessary while watching this vid!
As always, please leave any additional questions or comments below. Kind and constructive comments ONLY are appreciated.
Visit my blog at www.onmylevelchey.com
Follow me on IG @onmylevel_chey
Follow me on twitter @onmylevel_chey
and
Snapchat @onmylevelchey
Email: [email protected]
Hey guys so today, I'm gon na be showing you guys how to achieve this style, but it's mainly a tutorial to do a flat twist using this style, so you're gon na want to start by parting off the section that's gon na be flat twisted. I am NOT a huge fan of parts, I'm not a perfectionist, and so you will see that this part is actually pretty crooked, but I'm not going out. I'M really just doing this for the video, and so, if you're going out or you really want your style to look sleek and neat, you should try and get your part straight. And then you also want to make sure that you start with a side part. At least that's what I do make your straight part across the top of your head to kind of frame the flat twist and then, when you get to the side, you want to kind of let your part trail off a little bit, because your flat twist is Going to swoop to the side and join the rest of your ponytail, so you don't want to have a hard edge at the end of your part, I'm gon na be using this mixture of aloe vera juice and water to dampen my hair just a little bit. I want to get it just damp enough to do the style, I'm working from a two-day-old twist out, and so I need to dampen my hair a little bit just to make it untangled enough for me to run my fingers through, as I'm doing the twist out. So I'm using my Denman brush starting at the bottom and detangling my wait up again. My hair is barely wet. It'S just damp. You can see it looks a little bit wet, but it's not dripping. It'S not soaking wet. If it touched my clothes, it wouldn't make. My clothes wet so should only be like 20 percent way to do this, and so you want to smooth the hair out like this and also to prepare to add a little bit of product. That'S gon na help, smooth the style and add some hold to your flat twists. The cool thing about doing flat twists as a style is that after you take them aloose they look really nice. It'S a really nice! Twist out, I used the Cantu shea butter coconut curling cream. I really like that product a lot. It has really good texture, nice hold nice moisture, and so, if you notice spots in your hair, where you need a little bit more moisture, you want to use the product to moisturize it and not necessarily more water. So I found added that use my Denman brush. Just move out again, I'm gon na section off a little piece in the front. I'M gon na split it into two and that's how I'm going to start my slide twist. So, as you can see, I'm doing my flat twist towards the back of my head and away from my face. This is the direction that I like to do my flat twist when I'm having it framed my face. I think it looks better rather than flat, twisting forward so that it's going towards my face so here to do your flat twist. You want to grab sections of the hair with your index finger. I use my nail to kind of separate that hair from my head, and you want to hold on to the piece that you already have in your hand, grab an additional piece of hair, bring it together and then twist it over once you have that hair. It'S the same technique that you would do with a French braid only much simpler, and I kind of use my fingers while I'm doing this to feel for the edge of the section that I'm flat twisting. So I feel for the part, which is kind of the border of the flat twist and once I feel that I've reached that edge. That'S when I pull the section of hair join it with the other piece of hair and twist it over. You can see me, do it again here so use my index finger feel for the part pull my finger through join that hair with the piece of hair that I already have in my hand, you're gon na want to use your diamond brush to smooth it out. Occasionally, as you're doing the flat twists to avoid tangles or bumps in the hair, you just want to repeat this movement over and over again until you have a flat twist. That has come all the way across the front of your face, so probably about right before you get to your ear, once you've done that you're going to see I'm reaching for it again feeling for that part that, because my part is messy, I was a little Confused to where the part was at that spot um. So when you get to the edge of your face, you probably want to change the position of your hands. So right now I'm changing my hand position because I'm gon na grab my part now, starting from the front of my hair, I'm gon na grab the hair from the front rather than from the back where the part starts, because I want my flat twist to change Direction - and I want my twist to start to kind of curve towards the back of my head and off of my face because remember we're gon na swoop that twist towards the back. This is a really important part. I'M now getting ready to do a regular twist and my sections were uneven, so I grabbed a little bit of hair from the fatter section, put it over towards the skinny section and then just twist it as normal. That'S a really quick trick when your sections are. Aren'T even you won't even be able to tell that you did it. It won't mess up the flow of the twist. So here, of course, I'm smoothing out my edges gathering all my hair and then I decided that I needed to wet the back of my hair. Just a little bit, it was kind of puffy did a couple sprays on the ponytail, another quick spray on the edge smooth that out with a Denman brush and then voila finished product very simple, and it's a nice style for work or going out thanks for watching Guys, I hope this was helpful, leave comments below

Comments
Bianca N.: Easy to follow !!!
Ali Life: I need to learn how to do this lol. New subbie
So Divyne: u are so helpful I will definitely try this out
Jade Townsend: I love this video and your hair is and did you do it on freshly wash hair