No Heat! No Glue! 48" Slick Braided Ponytail On 4C Hair
- Posted on 30 July, 2020
- Ponytail Hairstyles
- By Anonymous
Hey my loves!
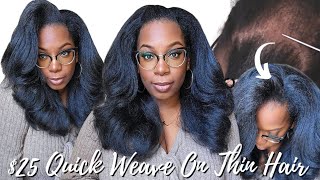
Today I will be showing you how I achieved this cute, sleek protective style for only $5. Enjoy!
Follow me!
IG: @Chilee_Baby
Twitter @Chilee_Baby
Hey youtube: it's your girl, julie and welcome back to my channel. If you are new to my page, then welcome and if you're a returning subscriber then, as always, i appreciate you so in this video. I will be doing a tutorial on how i achieve this sleek bun braid, look especially if you have 4c hair. This tutorial will be really helpful for you. So if you're interested in seeing how i achieve this look then make sure to keep watching. This is my hair um. I guess semi stretched, i put most of my hair into braids, and then i took these two braids out at the top and i literally just pulled them last night and clipped them with bobby pins to have this top portion as straight and sleek as possible. So because i have 4c hair, i'm using as little water as possible, why i detangle it so i start by finger detangling and then i'm going to use my easy brush to go through the ends. So once you've detangled it's time to sleek by section using smaller sections to sleek down, your ponytail is really key. So here i start by sectioning off the back of my hair so that it's easier to work with and then i put away the rest of my hair. So for each section i go through the same method. I start with the 24 hour edge control with a generous amount, and i apply that on the top and the bottom of the section, and then i use this brush specifically and i brush through um rubbing in the product all the way to the ends of my Hair and then i use my hand to slick it down, please your hand is important. Ladies, it's going to help to slick the process. So then, after that, i use the extreme gel and do the same method, brushing it all the way through the hair section and then using my hand to kind of smooth it out. You don't have to use the got to be spray gel, but i like to add just a little bit to make sure it's super sleek and then you're done with that section. So, like i said before, you're going to want to do this in separate sections to have the most sleek bun possible, so i repeat the steps i use this amount per section, push that through the hair and then use my brush to brush it all through add My extreme gel and then put this section away now for the front section of my hair. I went ahead and repeated the same steps, but i put the hair into the ponytail all into one section. So you'll see what i mean. I repeat: the steps rub in the edge control brush in the extreme gel, and then i don't put that away just yet and i use the same process on the top for this top piece. Make sure. Ladies, it's extremely important that you put the edge control on the ends of this section as well, so that it can lay down as slick as possible and then brush that in and repeat the same steps. Oh child y'all, don't know what it took. So obviously i don't need bobby pins, but if you do, you can go ahead and add them. The reason i added bobby pins was because some of the sections was not as slick as i wanted to so i go ahead and pull that back and then secure it with a bobby pin and i'll remove them at the end. Now this is key. Ladies. I use a do-rag and i've never been disappointed before it just gets. My buns super sleek better than a regular scarf. Does i highly highly recommend using a do rag to lay everything down, so this is the hair that i will be using it's the 84 inch expression braiding hair, so i actually ended up using two of the individual braids to make my actual braid thicker. So here i didn't attach it - i just placed it on my bun so that i can untangle it and then add them together. So this step is really important as well. Once i added the hair together, it began to tangle, so i ended up twisting each individual section of the braid beforehand and then adding a rubber band at the end to secure it. So you'll see when i begin to braid it it made the process so much easier. So essentially i added one part of the braid over my hair and then braided that into the entire braid. So i saw a lot of different methods, but this worked for me. So to finish out the style you're going to want to take a piece of the braiding hair. I took a piece from a new pack after that you're going to want to spray the hair, with the got to be free spray to make sure it sticks and then wrap it around your braid for a more seamless look. So this step is, of course, optional, but i personally didn't want the braid to look perfect, so i went ahead and pulled out a few pieces of hair to have a more natural. So after you lay your edges, you can go ahead and add a little bling to the look to make it pop and you're done all right. You guys. That concludes this video. I hope you enjoyed it if you did make sure to give me a big thumbs up, make sure to like subscribe and share. If you haven't already make sure to follow me on all my social media, all my social media is the same chili underscore baby. Thank you guys for watching this video and i can't wait to see you in my next one: peace, love and blessings.
Comments
Ms. Dose Of Melanin: well well look at my hair type out here doing it’s thang making us proud..girl u did that ..love the final look
Myuhhh: First and love your vids ❤️❤️❤️
Chelle Ocean: you made this look easy. watch me poop it
Chelle Ocean: u fine