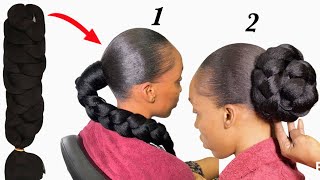
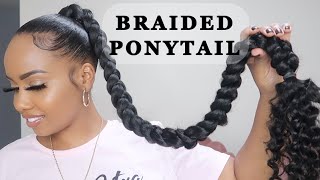
Sleekest Long Braided Ponytail On Type 4B/4C Hair -|For My Graduation Shoot|
- Posted on 27 November, 2020
- Ponytail Hairstyles
- By Anonymous
Hey Loves, this is a video on how I did the sleekest long braided ponytail on my type 4 hair for me for my graduation shoot. I was shocked at the outcome because my type 4 hair can be hard to work with sometimes, but I did it, guys!!. Please give this video a thumbs up and hit the subscribe button if you haven't. Thanks for watching guys.
Hey loves, welcome back to my channel and it's beauty name again and today we're going to be doing a sleek, braided ponytail and i'm also going to um be showing you my graduation videos and my graduation pictures, because your girl is now a graduate. So, first off i'm going to be going with my mega growth living conditioner. Yes, i did not use cantu leave-in conditioner today, okay, so i'm going to also um pat the front side of my hair, i'm giving it this covey shape or curvy foam, because i don't just want to do the regular um straight pattern i want to. You know add some juice to this hair because it's my graduation shoots guys, okay, so i'm just trying to make the part very the pattern very clean. I don't want it to look rough and not looking all that professional. That'S why i'm using a very sharp cutting or pattern comb to achieve this um covey look or cover foam that i want so just want to make sure that it's clean enough to pass as a professional pattern. She gets all right so after that i'm going to divide my front part into two sections, because it's quite hard for me to gel the front side of my head down or to you know, sleek it down with gel. So i always have to patch the front side of my hair separately from the back portion of my hair, so these are just the suicides i'm going to be patting. While i walk with the back um for the back, i'm just going to comb it out to give it more volume, because i already um wet my hair once i wet my hair shrinkage comes to play, so my hair is already going through that shrinkage process. So i need to like comb it out for more volume which i'm never really going to get it's just for sure. Basically, so i'm just trying to comb it out for more volume. While i go in with my eco styler gel, but in olive oil and argan oil, if i'm right, the green and the yellow, then i'm also going with gorillas, not gel, so you know make everything look sleek at the end of the day, so i'm going to Start with i'm applying generous amount of gel at the back portion of my hair, then i'm going to move to the side. Then i'm going to move to the front this way. The gel you know um slicks down the most important part of my hair than just putting gel all over my hair. Basically, i really don't like to add so much gel to my hair, because my hair doesn't do well with um too much gel. It begins to age, then begins to get flaky and stuff, so i always try out as much as possible to not add so much gel or too much product to my hair, so i'm just combing it out for more volume, because my hair is going through that Shrinkage stuff so um i'm going to be um brushing again and then packing with my air, packer or scrunches or whatever people call that in shadow elba car stuff. Shall you get my point so i'm just going to be packing. My air um with that and i'm going to make sure that it's slick enough and firm enough before i go on other sections of my hair. I decided to go three times with this because i wanted it to be tight, but you don't want it to be too tight. So you don't end up having headache just in case you're concerned. For me, it wasn't too tight and i did not have any form of headache. So it's fine, i'm fine! Thank you! Okay, so um just coming out for more volume, because i might end up plating the tips of my hair and yeah. That'S it so for the front section i'm going to um part into smaller portions, because my hair is quite hard to work with in the front. If you get what i mean, i don't really get to sleep the front side of my hair. Well, if i do not go in with the gel sections or portions by portions, so i'm starting with a smaller portion and i'm just bringing out a little piece of air in front for other sites area. We used to do you'll, see what i mean later, but you can't skip that part and decide not to do it. So i decided to um spray, my hair first before applying the gel, because i'm trying to reduce um flakes from you know coming up later and i believe that water applying water first would um help to eradicate or suppress any form of flake that might be coming In later so this is the last section for the side part and i'm going again with water, because i also really do not like to apply gel on my hair when there's no water yeah, i like it a bit wet or a bit damp before going in With gel, so i'm just going to apply a generous amount of gel, but not so much because, like i said, i don't like too much gel in my hair. So i'm doing this for the roots, then for the tips of my hair, then just going all over the hair with more gel, so it would lay well then i'm just going to come out again for more volume, because you know why shrinkage then i'm going to Be using the add, brush or the bristol brush to slick it down to meet the back portion of the air already packed so instead of using a new crunchy, a new scrunchie or a new air packer to pack my hair, i'm just going to remove the old One that i used to pack the back section of my and go over with it again, so this would like save me from using too many air packers from packing my egg so many times so this is just um a little tip for you, yeah, okay. So i'm coming out again for more um volume, because you already know why. Then i'm going to um work with the second section of my hair, the second part of the style, so um, i'm just going to um, go um portion by portion again because if i just decide to add gel the way it's looking this bulky, my hair would Not um sleep, neither will it slick down, so i have to really go potion by portion, starting from the smallest portion until i get to the very top. So once again, i'm going to spray with water. You already know why? Then i'm also going to come out for more volume, because once water gets to my hair, it reduces the length. So i'm going to um come out for more volume, then go in with my eco styler gel so because you have to use gel. Obviously so i'm going to go with my aqua styler gel apply on the roots, apply on the tips then go around the old air. Then i'm going to comb again for more volume. Then i'm now going to brush it down with my bristol brush or my hair brush, whichever name you want to call it, so this will help it sleek. As you can see, my hair is like sleeking to the side already, so i did the other portions of camera because of time. So this is the last portion of this um style. The last portion i'm going to be gelling and, as you can see it's quite little, so my hair would be able to slick down or slip down whichever one you want to call it, and i'm just repeating the processes i have done previously and i'm just going To go ahead with my bristol brush to make the sleep down a lot and, as you can see, my hair is really looking juicy like it's so sleepy. If there's anything like that, it's it's really really sleek right now for a type 4c natural hair, it would have been better. I'Ve had a type 3 air. I wouldn't have gone through this rigorous process. I would have just probably gelled, and that would just be it, but when you have a stubborn fussy, air like mine, you have to just you know, go step by step. I even decided to reduce the amount of steps or portions or where i have to section because of time. Usually i used to do it like really really step by step portion by portion. That'S why i'm having like short volume of air at the tips of my hair right now? But you know we move so i'm going to be using the um gorilla, snot gel, which is quite thick thicker than the eco styler gel, and this is just going to add. Like um, it's just going to be like my last layer of gel, so you know make my hair really sleek, make it really slipped down. It'S just going to make sure that any any side of my or any portion of my head that really really didn't catch. The eco styler gel would, you know, slip down with the gorilla snatcher. I hope you understand what i'm saying, because i feel like i'm beginning to run but anyways you just get my point to see what i'm doing so just follow the steps, please all right. So um yeah - this is what my hair is looking like right now, and i already did my baby hair off camera, so i'm just going to um tie my scarf to make sure my hair, you know sleeps well and to also make it dry a bit yeah. This scarf helps actually dry, my hair. Somehow, then, i'm going to now go in with my braided ponytail or my ponytail really. So i got this attachment from dali nigeria. It was my leftover attachment. I used the bigger portion to make some braids some time ago, and this is what's left of it, so i just i'm just going to use a rubber band to form a knot, because i will be using the rubber band on my hair. I would advise you do not use rubber band because it's not as firm as it should be. You could use your air packer or something else or a rubber band, a rubber band, much thicker than this. You know those black thick rubber bands. You can use down. Basically, this colored one, it's lifeless really it almost ripped off my hair at some point so um. Now that i'm opening my hair, you can see how sleek it is see. The front side of my looking fried looks like it looks like i literally fried my hair and um in case you want to tell me: costello does not work for type 4c. Here you see, eco styler gel actually does wonders for your type for ca. So i'm just going to um use the rubber band to pack my hair up. Then i'm going to divide these attachments into three portions because it's a braid. You know when you want to braid your hair, you braid into three portions, then i'm going to take it back, i'm flipping it to the back and just um, adding my short hair to the attachments. You know it's just like when you're braiding normal hair she gets. I know you can see what i'm doing. Do you understand? I hope you understand. Okay, so i try to remove another portion from the attachment because i'm going to be going round with it at the end of the day, you will see what i'm why i've removed this um portion, while i'm not braiding it with the rest of the hair. So for this bunny ponytail i'm going to be doing a different style. I was trying to achieve that. Coily. I don't know you know ponytail with coils. If you really get the picture of what i'm trying to say, although i really didn't end up getting it well before, i know that my second trial would be better. So what i just initially did was to remove small small sections or small small portions of attachment from the initial attachment i meant to braid, so i removed a bit of the attachment a little portion of the attachment i separated using my mouth to hold it. Then i continued to weave the attachment then at some point i would remove another portion of attachment use my mouth to hold. It then repeat that process over and over and over and over again, then another mistake you want to avoid when braiding your ponytail is to um brush or comb your ponytail attachments or brush your attachments. Well, before you begin to braid guys, i had issues trying to braid this thing, because i didn't comb it well and i just used leave-in conditioner and i didn't even bother to like brush it out. So the rectangles. While i was making the hair it was going to make it look rough, i just had to really really struggle to make sure that you know at least it gets neat enough. So when you want to do this, make sure you comb the attachments, well make sure it's it's free of tangles and nuts before you before you um braid it by doing that, your hair would come out neater than mine is looking right now. So i just repeated this process of removing small sections or small portions of the attachments aside, then um braiding the rest of the attachment until i got to the very tip of the attachment. So it's just um, like french, would say: repete it's a repetition of what i've been doing since i started to braid this air, so um, the other portion of air that i removed at first, that bigger portion of it. I removed that first. This is when it be, it begins to get useful, so i'm just going to go around with that portion. I really don't know what i was trying to achieve here, but i knew i had to cover up the um, the already packed part of my hair that i felt was going to be showing. So i used this attachment this portion of attachment to just cover up that side, so it won't be visible that i used colored, um air packer to pack my and stuff. Then i just decided to go in with eco styler, because i didn't have a good gutsu. Is it got to be glue or go to you know that glue shadow people use? Sometimes i don't know i don't have that glue, so i had to use them. Echo sorry, gorillas, nuts, gel to just lay that off. Then i also use the bobby pin to secure it to my hair, so it doesn't come off later. So i decided to open up the braids just to give a little space, so it looks more, i don't know more pronounced. Then i'm going in with this um realize i don't know what they really call this the bending rollers or something like that. Just to give that coil effect, you could use um anything you have at home that could make your hair curly, but i decided to use this, and this is what i did to all parts of my then i put in hot water before unveiling or before unwrapping. So i just use them bobby pins to secure my hair in case any there are any fly, overs of any sort so for the front serra part, i'm just going to go in with gel and twelve, with my finger to give me that coil effect - and i Did that for the other side, too yeah? I did that for the other side too. So now i'm going to be removing the bending rollers and you see the coil effect yeah. So this is the coil effect. This is, after i put my air in hot water and allowed it to. You know dry off for some time, but at the end of it i realized i didn't like how long the coils were. So what i just did was to um roll or flip over. What i'm just doing right now, because i really can't even describe what i'm doing i just decided to go around with it till i got a very short coil. I wanted like a shorter curl. The coil i got was too long and it was going to be disturbing me later on. So that's what i did for all the parts that i curled and now you are looking shorter. So after this i'm just going to be trimming, the braided ponytail to you know get rid of any flyovers or excess air bumping at the sides. Then i'm going to be going in with my mousse to um slick off the. I don't know what is most dosed to your ponytail. Actually i don't know why i applied it to my ponytail. I only applied it to my hair or anything. I need to slip down. I don't know why i'm putting it on the ponytail i'll, probably read the container later and see what it does for your ponytail, but well i applied it to my ponytail. I think it just make it smell nice. If you know the use, please let me know in the comment section so for the upper part of my hair, for this click cast side of my hair. I'M also going to be going in with mousse, after which i'm just going to use my scarf to let the mousse get. You know soaked up in my hair and i'm going to be getting my makeup done and you'll be seeing me in a jiffy guys stay tuned, okay, guys, you're, officially welcome to the vlogging section of this video. So, like i said i had to get my makeup done and my cameraman could not just get over me like it just kept following me everywhere with the camera, because you know i'm a speck y'all know: anyways uh stay tuned for more juicy looks coming up on Your screen and a second from now, okay, coming up on your screen, is a juicy ass style, yeah guys. This is what i'm looking like the coils. I really don't think i like, but the girl i love and you can see my hair's looking fried the mousse is giving it the shiny effect and uh. I decided to go around with this gold thing just to make me look cuter, and i just hope you like the way i'm looking right now, because i do you know anymore what happens to you so as a selfless person that i am, i decided to bless Your screen with my pictures, you know my sexy ass pictures, my graduation pictures, because the girl is now a graduate yeah, no anyways. Thank you for watching this video. Please subscribe to my channel. If you've not and i'll see you in my next video bye guys, i love you all so much
Comments
Aretha P: Beautiful sis ❤
love Babalola: I love the outcome
nyinye uba: You look so gorgeous
Karina Ortiz: How did you put on your graduation cap
Akintade Timilehin: I need clear skin routine and can guys use gel to curl the hair
love Babalola: You almost said bonytail
love Babalola: Did your arm hurt???