Criss Cross Rubber Band Hairstyle W/ A Ponytail | Curly Hair
- Posted on 25 February, 2019
- Ponytail Hairstyles
- By Anonymous
I wanted to bring you guys something different so is a recreation I did of this hairstyle. I thought it was super cute so if you guys do decide to try this don't forget to tag me on IG (zamoriannn) so I can see it.
Original video of where I got this hairstyle from - https://www.youtube.com/watch?v=MDCNCH...
HAIR PAINT WAX WEBSITE -https://www.hairpaintwax.com/
Hair
My Curly Hair Routine | Za'Morian Sherman -
HOW TO GET SUPER DEFINED CURLS | ZA'MORIAN SHERMAN - https://youtu.be/RDUwuGQZj28
____________________________________________________________
PREVIOUS VIDEOS
STORYTIME : Getting my wisdom teeth pulled out +VLOG FOOTAGE - https://youtu.be/69-J7KsQgLA
MY TOP 5 FAVORITE SNEAKERS | ZA'MORIAN SHERMAN - https://youtu.be/Wz0QXGAN9hY
$500 FASHION NOVA TRY ON HAUL!| Za'Morian Sherman - https://youtu.be/-o6KvvfKUAM
HAVE HAVE VIDEO IDEA? COMMENT IT DOWN BELOW!
_______________________________
⚠️BUSINESS ONLY - [email protected]
-
-
- CONNECT WITH ME
Instagram - zamoriannn https://www.instagram.com/zamoriannn/
Twitter - zamoriannn
Snapchat - zbabyxoxo
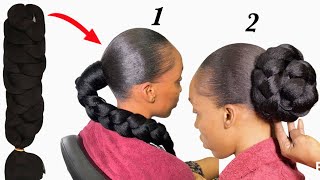
What'S hopping YouTube ichigo's Amorian and I'm back again with another video in for today's video, I'm gon na be showing you guys how to get this super super cute hairstyle, I'm a boss play me. Nikki Bella be lost. Oh don't! Try to talk now. I can't remember the name of the girl that I've got this hairstyle from, because I am recreating it. I don't remember her name, but I will put it in the description box down below which that'll be the original video, but for today's video I'll be showing you guys how to do it. My own pizzazz, I remember in her videos she did all black rubber bands, but today I wan na put a little a little more in touch and do some colorful, but a little bit of black type of urban hairstyle. So if you're new to my channel, do not forget to like this video, if you enjoyed it and subscribe, join the family, do not forget to click the bell notification, you guys, so you guys get notified when I post, you were already here. You'Ve already been watching the video this long, I'm pretty sure you've seen my video before yeah do not forget to click the subscribe button, while you're down there liking and subscribing and commenting don't forget to comment and if you're not into my channel, then welcome back. I'M glad you're here again so yeah you guys and I'm talking in a blubbering. Let'S get right into the video. I did not do it in my normal setting. If you've seen a lot of my videos, you know. Lately I've been using this setup, I'm switching it up, I'm saving my coin, so I can get a backdrop and I'm fixing and fixing it up. Okay, so don't so don't say, I'm tired of singing the curtain with the wooden thing on the side, cuz, I'm working on it, okay, but I am filming this in my bathroom, so that's kinda, my bath. I used to do all my little hair videos ahead, but um. I love her so much anyway. You guys, let's just get right into the video okay, so first things first, I want to go ahead and show you guys what I used in my hair. I use this can to leave in conditioner this Shea Moisture style, milk and then to seal in all these products. I went ahead and used this Africa's best herbal oil. The reason why I use these products is because I want to make sure that my hair is very, very moisturized, because I'm gon na be leaving this style in my hair for about five to seven days so almost close to a week. So I want to make sure my hair is very, very moisturizing now, as you guys can see here, I'm starting off by parting, my hair and the letter C. Yes, the letter C, I'm gon na make kind of like a half section on the top part of my hair, because this is gon na, be like the part that I'm gon na be swooping and creating my swoop with now. I want to make sure that my side part is very, very defined, so I'm gon na go ahead and go in with this marie's edge wax and I'm gon na put it on my part and go over it again with the end of the rat tail comb. So I can make sure that my part is very, very neat and very very precise, nice and straight and defined you feel me or defined. So I'm gon na go ahead and brush down my pony tail and I'm gon na brush this top section. Just so, when I'm doing the rubber band, I'm not accidentally pulling this hair and grabbing any of it. So we don't mess up the style or nothing like that. So I'm gon na go ahead and twist it into a little bun, make sure it's real tight, and this is what my swoop part is kind of. Looking like now we're gon na go ahead and go in and start parting for the rubber bands section. Now you guys I'm gon na, keep it real. I can't really describe to you on what shape this is, but if you can kind of catch my drift, it's just kind of like a little boo, boo boo, like a like a house roof top. I don't even know, but that's the shape, I'm gon na go ahead and brush down all this section, because again I don't want to accidentally grab hair from my ponytail as I'm tiny, my ribbons first things. First, we're gon na part one row right here, and this is gon na, be the first row we're gon na go ahead and braid it down, so we can go ahead and part the second row. Now I'm gon na work a little slow. I'M not gon na part, all of them at first I'm just gon na. Do these first two rows, so this will be got working on here. I'M gon na go ahead and comb it out and if you can kind of see, I'm gon na go ahead and zoom in a little bit, so you guys can see like this Rose. I kind of have going on here. This is what you kind of want. It to look like see, I have like three rows going on: that's just the gist. I'M trying to go for it. I'M gon na go ahead and braid this section down because I'm gon na backtrack and I'm gon na do the front section like the first row that I did. I'M gon na go ahead and Park that straight across and I'm have two squares going on right here, because it's gon na be two rows to start off with. These are rubber bands that I'm using, as you guys saw in the beginning of the video I'm doing. Colored rubber bands and we're gon na go ahead and put a little bit more back, Murray's edge, wax and we're gon na Park, my baby hair. So I don't accidentally put those in cuz. We go. We don't make sure our baby hairs on fleek. Now I'm gon na go ahead and take a blue rubber band and I'm gon na tie that down this hairstyle is super super simple. You guys it's not hard! It'S just kind of like a watch. It once or twice kind of thing about a boom: bada bang you're gon na get it so, as you can see here, I'm just I never been on there and I also want to mention this is not the best brand-new rubber bands, I'm a keeper room. They broke like ten ten times, I'm not even going front and even at the end of the video you're gon na see where my rubber bands ended up popping but ended up fixing it in the end and it turned out great but yeah, as you can see Here I'm just putting another ribbon on and I parted my sideburn cuz. I am gon na do a little soup on the side. You know I'm saying a little swoop. So that's why I parted that down. It looks a little weird right now, but yeah. So this next clip that you guys are gon na see we're gon na be connecting these two sections to the second row that we have so we're gon na do the same thing. We'Re gon na part that across we're gon na have two boxes literally like identical to the first row that we had we're gon na go ahead and slick that down with a little Murray's edge wax. So we nice and good, never gon na do the same thing to the top box. On top, you want to make sure that you're coating each a little like box or square or triangle. Whatever section you that you're doing with the merge edge, ooh actually looks real sleep now we're gon na go ahead and do is put a little more on this section on my hair is because, when I connect it to the other one, I want to make sure That it's straight and doesn't have like a curl to it. Now we're gon na be using this rubber band to tie on so it's kind of like we're like our little hair stuck right there, so it's kind of like adding hair. Every time we connect the rubberband to another section and, like I said, you want to make sure that it's really really tight, so we're gon na go ahead and pull it to make sure it's real tight and everything like that. We'Re gon na do the same thing. We'Re gon na go ahead and crisscross them just so. It adds a little flare and it looks a little bit more cuter. Instead of just doing them like straight we're. Gon na do back a little crisscross same things, we're crossing it ahead and like we're crossing it and then we're gon na put our ribbon on there and we're gon na pull it tight. Just so it looks more sleek and real neat boom. Look at X gone already now we're gon na go ahead and follow that line that we kind of already have going and we're gon na shoot it straight across and kind of make like a triangle. It'S not exactly a triangle because the top part isn't like pointy, but it says a morning triangle, if you feel me isn't wearing triangle. This is we doing here now we're gon na go ahead and just do another triangle, and at this point you guys I kind of just free handedly started partying, whatever sections just kind of worked so depending on how you do your initial part like when you're sectioning Off the whole rubberband section, depending on how you shape it, for me, I think kind of depends on how it's gon na end up looking and like what sections are gon na have and how big, and how small and just things like that. So basically, I'm trying to say is like yours might not look identical to mine because we all got different shape heads and we all gon na do this initial part section differently. But this is just kind of how I did it and all these sections kind of just happen like I did not plan it to look like this or nothing like that. But as you can see, I'm literally doing the exact same thing and I'm just kind of connecting each section to another section: that's like either above it or below it, because I want these rubber bands to be Criss crossing each other and kind of like Oh overlapping Or under like going under each other and just kind of like that, so as you can see, this is what I'm working with so far and I'm literally gon na part another triangle right there and that's kind of how like I want it to look and everything Like that, also for everybody out there that does do their own hair on a regular basis. Y'All know a mirror is your best friend, so when you're doing this hairstyle just to make sure that your parts are nice and straight and they look pretty good you, like. Don'T like just don't be afraid to use a mirror, get you a mirror. Your neck, gon na be hurting your hand, go be hurt, and but it's all gon na be worth it because at the end of the day you can say you this is you feel me, like. You did this so, as you guys have been saying throughout the video, I am using a mirror just to make sure everything looks real good and then oh, I want to mention this right here. You see how I'm putting a little more of that Mary's edge wax. If you feel like your part, is not super like straight use, a little more ease edge, wax put it on the part and then go over it again with the comb using edge, wax or using any kind of like gel. It really does help when you're trying to like define a part when you're doing braids or any kind of style like that. So that is a little tip. I want to put out there and let you know, and everything like that now we're gon na go ahead and begin to park. The last section that we're gon na part, even though I do have a little more hair. That'S under this first section like this section right here, I'm not going to be putting our bands all the way at the bottom. I'M gon na leave a little bit out just because one I did not feel like putting another event in there, and also I didn't want it to be a little uncomfortable on my neck. You know when you put something too tight, it kind of pulls the hairs at the bottom of your neck. I did not want it to be like that, so this is what I ended up doing. This is how it's looking so far, I'm just gon na brush. It into the ponytail now we're gon na go ahead and take this ponytail out and we're gon na begin to part like straight across and we're gon na put a little more of that Murray's edge wax in there, because I want this to look real real sleek. So, just to lay down my hair, because I am doing this one - my hair is curly. I want to make sure it's real straight, so we're gon na put a little bit of that Murray's edge wax all in between my hair. Now we're gon na take the rat tail comb and just start brushing it down just in case there's any curls in there that might list. You know and everything like that's where it's gon na comb, it all down, make sure it's real straight and get all those curls and everything like that. Next, we're gon na go ahead and take the brush and begin to brush it all down and make sure it's real sleek and I'm gon na go ahead and part out. My sideburn, because, like I said earlier, I am gon na be doing those and making him look real cute we're gon na put a little more at Murray's edge, wax on top right before we do the ponytail, because we're gon na put all this into a ponytail And once you're, putting all this section into a ponytail, don't worry about it! Looking real, perfect cuz, we're gon na, take it out and we're gon na be adding, in the swoop section that we have on top, because we're gon na go ahead and dr. upon that. Now, like I said, I want this to be sleek, so we're gon na do the same thing that we did to the back half of my hair, we're going to be parting, it with a rat tail comb and we're gon na go ahead and add in that Murray'S edge wax in there I'm putting a little bit more than I did at the back section on this smaller section, because I want to make sure that my hairs do not lift up because, like I said I'm I am doing this on. My hair is curly. I don't want no curls flying up or nothing crazy. I wanted to blend in with the back section, so we're gon na go ahead and put all that Murray's edge wax in there and we're gon na comb it with the comb. Now, when I was doing this part, I was kind of just playing with the swoop and kind of seeing if I wanted it to go a little more back or if I wanted it to come a little more forward. So when you are doing this part, I highly recommend doing it with a comb just so you can kind of play with it and see like how high or how low or how swoop do you want it now we're gon na go ahead and take out that Back section and we're gon na begin to slowly adding in this like front portion that we did and, like I said, I am kind of just playing there because I don't know like at this point. I didn't know how low I wanted my swoop to be so. I'M just kind of playing with it and redoing it. This this part is very, very tedious I feel like because, if you're doing it curling your hair, it's gon na begin to lift that's why I want to make sure that you put a lot of that Murray's edge wax in your hair. Just make sure everything's laid down we're gon na go ahead and tie our ponytail up, and this is probably my favorite part is doing my edges. I'M gon na be going it with this eco styler gel using my handy-dandy famous toothbrush. Should I literally use in every single video and we're gon na do my edges now, when you're doing your edges, you can literally get as creative as you want. I wanted to keep it real, simple and basic, so I just kind of did you know the top part and then my sideburns. Now I am fully aware that my room and is broke. You can really see it right here. I know that that when it's broke ended up fixing it later now we're gon na go ahead and go on with this pump it up spritz. This is going to lay it down. This is literally, if you spray too much your hair is gon na get really hard. It'S gon na be hard to wash out, so don't spray too much. I use this coconut, like frizz mousse kind of thing from Shea Moisture, because I wanted to lay down any flyaway hairs. Now we're gon na go ahead and take my handy dandy, silk scarf and we're gon na lay that down on top of my head, because I'm gon na go in with the blow dryer and just to set everything. I'M gon na be using heat, high heat and blow-drying my hair about 10 to 15 minutes and then BAM you guys. This is basically this style right here. I really really hope you guys enjoyed it. I really had fun making this video and trying this hairstyle out for you guys and you can get as creative as you want. You can do all red, all blue, all, yellow all black add in hair, whatever you want to do again. Thank you guys. So much for watching - and I see you in my next video bye
Comments
Renee Roberts: Omg I love her energy and how beautiful she is you just earned a like AND a new subscriber AND a comment
Gigi carver: I loveeeee your video omggggg
Inga Maiya:
Alaiah:
F.George S: You are very beautiful your parents must b gorgeous
colaGlase: It’s a comment
Gigi carver: I did not comment that!