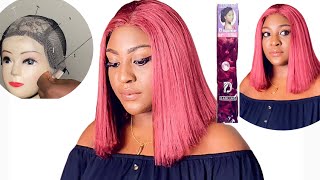
How To Make Ponytail Wig With Weave/ Blunt Cut Tutorial
- Posted on 27 September, 2020
- Ponytail Hairstyles
- By Anonymous
This ponytail wig using a weave or extension has to be the easiest ponytail wig EVER. With very little coins you can rock this whenever you please and thats the best part. Let me know if you prefer the quick one or the blunt cut one in the comment section. Make sure to give like, share and comment.
Making your attachment into a ponytail wig is made easy in this tutorial and it's going to save you some bucks, as it is reusable. Let’s save some money while looking good, babes.
_________________
____________
Watch my other videos
HOW TO MAKE A BRAIDED PONYTAILTAIL:
CLOTHING TY ON HAUL:
_______________
+ FILMING EQUIPMENT
- Canon 750D
- Ringlight
- A soft box
_______________
+ PLACES TO FIND ME
INSTAGRAM: https://www.instagram.com/the_basil_me...
EMAIL: [email protected]
Hey lovelies welcome back to my channel. I am the basil mercy and today i'm going to show you how i turn my weave into a ponytail wig and also showing you how i transformed it into the short bob you're, seeing here that’s a blunt cut. If that sounds like something you're interested in make sure to keep on watching love you music, so guys, i'm just going to jump in right into the video. I'M just going to tell you everything you need to have that perfect! Ponytail weave the first thing you're going to be needing is your ponytail net, then you're also going to need your t-pins to hold your wig down. If you don't have a t-pin, someone asked me this: if you don't have a t-pin, what do you do? You could use an office, pin just spread it out and just just treat the mannequin and also what you're going to need is your needle. I mostly use my cropped needle, it's just very easier for me. So another thing you're going to be needing is your weave. I'M going to be using this one from darling, it's their silky straight from their empress collection, so guys getting into the tutorial. I'M just going to take down my weave and i'm going to put it into two, i'm putting it into the two, because i want the weave to be full because when you sew one, it's not going to be so full because of the ponytail weave. So i'm going to put it into two: if you want it to be fuller, if you're going for more volume, you can fold this into three, whatever works for you. Actually, i'm just going to take my needle and pass it through the ends of the weave and then i'm just going to tie that to the net yeah. You want to tie this separately. Why? Because if you lose on like crochet this, if one thread loose and it's not properly tight, if you just start losing and everything will just unravel, so you want to make sure it's placed tightly it's tight properly. You want to make sure every needle stitch you make is well tied, so you don't have problems later on, so i just went in and took my tp to pin my weave down, because this helps your process to be faster. It helps it be easier for you. It was actually difficult poking it through at first, but the technique of the trick, i discovered, is that you pin the wheel first before you put it in it's way more easier. I tie with every stitch some people just sew, but i try to tie because i really do not like going back in and sewing after a while, maybe start losing so whatever works for you. I don't know if you could see the technique i use here, but i'm going to show it later on in the more slower manner for you to see how i stitch. So basically, this is basically a repetitive process. I just kept doing this. Basically, i sew, then i paint all basically i turn i pin it and i sew it down. Then i turn again. I pin it and i slow it down. That'S basically what this zero is, i'm going to skip to the end and show you what you have to do to finish this. You off. Take me so now for the end of the ponytail. What you want to do is you want to sew the ponytail so close to the draw string, but you do not want to sew over to draw a string because sewing over the drawstring can affect when you try to pull the drawstring. So you want it to be very, very close, so that in case you do not want to wrap your hair when you put it on your head, it's very possible and i actually gave space at the back because i didn't want to put it on the front. Actually get spacer, i can actually turn the weave to the back and sew. So i don't have to you know, cut it at the side because i just didn't. I don't know, i just felt it won't look nice or something, and i don't want it. I don't know, but that's just how i finish off. We will finish off with it again and we will cut off at the end. You don't have to turn it, but that's how i do mine i've, so it's in the edge and then i turn all right. So for starting a new thread, i don't know if this is really really fun to talk about, but starting a new tread. All you have to do is just sew that new thread in and tie itself severally down all right. I don't know if that will help anybody in case you're, just curious when you're done with the old thread, all you have to do is tie it down and then just continue sewing. Basically, so, basically, what i do is i take the scissors to put the part of the hair down. I'Ve actually measured this to see where it would get to at the back. So after i cut that, i'm just gon na take a clip and i'm going to pack off the one episode and then just sew the one to the back. I don't know if that makes any sense so guys. This is it for the ponytail, i'm just gon na put it on for you and show you how i turned this into that fabulous bulb or blonde cuts until you saw from earlier. I just venture if you can't subscribe to my channel, please consider, subscribing and also hit the description below to get a lot from me anytime. I upload all right, please please give this video a thumbs up if you enjoyed it. If you learned something, please give it a thumbs up. You'Ll help me know the kind of videos to bring out for you, so hey lovely, so i'm just going to show you how i fix the ponytail on myself. So the first thing you're going to do is actually fix your weak bone and please make sure you remove all these big and all the t pins from the wii, because you do not want to hold yourself with it. Please make sure you remove every one of them, so i'm just going to fix the weak foam. It doesn't take that much. You have to just sew it in. You can actually sew the t-pins either at the back of god or at the side side, whichever one, you think, will work better for you. I just like mine to be front and the back, because when is the front on the back, i can actually place it more and drag my ponytail to be more. So that's why i actually do mine, so i just decided to drag the drawstring and tie it around my head before approaching to now take part of the weave and wrap it around my head when you're taking this weave, you do not actually want to take from The side side you want to take from the box because when you take from the side side it's going to show in the shape of the hair, i don't know how to explain this, i'm going to try. But when you take from the front side side, when you wrap your hair, it's just going to be so obvious that you took from the front to wrap because it's not going to balance your cough and everything is not going to be symmetry. If you actually want to go for them clearly they're already slain, you can actually use a cut to be spray and a hair dryer that will help the wrap stay stronger and more firmer. I just wanted something very simple and just to wear it for you guys, because if you know i do not keep hair on my head for long, that's why i'm always doing the detachable tutorial, because that's what i do i just like quick and even like fireworks, Thought nothing could break us, but oh, how we got burned, so i just went ahead to brush it out all right this. Is it guys it's actually very simple, to just place on your hair. I just want the hair to lay flat and i'm just posing giving you guys some glitters of how beautiful it is. So i'm going to get right into how i put the blonde coat. All i did was slip the hair into a rubber band, and then i just took my scissors to cut it. You have to be very careful when cutting it, because be careful that none of your hair is in the way, and you also have to be careful with how you cut it, and you don't want to cross it when it's not on you, because then it's just Going to lose this fitting and when you remove it from your head, just be very rest assured that they're not all going to be the same length, and that doesn't mean it's not good. I actually messed up my own after a few minutes this year, because i actually went ahead to cut a little bit, but then, when i wore it back, it wasn't right for me anymore and also remember you have a longer strand because of the one you used To wrap so just cut it on you, and that is it, do not go back to the cutters, because you just might regret it, like i'm regretting mine together, just to know that hair away from my body and showing you how stick this looks. I think i actually like the shorter one more comment down below and let me know which one you think you love more, i for me it's the short one. Let me know in the comment section: do you like the blunt quad more or do you like the straight one more? I would really appreciate your comments in the comment section all right guys if you're watching this point, then you read mvp all right, i'm just showing you that one is going to be longer and it's not going to be the same length when you take it off And that's! Okay! So that's it for this tutorial! Thank you for sticking with me. Thank you for being my lovely. I love you so much and i'll see you in my next video bye, guys

Comments
Adesina Dademu: Nice, easy to make, slay on a budget. Thanks
belle_graciaz: It's definitely the short one for me, it's amazing
LimeLightLuxury Hair: Loved it!
Tife Adunade: it's definitely the short one for me. it's super cute!
GE Signatures Ugorji: So nice, love the blunt cut more
Obasi Ndip: That's beautiful
Pamela Orivri: Love this
JaysBeauty Wigs: You did a great job! How much did you get the hair from darling
Gifty Gilbert: Love love love...I love your videos
Salami Flourish: Both are nice, but I’d prefer the blunt cut in the video!
Shavon Greene: This is way easier with a sewing machine, but if you don’t have one available it’s a good strategy
Shavon Greene: I would use a machine to sew these in but without one this is a good system
Light tales: I.love and made this style but using Cambodian Stw Weave from Xpression... You should try it too
Afro Toun: Girl you are so gorgeous....
SOBRIGHT: Beautiful dear... Please did you see to the edges? Like where the rope is?
The Drama Queen: I like it long nice job booo
Blessing Uhiara: Thank u
Joseph Niscardy: Waaww
The Drama Queen: First again