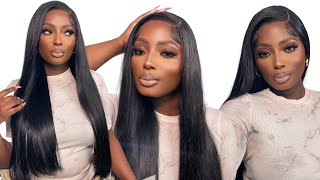
Sis How Is This A Wig?!?!? Extended Ponytail With Just A Frontal And Bundles| Ft. West Kiss Hair
- Posted on 04 February, 2019
- Ponytail Hairstyles
- By Anonymous
Hair I’m Wearing: loose wave 24 26 26 26 +20” Frontal
Direct Link☞ http://bit.ly/2EVG4eD
New Arrival Wig Get 60% Off☞http://bit.ly/2EWWO5g
West Kiss Hair Official Store☞http://bit.ly/2ETlqvH
Hot Selling Hair Weave ☞ http://bit.ly/2EV0Qef
Loose Wave Bundles With Closure☞ http://bit.ly/2F5iYlX
WEST KISS HAIR HAPPY NEW YEAR UP TO 60% OFF
Further Reduction For Wigs! Save Extra $8 With Code “WKWIG”
Save $5 Off $99 with code “WK05”
Save $10 Off $199 with code “WK10”
Save $15 Off $299 with code “WK15”
Save $20 Off $399 with code “WK20”
➤RANDOM FREE GIFT & $6 OFF WITH EXCLUSIVE CODE "LOVEWK"
West Kiss Hair on Aliexpress:
Loose wave bundles with closure : https://goo.gl/YUEnKv
Loose wave bundles with frontal : https://goo.gl/XSdBfy
Straight hair bundles with frontal : https://goo.gl/V5QRoL
Body wave bundles with frontal : https://goo.gl/4yEoQq
Amazon Store Link: https://goo.gl/61qJGP
Brazilian Body Wave Lace Closure: https://goo.gl/8BA5tg
Brazilian Body Wave 3 Bundles With Closure: https://goo.gl/QDxFZt
Instagram @westkiss_hair_store: http://bit.ly/2qpyH5Y
YouTube: http://bit.ly/2quw5E0
FaceBook: http://bit.ly/2qtVbCX
Twitter@WestKissHair : http://bit.ly/2qv4WAy
E-mail: [email protected]
WhatsApp: +86 17719937631
Social Media & Contact:
Instagram- Brionna Laroux
Business Inquires Only: [email protected]
Hi guys today we are working with wes, kiss hair and i'm so freaking excited, because not only will we be doing something that i've never done before on my channel or ever in life, but i am just freaking enamored by how romantic all of the packaging is For west kid's hair, it comes in this like red and gold, satin storage bag, which i don't know how many times to tell y'all. But i love storage bags, not only that, but i want us to get into this. The curl pattern of this remember back in the day when romance curl was the curl to get. I do not remember the brand, i don't remember the brand. I want to remember it's so bad, but it was a synthetic hair brand everybody any mama had romance curl and this or twin curl, oh my god that was my fave twin curls, my my but romance curl as well. It just takes me back to that. Like i've never used such curly hair before like this, this spiral, bouncy curl, is so gorgeous um. I have four bundles, so i have a 24 and 326's and i also had oh, my god, get into this rental. I also have a 20 inch frontal look at this frontal, you guys it is pre-plucked um. I do have to bleach the knots and i will go in and pluck a little bit more, but this this is gorgeous. This is gorgeous now, let's see um see if they did a good job matching the frontal. I think the frontal matches the bundles pretty well uh. I think the frontal is a little bit more of a finger wave type and this is definitely a spiral, but once you kind of brush it out, you'll see kind of like it'll it'll blend very well um. I am going to dye this hair just dark black jet black, hopefully, and i'm going to bleach the knot. I'M not going to show myself bleaching tonight because i've shown myself leaving tons of knots, but we are just going to try to water dip this hair to make it a little bit darker just put a rinse on it and then we're going to get into the Video which is going to be so freaking exciting you guys already know what it is because you thumbnail, but if you would like to see me accomplish that, i look like a cartoon mom. You can't see my head, i'm one of those cartoon parents uh. If you would like to see me, go ahead and accomplish that with what's kiss hair, then stay tuned all right, so here we have some near boiling water, it's pretty hot, but not technically boiling hot. I'M just going to use the kiss jet black. You know how actually my hands are they've been in and out of hot water all day, but i'm going to use about a half a bottle and i like this die because it has a blue undertone and not a green undertone like the uh jet black. From a door, that's why we're using kiss today, just a little bit more of that die now for four bundles. In the frontal i've used, three bottles of kiss temptation die, and it has been more than enough. So basically, i've unraveled my bundle here. This is a 26 inch and i'm going to sit it in the die bounce up and down a few times to get coated. It'S going to sit in the die and let it soak for about 10 minutes now. I did it bundle by bundle to make sure that they were saturated enough, so i've already done three of the bundles and i actually bleached my knots on my frontal and i went in by hand. Let me just set this to the side what processes processes i actually bleached my knots on my frontal and then i went in by hand, and i uh basically put the black dye near the roots. That way, i wouldn't because, if you dip dye this entire frontal, no matter, if you do the hairspray method or not you're going to re-dye the knots trust me, i've done it before do not do not d. Do not bleach your knots and then waste time dip. Dyeing it you're just going to re-dye the knots and then you're going to waste complete time. I'Ve already been through this. So take my word for it. What you want to do is bleach the nuts first then go ahead and dip dye your hair, but you only want to dip that in so you want to just go in and use um a small brush and do the rooting with the black by hand. Now, the reason why you don't want to dip the frontal and then bleach your knife is because if you can't tell what undertone the black dye is, sometimes you can get a jet black dye with a green undertone. And when you go in to bleach the notch. You'Re going to turn your frontal green, so i've already been through hell in high water with these different methods. Trust me, the safest way is to bleach your knots and then go in carefully by hand and go ahead and um dye. The hair black, alright guys. So now that that last bundle is done, i'm gon na just do the frontal that i have here and i just refresh the hot water and i'm gon na, pour in the last half of the uh bottle. Just gon na mix this in a little bit and just like before we're gon na dip dip little by little, but i'm gon na grab the frontal so that it's horizontal to the water and so that it doesn't dip in too far. That makes sense to you guys, so i don't want my frontal dipping in at all, which means i'm going to hold it parallel. That'S what i'm going to say parallel to the water and dip it in careful all right, you guys, so i got you up close and personal for this one, because you really need to see the detail on what i'm doing to make this turn out. Okay, so basically i have my frontal here, and i've marked where i want everything to go so that it lays as flat as possible, and what i'm about to do is just place my frontal down exactly where i've marked it so that i know where i'm sewing. So i'm just going to pin this in for now. This is just like a preliminary pinning, because i need to get all the hair out the way as well. I'Ve marked with my ear stops i'll have that as a guide, so you'll see here on the side you see where my ears i have on both sides, where my ears stop and again this is just a preliminary pen, i'm going to shift it a little bit After i just need to get it down, so i can gather all the hair up all right, so i have it lined up with that pink line that i made. That shows where my ear is um. Toronto, isn't, as long as i would like it's only about. Maybe i think four inches, i'm gon na, say three inches long wide. However, you know the parting space in that uh. So honestly, it might not be the best principle to do this, but hey if we, if we're able to pull this off uh, you can pretty much do it with the you know, any frontal. Basically at that point all right. So here's what i'm gon na do we're just gon na start sewing yeah. So the next step after we already have our frontal down nice and tight, i'm going to do a double weft underneath the wig cap, because we are going to be putting this bad boy in a ponytail when we pull everything back um, i'm not gon na. It'S not a 360., so i don't want any tracks or wig caps showing so i'm just going to sew a double weft underneath so that when we pull it back, it'll kind of uh bend up like that and you won't see. You won't see that band all right, you guys that was like impossible to do it. While i was on the wig head, so i just took it off of there, but i'm doing the same technique. I'M basically just sewing to the inside of the cap. All the way around that elastic band, this is basically just to show you guys how you're supposed to sew it. I'M going to put this back on the wig head so that it's stretched out enough for me to sew without being nervous of it fitting on my head, but i just wanted to show you guys in detail what i'm doing so. I'M sewing the track on the inside of the cap. All right, you guys, so i have that. I have that one track underneath, so you guys can see that when you pull it back into a ponytail, it hides that band. So that's exactly what i was aiming for, just to kind of hide that band um now to add the rest of the tracks. Usually i would do double wefting up to like the middle of my hair and then i would do the rest of the single weft. It, however, because i want this ponytail to be super sleek, i'm going to do single wefts throughout i'm only going to use two bundles and well. I guess this is like yeah two bundles, so i i have four bundles and two of them will be used for ponytail. Two of them will be used to make the base, so what i'm gon na do is instead of going up like i usually, would i'm actually going to go like in a dome shape so that everything kind of can kind of uh lay flush when it's a Ponytail, so i want this to lay flat like this, so what i'm going to do is kind of stack everything going that way and then coming to the middle, and i think i might even do some of these upside down so that it'll lay flat as well. Um yeah, i think that's exactly what i'm gon na do so for the back. I'M gon na sew the tracks upside down and then for the top. I'M gon na sew them going kind of dome shaped instead of straight. It'S not like u-shaped, it's gon na, be like a reverse u-shape here and they're gon na come flush to about right here. So there'll be like a little eye opening where there won't be any tracks and i'm okay with that, because it'll be all pulled into a ponytail anyway. So let me stop talking and kind of just get to some all right guys, so i've managed to fit. I'M all in the way, but i've managed to fit about two bundles in here to keep it really um thin. Basically, it's not even really thin. It'S very natural looking, but if you open up open her up, you'll see that okay. I have no idea how i sew this in here. What the hell is going on. Oh okay, anyway, you'll see that all of this is a gape and the reason being because it's going to be pulled into a ponytail anyway. So you don't really need that middle section, so you don't really want to bulk it up with tracks um. I did well enough with just two bundles i actually could have probably did less than that, because i think i added too many tracks to the bottom, but i wanted to be able to. I had the option to pull the ponytail up a little higher. If i wanted to and not have that band showing there in the back, it's a little tacky to wear it like that, though, so i don't recommend it, i'm going to be doing a little ponytail and i've already. Basically i've already uh customized the frontal. It did seem to have come pre-plucked, but i like mine, just a little more faded in a little bit more plucked, and i plucked the part because i'm going to be doing a swoop in my ponytail and i basically straightened the hair as bone straight as it Would get with my flat iron and it is super long. Let'S see, let's take a look, so it was 26 inches still curly um. I think we're at a good, maybe 30 inches right now, actually um yeah. It'S definitely down to my hips. So we're closer to like 29 30 inches with it straightened, which is awesome. I still have two bundles left from my order, so i'm going to uh use that for the genie ponytail and yeah. So basically you guys, let me show you the pattern in which i have these tracks sewn. So i have my frontal and then i have about maybe four tracks going down, so you guys can see that like four tracks going down, then i have that gap and then i'm still sewing downward in a downward motion for about three more tracks. And then i have three tracks: no just two: i have two tracks going upward and then the two tracks underneath so um. Hopefully that makes sense, so i'm not uh confusing you guys to have shown you on video would have been like super duper, confusing and near impossible. Just because i mean there's no way to get all those camera angles. So i have one two: three, four five tracks going down a gap, one two three tracks going down, then two tracks underneath and two tracks up all right, y'all. I don't know if y'all as nervous as i am, but i'm freaking nervous, because i've never done this before so i'm done plucking. As you can see, she looks nice. She giving us hairline. She looks really nice. I actually tried it on my head and cut it to my head, because the style we're doing um technically it should be done on my head, but just to make it easier for you guys to see exactly what i'm doing and to make sure everything is slick And straight i'm doing on the wig head, so i already cut off my lace in the shape of my hairline, and hopefully this works out. But first thing we're going to do is take some of our care care wax stick, which is my favorite wax stick to use we're putting very little right up here by the part, because we don't want any flyaways. We want to make sure this baby is sleek and the reason we're using so freaking little is because this stuff gets um it just it really uh. It really gets your hair flat, but it can get greasy quick so like, as you can see, it's working like it's getting that bad boy flat, but it is still waxed and you don't want to have a lot of wax in your hair. You'Re gon na need some rubber bands, some pump it up. Spritz you may need your handy dandy got to be glued. I have it just in case, but you may not need it. If the puppet express does the job and your wax stick now. First thing: i'm going to do is cut this hair in half reason being is because i want this ponytail to be as sleek as possible all right. This is nice and sleek for me flat ironing it, but i'm going to go ahead and uh run my hot comb through real quick, get out any extra bumps. Okay, y'all whoo she's saying it is. We need to make some swoops some baby hands all that good stuff, so i'm gon na leave that portion out and i'm just going to wax up this portion here now. What i'm going to do is just spray some pump it up and pump it up. Spritz right on the hair go ahead and uh go back there with our hot cone. You want gon na do this quickly so that it doesn't leave any residue. I'M gon na take two black rubber bands and i'm gon na start forming molding our ponytail. Now you may need the use of your comb to do this and that's cool just make sure there are no lumps there are no bumps and there are no traction now. If i start my ponytail down here, this ponytail is going to be so freaking ridiculously to the floor. So what i'm going to do is even even better i'm going to fold this this up, i'm going to fold it up just going to tuck this in here half so now the ponytail is half as big as it was. I'M actually going to do this tuck. It behind here just to ensure that both of the wefts are together so take my needle through both my wefts and i'm going to start here at the very bottom of the hair, i'm going to go through the hair, both of the parts of the braids curls. I'M using a one inch barrel wand. I think this is one inch if not just use one inch. This is basically what the ponytail is. Looking like, um, while i was curling, i did kind of mess up this portion, so i'm gon na redo that portion. I think it's pretty good, especially for it to be a wig and not on someone's head once i apply this bad boy to my head, we'll come back and look at the finished product. All right, you guys so we've made it to the outro of this video. Finally, now this is actually two days later from when you've last saw me um. I have not been able to sit down and film this outro i've been on the go, so this is two-day-old ponytail um. I actually had to re-wrap like the little band that goes around it. Does. It does not look good right now, like the little band. It'S a little, it's a little poofy as you can see, and that's just because i've been sleeping on it and it's unreal, but we got a little owl, it's whatever um. Otherwise, the ponytail itself has held up. These are two day old, curls going on three day old curls and they still look pretty good, especially for the them to be like hanging, and i didn't really, i didn't didn't, pin them up or anything when i put them inside of my bonnet. This ponytail is a little heavy. I'M not gon na lie. The braid on the inside is, i think, what makes it heavy plus you just have two bundles of hair, basically just hanging off of that braid. So um, if you don't have a strong neck from wearing wigs for years like i do, please be aware that this ponytail gets heavy. I think a way to combat that is to use a shorter length of the hair you use for the wig. The hair used for weight was either 24 26 inches. I'M not even sure, because i was just putting any of the inches in it. Didn'T really matter to me, but i'm pretty sure i used a 24.. No, i probably used 26. anyway. I have a 24 20. I have two don't know i used to 24 and 26. I had four bundles and a frontal and i believe the inches were 24. 326'S and a 20 inch frontal. So that's what we have here y'all this frontal is z-bomb. I need to relay this part. I don't know why. I came on camera and i did not lay my front tool. Oh boy, oh she's, struggling but um. This front was the bomb um. This part, i'm always i'm so in love with this freaking part again, please keep in mind that this has been in my hair for two days, so i have not re-upped on anything when i applied it. This is from there. So i do need to go back in and put a little bit more glassy glue and lay down that little part, that's lifting other than that. I think it looks really good. I should probably curl my sideburns, i'm just not preparing it for this outro. I had two days and i still didn't prepare for it. Basically, i just want to give a shout out to wes kiss hair you guys. First of all again, this baggie is super freaking cute, this gold writing on this red. It'S so romantic! It'S super freaking cute! It is like it's february to me, but it's definitely valentine's day packaging. I am in love with this love, your hair, kiss your beauty. Oh that's, cute, um, the hair, i'm in love with. I want to work with this company again and again again. This hair is ridiculous. It'S straight and bone straight. It curled beautifully it's freaking low maintenance. I can't believe i was able to throw this whole entire, huge ponytail up and up on it and sleep and wake up, and these curls are still here. I'Ve been to the gym with this wig on and the freaking frontal is still on. I'M excited, i i want to work with this company again i do like i, i i need to contact them like send me more hair. I want to do different things. I want to do some colors. I am in i'm crazy about this hair. I i i find no fault, i find no fault, especially with this style that i wanted to do. It was pretty difficult, and i know like any other inferior hair would have tangled by now like the fact that this hair is ridiculously wrapped around itself, and i'm still doing this, i'm still doing this y'all got ta. Be you kidding me i'm still doing this? Are you kidding me? It'S it's oh um! This ponytail is too much right now, y'all. We don't have a lot of memory, so we're gon na have to do this real, real, quick, okay. So let's do some pros and cons. It'S gon na be easy because ain't no cons, there's not one con with this hair. I don't have any i'm done. That'S it bye! No, but for real for real. I have no problems with this hair and i put her through somehow: okay uh, we hot watered it. We twisted it around, we curled it, we straightened it, we straightened it, we straightened it, we straightened it again. We straightened with flat irons. We straightened it with hot comb. We didn't put some spritz on. We didn't put some some uh hairspray on her. We didn't. Oh, we didn't do a lot. We did a lot to her and she's still sitting she's still silky. Oh my gosh. She came through for us on this video. I can't believe i really can't believe this hair looks like this. I can't and i'm happy because y'all know i can't put my little bit of hair in a ponytail, so for me to be able to do this style. Finally, and do it on a frontal in four bundles of hair, it's lit, it is what it is. I love this hairstyle and i'm i feel i had to put my lipstick on. I got a little bit of 50 beauty in the middle um because i was feeling on my rim. This is this is getting me rihanna circuit, circa. What 2014? I can't remember girl, i'm i'm not part of the navy, but it's definitely giving me like rihanna vibes. A little swoop and red hair red lip. What am i talking about? There are so many pros with this hair. You guys, i just can't believe it curled away. Did i can't believe, the luster of this hair. I can't believe the quality of it. The follicles there were not a lot of split ends. There were a few flyaways in the frontal, but you guys saw i was able to put those down with a little bit of wax and we have not had any problems since then um. I do wish that the frontal was bigger. I do wish that it had more parting space, like you guys see that this is a pretty deep part, but i'm almost to the back of the frontal, like the front only has like this, like literally this fingers width left before it's the tracks. So i do wish that the front tool was a little bit bigger. I would like to bring it a little bit farther on my big forehead, so um. I wish it was just a little wider over frontal other than that this hair behaved wonderfully. I also wish, when i wet it, that it went back to the original curl. Does you know like that? Real mess curl, but i knew that wasn't going to happen. So that's just like me wishful thinking. It did have a really nice wave to it and it does curl really nicely. It does curl really nicely it's just not that original fantasy wave that we had when we first started um, so yeah i'm having a bad eyebrow day, don't come for me, but other than that you guys we are pretty much done with this tutorial uh. Please leave your experience with west kiss hair. I know that a couple of bigger youtubers have done videos for westchest hair and the hair looked amazing in those videos as well so kudos to us kids for really um reaching out to me and working with me on this one. I thank you guys so much for providing me with quality hair to review, and you know subscribers. I would definitely check out west kids like they're living like i. I cannot like just go. There go to instagram it's in the description and just look at some of the pictures. The hair is true to form like y'all saw me in here twisting this bad boy around, and you saw me in here.
Comments
Helsea Colon: I ❤️ it. I’m going to try this with my full lace wig
bella: the weft on the inside of the bottom of the cap is pure genius! beautiful!
Sugarrr: I wish I could just buy this! Love how it looks, but can't make it myself.
Dess ,: oooh girl, the hair looks like straight silk great in-depth vid!
Kat Walk: I love this look!!! I wish you would’ve shown the bottom tracks tho. I was more confused listening to the explanation of how you sewed them than I would’ve been watching lol. We can’t see that it’s lifting it’s unclockable boo!! ♥️♥️
VillaT: i so wish you'd have done a full standing model of it. Its epic-ness is just too much to sit and show it :)
Fygi Drea: Sis this a whole cosmetology class ❤❤❤
bre smith: I love how this turned out
Quara: Wowowowowowowowowow the finished product! ❤️ my fave hairstyle in wig form
Fygi Drea: Ok sis takin us back with the ROMANCE CURL yassssss❤❤❤❤
Quara: I can just smell the Pump It Up, wax, and hot comb! Nostalgia from the updo days.
Vandy Vanity: Great Wig, Thanks for Sharing!
David McClellan: wig is soooo beautiful love David
Timma Bebe: Beautiful ❤️
Missy Grando: You could have went back further to microwave curls. I love how innovative you are in your channel.
Sharinda Williams-Simmons: what wax do you use?
Zephaniah Moore: Ugh is it sad that I want this like like ugh she is amazing asf
Nika Carter: Zury was the brand !! lol
Racheal Johnson: My neck would Fall Off...wayyyy too much going on for me
chloe williams: Wow
ggh grfs: Very beautiful video,last month I order the same product from newigstyle..com
Sugarrr: And what is on your lips please?