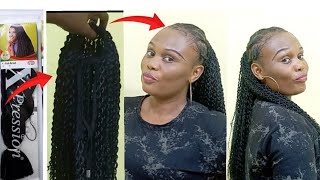
How To Make A Ponytail Wig | Diy Long Ponytail Wig With A Short Weave
- Posted on 15 November, 2020
- Ponytail Hairstyles
- By Anonymous
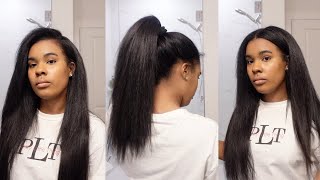
This ponytail wig style helps you save some bucks on your inches, you can use a 5 inches weave to achieve up to 20 inches as long as it is well spaced and well arranged. i hope you find this very helpful lovelies. Make sure to smash that LIKE button as this help my youtube recommendation, I love you always ❤️
______________________
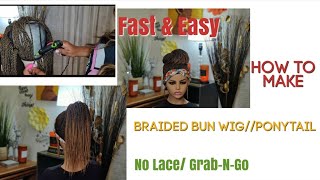
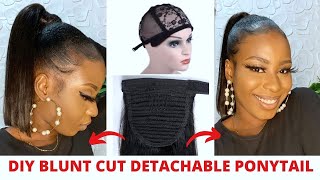
HOW TO MAKE A PONYTAIL WIG/BLUNT CUT TUTORIAL;
HOW TO MAKE A BRAIDED PONYTAIL WIG;
______________
+ FILMING EQUIPMENT
- Canon 750D
- Ringlight
- A soft box
_______________
+ PLACES TO FIND ME
INSTAGRAM: https://www.instagram.com/the_basil_me...
EMAIL: [email protected]
#ponytail #ponytailstyles #ponytailwig
Do you want to see how i make my short weaves into a ponytail wig as long as i want it to be, then make sure to keep on watching? If that's something you're interested in love, you, Music, hey lovelies. I am the basil mercy and i'm just quickly going to go into the video. Basically, i'm just going to show you what i'm going to be needing for the video for this hair. I'M going to be needing the weave i'm going to use also going to be needing my crochet, pin the thread, the needle and pin i'm going to be using.. I always keep my needle and pin in the small case, so they don't get missing. I'M also going to be using my crochet net, which is very important. You can make this yourself or you could buy it, i'm just going to pin that down to the mannequin head, which you're also going to be needing. I'M also going to be needing my braiding attachment for your braiding attachment. You want this to be as long as you want your weave to be so you can either cut it as long as you want or as short as you want it to be, but since we're trying to achieve it a bit longer than it's supposed to be, How you want it to be at least as long as you want it to be? Basically if that makes any sense., So i'm just going to go ahead to straighten the attachment. You know you have to straighten the attachment. If you want your attachment to work for you, if you want to create an attachment to work for you to not lose it's very necessary for you to straighten after i'm just showing you how i straighten and i'm just going to go ahead and cut it out. So it looks nice and smooth while we're using it, and we have blue tangles. So what i'm doing right now, i'm measuring where i want to crochet the breathing extension in you don't want to crochet. You don't want to crochet it on all the neck. Just on a portion - and i advise this - should be done with very little braising attachment. I don't think what i'm using is even too heavy. You want it to be as tiny as possible, because the tinier it is the less heavy the hair is going to become afterwards. You just need the braising extension as an extension to make your hair long. You don't really need it to make your hair full. So as little as possible, we actually go a long way and i'm just going to go ahead to divide it by section i went ahead to divide it into four section and i braided them without braiding the middle i'm just braiding this. So it's easier for me to pack it into one so that when i'm sewing my weaves down so that when i'm sewing my weave down, it's very easy for me. So i'm just going to go ahead and break that into one see how it goes. You want to make sure you bridge to the tip it's very important for you to braid to the last minimum, so see the weave i'm using from darling hair. It'S actually very nice, it's from the empress collection. So what i do i just use the normal method. I already have a video about ponytails. If this is not detailed, i'm going to leave that in the description box below and you could check it out for anything else you have regarding ponytail, i'm just addressing how to make it longer. I just went ahead to pin that down with my t-pin and i'm just sewing it quickly. This is the same method i use for every of my ponytail videos. You could check them out if you're confused about anything. If you're confused about how to sew the weak home, you could check it out. So basically, i just keep turning and turning and sewing until it gets to the edge of where the hair braiding extension starts from. So now, for the reason we're here, i'm just going to take that hair with braided and then that tip that is so thin that you cannot actually say weave around i'm just going to fold it in till it becomes a bit thick, i'm going to fold it. So as i could wrap my hair around it - and it won't be so thin not to be able to take the hair, so that's why i put it in and i just sewed it up. This may take a while just take your time in doing it, because you want your hair to be fine to not lose afterwards. You want that and today you're starting to be very thick, so i'm just going to take my weave and i'm just going to sew it and wrap it around the braided hair that was braided already. So that's it guys easy peasy! You just keep wrapping it round. You won't wrap it as close as possible because this is going to help with the gapping space so that braiding hair does not show. So you want to turn it and wrap it as close as possible to the other one. For this, you want to thread when you're turning it, you want your threads to be above the weave. This will help a lot to tangling. This will make the process very easier for you, because if the thread is below when you're turning the hair, it's going to make it very hard for you to turn. So that's it guys so the longer your braiding hair or the longer the hair you braided the longer your weave is going to be, and that's how simple it is. That'S how easy it is. It'S very easy to do. I'M just going to go ahead to just continue sewing the normal way to just kind of block the braiding hair, so that people don't see so so guys. The end of the video please, if at this moment, you're not subscribed, please hit the subscribe button more videos coming up so make sure to hit that subscribe. Button make sure to hit the notification bell at the side, and you already know if you watched in the end of this video, you already know you're the what if the real, mvp and i'll see you next week. Thank you so much. I love you always bye.
Comments
Peter Lukan: This is amazing dear!!!
Aretha P: Beautiful sis❤
Salami Flourish: Now I want my own ponytail