Versatile Criss Cross Rubber Band Crochet Braid Ponytail | Toceana Wavy Locs Ft. Toyotress
- Posted on 10 December, 2021
- Ponytail Hairstyles
- By Anonymous
♥ INSTAGRAM: https://www.instagram.com/forevercryss...
♥ TWITTER: https://twitter.com/forevercryssy?lang...
♥ EMAIL: [email protected]
♥WEBSITE: https://www.forevercryssy.com
#crochet #toyotress #ponytail
Toyotress Toceana Wavy Crochet Hair - 24" | 1B |
Use “Cryssy20’’ for 20% off (website)
https://www.toyotress.com/collections/...
Discount Amazon link (If you are from the US, please click here)!
https://www.amazon.com/gp/mpc/AH24EIXD...
Connect with us
Instagram: https://www.instagram.com/toyotresshai...
Facebook group: https://www.facebook.com/groups/toyotr...
YouTube:https://www.youtube.com/c/Toyotress/fe...
Tiktok: @toyotress_hair
Business email: [email protected]
Year-end promotions for Christmas sale!
UP TO 25% off: https://amzn.to/3DG39fo
Register toyotress VIP account, DM us your email address and user name.
You will get one FREE hair.
**BE A VIP TO ENJOY OUR EVERYDAY EXCLUSIVE DISCOUNT**
JOIN OUR FACEBOOK GROUP TO BE A VIP!
JOIN WEEKLY LIVE ON TOYOTRESS FACEBOOK GROUP AND INSTAGRAM TO WIN FREE HAIR.
#toyotress #toyotresshair #crochethair #butterflylocs #waterwavecrochethair #goddesslocscrochet #boxbraid #fauxlocs #marleytwistbraidinghair #passiontwistcrochethair #toyotresstianapassiontwisthair #ombremarleyhair #passiontwist #butterflylocs #discounts
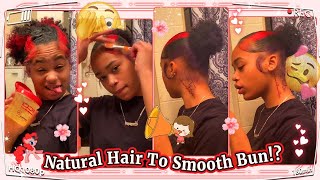
Hey babes welcome back to my channel. If you are new here, welcome now's a good time to go and subscribe. You guys know we jump right into the video, so, as you guys can see from the titles today's video is in collaboration with toyotres. You guys know i've been bringing you a ton of crochet protective styles and today is no different than any other day. So, as you guys can see, i'm actually starting off with freshly washed hair and, as you guys know, and if you don't know now you do. I love mamazoni leave-in. Of course, all the links to the products will be listed down below i'm also using their thermal smooth uh, it's like a cream product, and so i use that just to smooth all throughout my hair. It acts as like a heat protectant, a detangler and kind of a way to like hydrate and lock in all that moisture that we would have gotten from the conditioner. So i'm going to go ahead and just pretty much blow out my hair, you guys have seen me: do this a million and one times if you want to stay heat free, definitely do that. I should have done this, but i was actually running out of time. So i needed to go ahead and get this video up and out, and so i decided i was going to go ahead and just blow dry, my hair out, i'm actually using my eap heat blow. Dryer doesn't matter what you use! If you want to do a heatless way to kind of blow out your hair or kind of get that stretched look without having to do this process, then i also have a video for that. So definitely make sure to check it out. Now you guys see i'm over here spraying the insides of my ears like what's going on, but anyway i continued that process all throughout my hair until i got to the top - and you really want to make sure that you really really detangle your hair. You want to make sure that all the product is smooth through and, if you want to add any type of like oils, or especially the heavier oils. Now is a good time to go ahead and do that because your hair is going to be tucked away from root to tip, and you definitely want to make sure that it is hydrated and definitely not breaking off in between the protective style. So a way to make sure that that does not happen in between styling is um. For you to pick up some scrunchies, i got the scrunchies that are kind of like that. Is that, like velvet, we know that it's not really velvet, but it's giving velvet okay. I got them on amazon and they are really soft and do not pull or tug on my hair at all and then, of course, we're jumping right into the actual tutorial. So you guys have seen me: do this a million times and what i'm doing is just literally parting, my hair off you guys know i like to work in sections, because it makes it a lot easier, especially for you guys to follow so i'm starting off with A middle part, then i'm going to go down and do the side parts which is pretty much just following along the back of my ear, all the way straight across the top to the middle and that's gon na be section one right. We'Re gon na go ahead and just tuck that hair away just until we need it and then we're gon na go ahead and work on section. Two, and you guys have not seen me do this, but i'm actually gon na be doing some crisscross rubber bands. You guys will remember this from like way back in the day, i'm not that old, but i know a lot of people consider this to be an old hairstyle, so we're bringing it back and yeah, i'm just finding a way to kind of revamp. So i'm going to go ahead and section my hair off into two sections. I decided i wanted to do about eight across. If that makes sense, you guys will see what i'm talking about in just a few moments. I'M actually going to take some of my edge booster, which has currently been one of my favorite edge controls. It'S kind of replaced my cream of nature for no particular reason it just pretty much has, but for now i'm going to be using that to smooth everything through and this is actually their extra hold. So you guys are seeing i'm splitting my hair off into smaller parts. This will make a lot more sense once you actually see what it is that i'm doing the way that i initially started off doing the crisscross parts or the rubber band boxes on one side was very different than how i did it on the second side. So if this part kind of you know kind of made, you go chrissy like what's going on, i'm not really sure what's happening, then definitely make sure to watch uh the other side of my head, because i did it in a more. I guess a more beginner friendly way. I would say that so you guys know i like to do a little bit of baby hair, so um we're just taking those broken off hairs and we're smoothing them out ahead of time, because i don't really like to do it at the end. I kind of already want the style to be set and then from here i'm just pretty much parting, my hair off into two different areas and we're gon na go ahead and just start applying the rubber bands. You guys usually ask me like which rubber bands is. It that i'm using you guys can definitely use whatever you feel comfortable with. I just picked up some from my beauty supply store. These i mean i'm assuming it has a pretty decent hole. None of the rubber bands broke in the midst of me like doing the style, and i'm literally just so creating three different rolls and then well, i guess, rows and columns. I i don't know how to even really describe what it is. That'S happening right now, but you guys see that i'm parting off and i really love to use the racktail comb in this case, because it makes everything a lot easier. So once you get that box going, you could decide to either twist braid or simply take some edge, control and smooth down your hair, make sure to comb through it and connect it to the other box. In some spots you will see me actually go ahead and pre-comb out that um box area take the rubber band, go ahead and lock that down and then i'll attach the second strand at the end, that's only for some sections that were a little bit too thick. I wanted to make sure that everything was going to be really nice and close down to my scalp, since this was going to be the exposed part of the hairstyle. I wanted to make sure that it was as neat as possible. So in some areas you'll see me double rubber band and in other spots i won't need it as much, but definitely make sure that you are centering your rubber bands, please make sure, do not have them lopsided. I'Ve done it before. So. Don'T feel bad about that. But definitely make sure that you are centering them, so i'm pretty much just going to continue this process all the way across until i get to uh, i guess the other side of my head and then once we go to the back. I know you guys have been asking for me to do more boxes. Chrissy. We want to see more boxes, so guess what we're doing more boxes in the back except this time it won't be crisscross and you guys will get a chance to see what that looks. Like so i'm going to shut up for now, and i pretty much let you get to really enjoy this tutorial play it back. If you have to watch it a million times do whatever you have to do right and then definitely make sure to send me any pictures or videos that you guys decide to do on instagram so that i can see your work, because that makes me really really Excited to see that you guys are actually trying these styles and they are actually working. Three hey uh, yes, yes, so so, and voila you guys can see. The style is pretty much done from here. Most of y'all are like chrissy. Just wear your hair, like that. I know i know, but it wouldn't be a protective style with just having my hair in a ponytail in the back, so we're going to go ahead and kind of step it up a notch. I did go ahead and kind of seal everything with mamazoni um. This is like their thermal. I don't even want to call it like a, i, don't know a spritz, but it's definitely a stronger hold. It'S a humidity resistant spray, and so i put that on the front just to make sure that nothing, we don't have any fly. Aways no craziness happening and then, of course, we're going to work on the back. So first things. First, i like to go ahead and kind of make sure that all the hair is where it needs to be so i took a little bit of edge control just to go around my perimeter and then we're going to start off parting. Now you guys are probably going to get tripped out at this part, because i'm really good at parting, the back of my head with no mirror you guys. I promise it's taking years of practice, but nevertheless we are here. The best way to kind of get this done is to, of course, have a mirror. So two mirrors one in front one in behind and then take your rack tail comb, the metal side and literally just smooth it across your scalp that every single time is going to get you apart. Whether or not it's going to be straight or not, is kind of questionable so practice as much as you have to and honestly this part won't even really matter, because it's going to be hidden by the ponytail that you guys will see eventually anyway, but just for The sake of neatness and making sure that you do it right the first time, at least to the best of your ability. You guys are really getting a chance to just see what it is that i am doing and we're going to go ahead and connect the parts the same as we would have in any of my other crochet videos we're going to go ahead and literally connect them. All the way up to the top until we cannot anymore and then you guys will see i kind of just braid it across and set the style. So i'm going to go ahead and finish up the box parting here and then i'll be right back all right, and so once we got to a spot where i'm like all right, we have enough boxes going up, uh and across. I went ahead and pretty much just braided did a quick little cornrow across the ends of each box. Part if that makes sense - and you guys can see i'm going to follow that same pattern. Kind of in the snake pattern going back and forth from left to right, if you guys want to make your braids smaller, definitely do that. But i was ready to be done with this and i'm trying to get you guys this a quicker video. So i want to make sure that you guys are able to do all of these protective styles in three hours or less, and that was including the blow dry. So i just want to point that out for you. But again, if you want to do your braids smaller you can and that'll also help with the flexibility of you being able to wear these down because you'll see my hair is kind of thick. So it will be kind of bulky right here in the center, but we're going to be wearing it in a ponytail. So it's not a big deal to me if it is to you make them smaller, if not keep it moving darling. So what we're going to do now, you guys can see. I have just a little bit of leave out left, i'm going to go ahead and just finish that braid all the way through you guys, can see how thick and chunky it is. I'M so proud of. My hair growth, like let's just take a moment to say that you guys remember where i started and look at us now. Look at this. We got hang time so, yes, i was super happy with it. Y'All, i'm working with this small barbie mirror like what's even happening. I'M gon na go ahead and actually just make sure that the braid is tacked down. Typically, i use a bobby pin, but i did not want to hear your mouths, so i went ahead and actually just sewed it down. Obviously, if you're a beginner, you might not be familiar with how to sew. So all that i'm doing is i've knotted one end of that thread and then i'm just pushing it through go ahead and kind of tuck that underneath each braid seal. Everything in this is not the best way to describe how to do a sew in. But this is not what this tutorial is for, so if you guys want a more detailed video on how to actually sew thread a needle all that good stuff, i would love to do a sew in like. Let me know: i'm here: okay, anywho gon na go ahead and seal that trim off the extra with scissors and voila. You guys can see how everything is nice super great foundation. I actually considered making this a two-part video, but then i realized it was completely pointless because the rest of this hairstyle literally gets done in about four virtual minutes which, in real life, it probably took me about 30 minutes just to go ahead and get everything in And then you guys see me kind of putting up my fingers here, because i'm counting out the packs so biggest question you guys are always like christy anna. How many packs did you use how much hair came in each pack? There were exactly eight locks in each pack right. Well, i got a total bundle with eight packs. Also, so you do the math. In the end, i only ended up using four of the packs so four times eight thirty two. I did not use a lot of locks. You guys can see how many um you guys are able to see how thick the locks are and how wavy they are super soft and they are sliding through my hair with ease. You would think that the rubber bands would be super tight, but you guys this was super attention free, it's all going to be according to how you do your own hair right. If you're doing this on someone else, sometimes you can be a little bit more heavy-handed. So definitely just be mindful when you're tightening not only the crochet but the rubber bands onto your hair, because you don't want to get to a point where it's super close to the scalp that you can't get the crochet needle underneath. And you also don't want it to pull so much that you end up with those like red little bumps and you know just raised areas around your hairline now y'all know i'm light skinned, so i'm gon na get a little red here and there. But i promise you: it was completely tension free. I was able to go about my day and put this up right away, um and so yeah, i'm just filling everything in from here. This is pretty much self-explanatory if you guys need a more detailed video on how to actually do the crochet part highly suggest you guys checking out one of my other crochet videos, because i get into that just a little bit more and for you newbies. I definitely just want you to know that these boxes do not have to be perfect, especially in the back when it comes to braiding. If you want to try to do the twist, i would probably not recommend it on this style just because the weight of the hair is going to be mostly in the center, and you do not want for any of these to be falling out. Once you go to put in a ponytail or any of that good stuff, so definitely just be mindful of that. So far, so good you guys can see. I just pretty much filled. Everything in the hair is looking nice fabulous shiny. I did use a 1b. The length of the hair is actually 24 inches and this is their wavy. So i did another video showing you how to do a really quick ponytail that probably took maybe an hour. I think um and i did post that video a little while ago so definitely make sure to check it out. Those locks were actually curly and these are wavy, so you can see the more relaxed look toward the end. I hope you guys enjoyed this video. I had so much fun making it, so i also want to point out that you have the flexibility of either wearing this down or up in my case, i'm mostly going to wear it up, because you guys know anytime, i wear braids or any type of protective Styling, usually i want it out of my face and as much off of my shoulders as possible. I don't know why it's just one of those things. I think i look a little bit cuter with a ponytail, and so that's where we are with this, but always remember. If you're going to be doing this style - and you want to wear it down - definitely make sure to keep those crochet locks right on top of each other right beside each other, i mean you should have zero gaps if you're going to be wearing this down and Also make sure to do those braids a little bit smaller in the center. So just so you have that flexibility. You will definitely be able to get this style and wear it for a while. Just wanted to point that out, i love you guys so much stay pretty leave any comments or questions down below and i will see you in my next video bye babies. You

Comments
S Chin: This is so beautiful. I can imagine the addition of some beads or gold hair cuffs in the cross hatch overlap to add some extra pizazz for a special event! Thanks you so much for sharing Cryssy
ceelovekay: These videos are so helpful. My little sister has been wanting locs for ages, but my hair texture is more fine so I’ve never been able to wear them and therefore had no idea how to do them. Your videos give me hope that I might be able to make her dreams come true!
Lami Akindele: Miss ma’am! You are so effortlessly creative I would simply get overwhelmed by all the parting this style needs
Christiann Gainey: Love love it I did I style similar to this about 2 yrs about but I use a ponytail I made it was fun and easy forsure! Great job per usual
Bernadette Harper: This hairstyle is fire yasss sis...you came through with this one I really enjoyed watching the hair tutorial, thank you for sharing with us .
Lala K: Wow your hair looks so much healthier than before keep doing what you’re doing!
Asia Mone’t: This came out so pretty
Jay Bee: Girl you did that!!!! I just thought the back half was done individually
Keisha Mckoy: Love it , might have to try this with crochet box braids hair packet .
Della Dabner: I really truly love this!
Alisha Carr-Bennett: Omg thats so beautiful i wish I could do that to my hair
MIRANDA TILLMAN-DAVIS: This is so pretty. Thanks for sharing
BrownBeatss: Wow these are beautiful. Love them.
Dorissa Williams: I lovvveee this it’s so simple but so cute. I also like my protective style better up
Jeanette Standard: I love it looks so beautiful on you❤
VictoriouslyTierra: Absolutely gorgeous and creative!!!!
Donesha Betts: And ANOTHER ONE!! This is super cute
Star Mocha: Love it❤️❤️❤️
Naturally JaCara: Omgg this is so bomb well now I know what hairstyle I’m going to do next
Jean Carlo D'angelo: ¡Dama hermosa! ❤️
Quisha: ❤❤❤❤ You just gave me an idea, thank you
Jasmine L: So beautiful
Charity Hall: Beautiful
Herself🦋: Nice
shaune hemphill: Are you a straight natural?