How To Create Tight Curls On Braids | Braids With Curly Ends
- Posted on 13 December, 2021
- Ponytail Hairstyles
- By Anonymous
#tightcurls #braidswithcurls #curlsonbraids #howtocurlbraids
Step by step guide on how to create curls on the ends of braids.
**This is one of the top detailed videos on how to create more defined tight curls on the ends of your braids.
** Watch this video without skipping and try not to miss any part of it and you will be glad you came across this channel.
**Thank you so much for watching my video, please SUBSCRIBE, LIKE, and SHARE with FRIENDS, Thanks
PRODUCT USED
Expression extension
Cutting comb
Flannel
Bowl
FOLLOW ME ON INSTAGRAM TO ORDER CHANGEYOURLOOKUK WIGS
http://www.instagram.com/changeyourloo...
VIDEOS YOU MAY LIKE
Pick and drop with curls: https://youtu.be/PvBK4yjswz4
How to do knotless braids: https://youtu.be/d7nEvYiO-_c
How to make lace closure: https://youtu.be/t2PWUK8xeRU
How to dye black hair to wine: https://youtu.be/EyL5QVF_868
Natural-looking 4c hair: https://youtu.be/ke7n1oidz18
Ponytail on natural hair: https://youtu.be/fCIcbBQ9OxI
FOLLOW ME ON INSTAGRAM TO ORDER CHANGEYOURLOOKUK WIGS
http://www.instagram.com/changeyourloo...
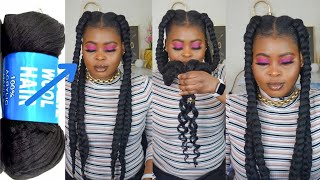
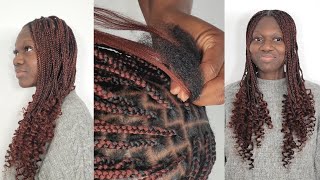
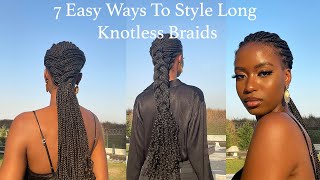
Hey guys welcome to my channel if you're, assuming my channel for the very first time this is stranger. Looking here on today's video, i want to show you guys how to create a tight koi pattern on the ends of your braid. Yes, if you're looking on how to create a chord pattern, a very more defined coil pattern on your braids. This is the right video for you and look at the braids see how neat this braid look, it's very, very neat! So if you base in manchester, we take booking on change your look uk all in one word on our instagram page, so we do a lot of tutorials hair, tutorials wig, revamping of your wigs and the rest on this channel. Let'S dive into this tutorial, so i'm going to be using this small, tiny rollers on this koi pattern to achieve this koi pattern. This is what you need a tiny rolex it can be longer than this, but just the same size of it as tiny as it is. That'S what i've used it on a lot of hair, but i've not, i don't think i've filmed any of it. So that's why i'm using this koi these rulers for today just to show you guys how it works. So that's what i'm using to achieve the choice. And secondly, one thing you need to do when you're rolling the braid into the rollers make sure you are twisting the braid. Also it gives it that more tighter koi pattern, if you just roll the braid into onto it without um and squeezing the braids. The koi pattern will not be as tight as the one i themed now. So all you need to do is to make sure that while you are um twisting the braid into the rollers make sure you are twisting the braid itself as well. While you are twisting it into the rollers, if you guys understand me, i don't know how to explain that better. So that's exactly what i just did and you can see how it looks so i'm done rolling it. So the next thing to do right now is to put it inside a hot water like a boiling water. The water has to be hot. If it's not properly hot, you might not get the same koi pattern so just make sure that your water is really hot and then i'm going to show you one more trick, while i'm putting this um the rollers into the water, what you do, if you notice, I raise the ball up onto like more than half of the braids. That is to give you when you already, when you finish braiding, it gives you that very nice, smooth braid. It looks perfect like as if you're wearing a micro braid as if you're wearing those braids, they actually use machine to create. So that is how to look so, if you've not been doing that just try to let the water reach like half get to half of the braids. It'S really make your braiding look very, very neat seriously. So that's just one trick that i'm going to them that i'm giving you guys on this um coily tutorial. So after doing that individually, i'll just put all the braids into the bowl and make sure that the water gets into it properly. Just to make sure that in case i'm missing, one rollers or the other so i'll be able to get all through to be able to get the water into all the braids. So after doing that, i like using this bigger way to just absorb the water out of the braid. Yes, it helps a lot. It removes like 85 percent of water out of even though after removing it away, you might see, get one or two drips on the floor, but it really helped a lot to just take out a lot of water out of your braids. So i really love using the store a lot. So after doing that, i just use the toy to squeeze it just the way, i'm squeezing it right now and then i start removing the rollers. So, while you're removing the rollers, you have to be careful with it, because some of the rollers normally have these little sharp edges on the roller. So if you're, not careful with it, your coils is going to be rough, so make sure that you move left or right to make sure to find the position where you can actually lose it so that it doesn't grip. Those chop sharp mouth on the roller. If you guys understand, if you've been using real last, you understand what i'm talking about normally. Has these shorts short grips? If you don't take it off, it will just grip the coils and maybe mess it up. So i, like i'm trimming the ends of the of the coil of the braid when i'm done, removing it from the rollers, because that end is the tiniest end and i normally use it to secure the braid on the roller. So it doesn't fall out. So i like, taking that part off, that's exactly what i did. So, if you don't like it, you want to see that and that tiny end dropping that's fine, but me i don't like it. I always take it off on all my toys. If i'm creating a choice, i always take it off, except i'm leaving the tips like a straight braids. Look at the koi pattern. Can you see how beautiful that looks? Look at the braid take a look at this braid. It doesn't look like it's is like easy and braided. It looks as if is a machine braid. You can see how beautiful so you want to get a nice braid, follow my teeth seriously: you're going to love you're going to love it here, a lot of diy tutorial on how to how to make how to diy yourself how to revamp your hair vlog. All of it on this channel you're going to love it. So if you've not subscribed to my channel, please - and please again, support me by subscribing to my channel - make sure you turn on your notification bell. So you don't miss any of my videos. I do upload new videos every week, so if you don't miss any of my videos any of my tutoria any of my review any of my vlog please and please again, subscribe to my channel and make sure your notification bell is on. Thank you so much for watching. I love you guys and i'm going to see you guys on my next video look at that braid guys. Ah, this is arts and look at the koi pattern. Are you kidding me? This is beautiful, guys,

Comments
jen's channel: Wow