Is This Amazon Wig Worth It?! | Headband Wig Tutorial + Review
- Posted on 08 December, 2021
- Ponytail Hairstyles
- By Anonymous
Hi Loves,
I applied my first Kinky Straight Headband wig from Amazon today and loved my results. I normally make my own headband wigs, but this is a keeper!
LINKS:
♢ Hair https://amzn.to/3ozoh2o
♢ JOGGING PANTS https://amzn.to/31DySkg
♢ TOP https://amzn.to/3EEahdt
SUBSCRIBE. SHARE. LIKE
________
Previous Video: https://youtu.be/3kEsdLy-abU
Related Video:
$35 DIY CROCHET HEADBAND WIG| UNDER 30 MIN INSTALL
OMG?! NO LACE! DIY Headband Wig - LOOKS SO NATURAL
WOW! I TURNED MY OLD WIG INTO A HEADBAND WIG
_________
Sit Down Filming Equipment Links:
♢ Camera (Kit): https://amzn.to/3lTgvf3
♢ Camera (Body Only): https://amzn.to/2VISTPE
♢ Lens: https://amzn.to/33OqgFb
♢ Tripod: https://amzn.to/3IbYO6X
♢ Ring light: https://amzn.to/36LW5QU
♢ LED lights + Stand: https://amzn.to/3osVlGr
♢ Battery Adapter https://amzn.to/3G9y5pX
♢ shotgun Rode microphone https://amzn.to/3ocgLdF
♢ storage Hard drive https://amzn.to/3IbDazO
Vlog Filming Equipment
♢ Camera\Phone SAMSUNG GALAXY 21+ ULTRA https://amzn.to/3d9jxtT
♢ Tripod + Selfie Stick https://amzn.to/3lsGlt3
♢ Microphone https://amzn.to/3ocgLdF
♢ Headphone & microphone Adapter https://amzn.to/3Efs0rf
♢ Phone Mount for Tripod + remote controller https://amzn.to/3Ee1w9z
EDITING SOFTWARE + MUSIC
♢ LINK COMING SOON...
♢ MUSIC COPYRIGHTFREE LINK COMING SOON...
_________
Social Media ------- ♡ ** Connect With Me **♡
PO BOX 315 JUSTIN
TX 76247
♢I N S T A G R A M https://www.instagram.com/gabbysqueend...
♢B U S I N E S S:
#HEADBANDWIG #KINKYSTRAIGHT
*FTC Disclosure: This video is not sponsored. Some links above are affiliate links from which I get a small commission, which does not affect you as a customer at all, but helps me keep on making videos for you guys! All opinions are my own.*
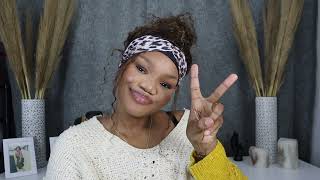
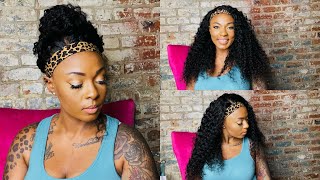
Hey queens, welcome or welcome back to my youtube channel. My name is gabby, don't forget to like comment and subscribe, so we're jumping right into today's headband wig review. This is a gorgeous kinky straight unit. Affordable headband wig from amazon here are a couple of shots of the unit that is clearly african-american. Inspired, let's dive into the tutorial okay. So here i am in my brown bonnet, i'm going to go ahead and remove this in just a second to show you what i've been working with underneath, so my hair has been slicked back for a couple of days. This is how it looks so. I'Ve been using the shine and gem extra conditioning gel to slick my hair back, and this is one of three products that i've been using consistently that have been working for me so yeah, i'm just gon na apply that like so next, i'm gon na go in With this nairobi foaming lotion now, this lotion is going to serve as a gel substitute, so instead of using a gel that gives me more of a crunch, i'm going to use this hair mousse, which gives me less crunch and i'm just able to mold everything into Place so that is why i prefer the mousse instead, alright, so we're just going to tap that in all over and then it's just going to marinate and melt into the skin next we're going to go in with the edge booster by style factor. Now, if you know me, then you know i have been using this product a while, and i absolutely love it. I definitely recommend it. I just don't recommend you know a disclaimer. I don't recommend that you use this product alone, find other products that work in your regimen along with this product, to make sure you don't get that flake and that crunch that you typically would see with using this product alone. So, as an additional precaution, i'm gon na apply this do-it-yourself elastic band that i made, and i'm just gon na put this on my hair, to slick it back and hold it in place so that it doesn't revert while i'm styling it. So that is how that looks now we're going in with the headband that came with the unit. So this is a beautiful headband and i wasn't sure if i was going to use it at first, but it grew on me. So i'm going to go ahead and place it onto my head first next, i'm going to go in with the weaving cap that came with the headband unit as well. Now i have tons of these laying around the house. So this is not new to me. I'M going to use it to make sure my hair doesn't move thumbnail. Okay, so, as you can see, my hair is nice and secure. So here is some cell phone footage of the you know, just a better visual of how my hair actually looks when it's laid and in place honey. So next here is the packaging that the headband unit came in. So, as you can see, everything is still in the package. You know this was pre-recorded, but we got the shot. Okay, so we're gon na remove everything out of the packaging and look at the gorgeous luster of this unit, and the shine is on point. So. The cap construction here is the front of the headband wig nice and full with two combs on each side. Here is a look at the front construction. This is a wefted unit, so everything is sewn together and yeah. I'M going to show you a 360 view of this unit as well. It does have adjustable straps in the back with one single comb in the nape area, so that is that it does have an elastic band on top with velcro on each side, so that you can go ahead and attach the unit and make it very very secure. In back okay, so let me give you a full view of this unit. As you can see, it's thick, it's full it's full of texture. Now i didn't want to insert this clip because it is a little thin with where the mesh cap is. You can see it through my walls, but honestly you're not going to see that once you put this unit on your head and as long as you use a black cap underneath you should be perfectly fine all right and it has very thick ends as well, which I showed you in that clip i'm just going to brush the unit out a little bit and we're going to place it on. So i'm going to be very gentle with my placement making sure to slide the combs in very, very gently all right and once i've got the combs in and nice and secure we're going to pull down the back all right. So it's been a while, since i had straight hair in my head y'all, so i was a little shocked at how well i looked with this straight hair. Now i did have a little trouble um getting the velcro to unsnap, but i was able to get it as you can see now i will say that when you're trying to attach the velcro in the back of the headband, it was very very hard. So i had to move all the hair to one side and then i had success with that. So try that, if you're having a little bit of trouble, but nonetheless this unit looks gorgeous but we're going to slide this headband wig up just like so and yeah. The look is definitely coming together. Now, of course, i'm going to show you a couple of clips and visuals so that you can further see this unit in its entirety so yeah. This is a front view and this unit is actually pretty long longer than i would typically wear my units. I typically go for like a 14 and a 16 inch, but i went a little longer. You know trying something different getting out of my comfort zone. A little bit with this unit, all right, i had this little piece of net, stuck in my hair that entire time alright, so i'm going to brush this unit out just a little bit i did. I did prefer my wide tooth comb over this felicia brush, but nonetheless it got the job done. I will say that this unit does tangle very easily, but it is a very affordable unit, so you can expect tangles with it um, because it's not you know it's not a virgin hair, so you're gon na have some tangles alright. So if you're not a fan of tangles, then maybe don't get this hair, but i found that the tangles were not that hard to get out and with how affordable this unit is. I would still purchase this unit over and over again because of how amazing and how easy you know, just from start to finish it is to put on so you know just switch it up every now and then - and this is this - is giving for sure all Right so now we're going to get into a couple of looks now. This ponytail here definitely gave me relaxed hair vibes back on my hair was relaxed. This is exactly how it would look, maybe not as long but you get it. You get it all right. Next, we're going to try a messy bun, so that is how that looks. I did put a clip in in the back just to kind of hold it in place, nice and cute up top. This is a definite go-to for, like those lazy, natural hair days yeah. This is cute all right now i did try a under braid, which i don't know if i've ever actually tried an underbraid before, but i struggled with this one a little bit so i had to speed it up. So y'all can see all of my struggles and i'm just i'm just trying to give you all the visuals here, so we're going to braid that all the way to the bottom, and that is how that looks, nice and cute. I definitely would rock this one. All right, so i got a little lazy on this part. I'M not gon na lie and i'm gon na show y'all a little side. Bun here, just hold it up there, but you can. You can see the style and that's what matters i captured that moment. Alright, so we're going to unravel the braid really quick and i'm going to also show you one more braid. Now i'm showing you a pigtails, but these are like grown in sexy pigtails. These are not kid: pigtails, okay, nice and loose and thick and full. Now, if it were me, i would put both of these pigtails into a nice little halo, braid and call it a day. So that is just what i would do: okay, but yeah. This is how they look all right, so now we're gon na do the final look, which is a nice elsa braid in the back. I figured i'd finish off with this. Look because you know why not, why not have one single braid with everything out of your face in the back, so that is how that looks, and, of course, if you want to you, can swing it to the side as well to give that other type of Elsa vibe as well, okay, but that is it for today's look, don't forget to like comment and subscribe. I will see you guys in my next one bye, guys you

Comments
Tyequiece Beautytutorials: Wow thanks you for sharing, it looks beautiful Great job.