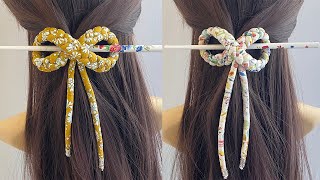
4 Diy Hair Ties | Bow Hair Ties
- Posted on 27 February, 2019
- Ponytail Hairstyles
- By Anonymous
In this video I am showing you 4 different diy bow hair ties. This is a super fast and easy diy. 3 of the bows are done with a hot glue gun and the other one is a sewing one. You can find a template for the last bow on pinterest just type in bow hair tie and there are a ton that come up. I just eye balled mine and drew it myself.
MY HEADBAND AND HAIRBOW PLAYLIST:
This is everything you need to know about my sewing machine: https://youtu.be/nKRkfHdQgcY
This is where I buy all my fabric:
WHERE TO BUY FABRIC ONLINE: https://youtu.be/MM-2uxj6XBw
This is where I buy all my headband supplies: https://youtu.be/mhIGgS8K-eo
Some of my favorite DIY videos:
Kids Apron Tutorial: https://youtu.be/6szr8jUo9WE
Sailor knot headband: https://youtu.be/oQ9IxIzWKbY
4 Hairbow tutorials: https://youtu.be/UjHkl2Ok4ec
Diy Purse For kids: https://youtu.be/1h44Ij8fqwM
Diy cardigan: https://youtu.be/aOWKIbK_uCk
DIY HEADWRAPS VIDEO: https://youtu.be/VC2c19P39Ck
DIY HAIRBOW TUTORIAL PART 2: https://youtu.be/bXuZHKIU6Zk
DIY TURBAN WITH A SPARKLY CUFF: https://youtu.be/sgEIEIZuj9k
TODDLER MAXI SKIRT TUTORIAL: https://youtu.be/8SHLt1DH5TI
DIY BOHO WALL HANGING: https://youtu.be/GbQhILc68f0
5 MINUTE SCARF TUTORIAL https://youtu.be/F-4_iaxtF50
DIY SLOUCHY BEANIE WITH A BOW: https://youtu.be/_XYrqIzTWEA
BUNTING BANNER TUTORIAL: https://youtu.be/e4JEL3qUiUo
DIY HOODED TOWEL: https://youtu.be/NUih07cNpJ4
Please don’t forget to subscribe if you are new! There will be new diy videos every week! I try to upload every Tuesday!
Thanks for watching
-Dawn
FOLLOW ME ON INSTAGRAM @EATCRAFTCLEAN
Hello, everyone welcome back to my channel in today's video we are making these hair tie bows, I'm going to show you how to make all four of them. They are super easy and cute. They add the perfect pop to any outfit and any hairstyle. I really hope you enjoy this tutorial. If you do, please give this video a thumbs up. Also, please consider subscribing. I do fun DIYs every single week anyway. I guess let's just hop right into this video okay, so everything you need for this tutorial is just for hair ties, a glue gun and the supplies, the the material and stuff like that that you'll need for each bow. There is one that you're gon na have to sew and I will show you how to do that, but the other ones just used a hot glue gun. So to start, we are going to start with this leather bow. So I cut it one inch wide by three inches long and I cut the ends on a diagonal. So you just want to make sure the points are on opposite ends. Then for the centerpiece it is a half an inch wide by four inches long, and I am just going to tie that in a knot and I do have other tutorials using this faux leather. So I will link that above here somewhere. So once you have it tied in a knot, you kind of want to manipulate it a little bit so that you cannot see the white background and that would even be cute just on a hair tie. Just to tie this simple half-inch around that's kind of what I was like. Oh, maybe I like that better, but I decided to go ahead and do it the way that I had planned so you're gon na take your longer piece now and you're just going to like accordion fan whatever you want to call it scrunch, the middle of it And then you're going to lay it down so that the color is on the mat or on the table, put your middle piece in the center, where it belongs and lay the bow on top of it. Now I'm gluing the hair tight to the backside of the bow and I'm just gon na wrap that middle tail up and around the hair tie and kind of glue it to itself. Then I can see that I'm gon na have a whole bunch of extra tail. So I'm going to cut that off before I glue the next one up and of course I forgot to grab my scissors, so I had to have my daughter come in the room and hand me the scissors. So that's why it took a little bit longer. But I'm just cutting the tail and I'm gon na glue it in place and then you're done with this bow, and I think this one turned out to be my favorite one out of all of them. I took a quick picture of my daughter just so you could see what it looked like and I loved it. Okay, so for the next one we are using felt, and I do have tutorials on felt bows too, that I will link these are cut at two inches by six inches. So I'm just folding the one side up, I'm going to put glue down the side and then folding the other side on top of that. Okay, once that is glued in place, you are gon na fold. It I start by folding it down. Then up then down you are looking at the back right now. So then you get your centerpiece and lay it down. Stick the bow straight. On top of it make sure it's in the middle, then we're going to glue the elastic to the back here and do the same thing as the other one just wrap the tails up and around and glue them in place. I also took a picture of my daughter with this one. I love these bows like underneath a bun or in the back of a ponytail. I don't know, I think it looks so cute, okay, so the next one we are using velvet material. You don't have to use velvet, I just used it because it doesn't fray on the sides as bad, and I wanted this to be like a big, fanned out bow. So I cut this at 8 inches long by 6, inches wide and then the center piece is just a 2 inch by 6 inch. So what you're gon na do is take the shorter ends and you're gon na fold it up and you're just going to put some glue. I just put dabs of glue down the end, then you're gon na fold up the other side to me that this is just like the felt bow, we're just using bigger pieces and, as you can see, I started with the right side of the fabric facing up. So now I have to flip it so make sure you do that now I can see where I put the glue. You can see that you want to make sure that side is facing up and you're just going to start like accordion, Fanning it and there's going to be a lot of folds up down up down. And it's supposed to look that way, because it's just going to be like a big bow. Okay, so before you can do that, you've got to make the centerpiece so you're just going to fold the sides up of the centerpiece and you're going to put dabs of glue and then fold the other side over very simple, then you're gon na make your fan. I decided that I liked it better if I started by folding the sides up, so they go up when you're looking at the back anyway, then you can do what. However, you want and then the rest of it is just the same. You'Re going to lay the bow down on the tail. Then you're going to glue the hair tight in place and then wrap the tails up around the bow and make sure if you have excess amount on your tail, you can just cut that off and then you're done. I really like the way this one turned out. As well, it's super cute, it's big if you like big bows, so there you have it okay, and for this last one you're gon na need like a template. I just drew one out by eye: you can do it as big or small as you want. I actually wish I would have done it bigger, but you're gon na need two pieces of it and you're gon na lay them right sides together. I know you can find a pattern on Pinterest. If you don't want to draw one out yourself, but right sides together, then you're gon na sew all the way around, but you're gon na leave a gap in the middle so that you can flip it right side out okay. So this is what the finished product looks like after you have sewn it. So now I am just gon na flip it and then you're gon na grab your scissors or something to help you like point out the ends and make it look nice and pretty, and once you have it looking all nice, you can hot glue the inside. If you want, or you can leave it you're gon na tie it and you won't be able to see it either way I hot-glued it just closed just so. There wasn't a hole, then you're, gon na grab your hair tie you're gon na stick, one end in and you're just gon na tie a knot. This is why I wish mine was a little bit bigger just so that my tails were a little bit bigger, but it's okay. It will look cute and my youngest daughter's hair and then, when you're done with that you're just gon na, like fluff out the tails and you're done. I actually did not get a picture of this one in my daughter's hair because she had to run to school. But this one still looks super cute and these are way popular right now. I'Ve seen them all over the place, so that is it for this tutorial. I hope you enjoyed it. If you did, please give it a thumbs up. Also in the comments below please tell me, which one is your favorite, I think this leather one is my favorite. I don't know I like them all. I think they all look super cute and they are very easy anyway. Thank you guys so much for watching. Please subscribe if you are new and we'll catch you in the next one.
Comments
UNKOWN DONT WORRY: I love the big velvet one!!!! So cute and easy
J L Stryker: I like the velvet one, because my daughter is so dramatic and it suits her, but if it were for me, I'd wear the faux leather one. Cute and simple. Thanks for the video!
Sarah S: I like the big one best. Thank you!
Lisa Cottrell: I like them. I would like to know what glue gun you use ? Mine seems to run out the end in between when I’m using it , but yours didn’t seem to do that !
GG&AJ CHANNEL: thank you for sharing.. this is one of my favorite ponytail design.. Hello po greetings coming out from the philippines..
Letty Rodriguez: Omg am going to try this. I really like them
OC: Hi! May i know what tyoe of fabric did you use?
Pushpa Karsh: Nice
Ranjith Raams: Very nice I will try for my baby tqq