Diy Scrunchie Using Your Own Hair Tie! Great For Fine/Thin Hair!
- Posted on 19 August, 2019
- Ponytail Hairstyles
- By Anonymous
This is my favorite way to make custom scrunchies for my VERY fine hair. Use any and all of your scraps to make the most adorable accessories. Should your scrunchy match your quilt/bag/shirt?? Of course it should! Take a few minutes and make some. Enjoy!
Materials needed:
Fabric (any kind) cut 3.5”x22”
Sewing machine needles (I use universal)
Cotton Thread 40 or 50 wt
Hair Tie
Safety Pin
Time stamps for each step in the first comment!
----------------------------------------------------------------------------------------------------------------
Products Used:
Backstitch Fabrics: Facebook Search
*Hair Elastic for Fine Hair: https://amzn.to/2KHLKKZ
----------------------------------------------------------------------------------------------------------------
My sewing machines -
*Main workhorse: https://amzn.to/2YGTZur
Portable workhorse: https://www.bernina.com/en-US/Machine...
Coming Soon: https://www.bernina.com/en-US/Machine...
----------------------------------------------------------------------------------------------------------------
Say "Hi!" to me on some other platforms:
OklaRoots Website: https://oklaroots.com/
Instagram: https://www.instagram.com/oklaroots/
Facebook: https://www.facebook.com/oklaroots/
Don't forget to tag your makes with #OklaRootsTuts so we can connect!
----------------------------------------------------------------------------------------------------------------
Filming Equipment Used:
- Video: Samsung Galaxy S10+
- *Audio: https://amzn.to/2k1sQUE
-*Boom Mic: https://amzn.to/2GYK5ye
*Indicates affiliate links.
#sewyourown
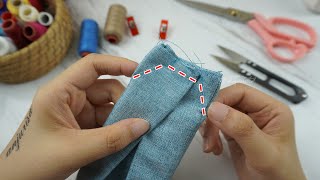
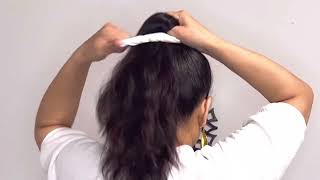
My reporting yeah, so are you dizzy mm-hmm I feel like we should do dancing now. Follow me: hey everyone! Welcome to the upwards YouTube channel. My name is Jessica thanks for stopping by so today's tutorial is all about hair accessories and we're working on the scrunchie. That'S right, the scrunchie, I honestly never thought I would be wearing a scrunchie again or making a scrunchie. I mean I was a child of the 90s, so I know the scrunchie and I watched the scrunchie die. I watched the scrunchie die, nobody warm anymore, and now every teenager I see, has it on their wrist or in her hair, and apparently they gave it to boys for something I don't know. I don't want to get into that, because this is crazy. So as a notorious fabric, hoarder like why not make some of our own scrunchies, you know what my style is different. Now I can see the appeal of the scrunchie again I do. It is a much cuter thing to put in your hair than one of these right. This is cuter than this. This has its purpose, but this is cuter, so why not make our own scrunchies and also if we can make our own scrunchies? Are we limited to what type of material we should use when making a scrunchie? I think not so, let's test that out today. So today's tutorial is all about how to make a scrunchie. However, I will not be using any of this stuff, the store-bought elastic stuff. I don't like it guys. I know that all the tutorials out there to show you how to DIY a scrunchie how's he using this stuff and it will be easier during construction if you use this stuff, but I don't like this stuff, I can't seem to get the right length. I can't seem to get the right tightness. I don't like it. I don't wear scrunchies where I use this stuff. I do wear scrunchies where I use one of these see that this is a basic hair tie and I'll have links for these hair ties in the description below, but these are basic hair ties. I have all different colors here. These are basic hair ties that I normally wear. I have very, very fine, thin hair that does not like to stay in ponytails, so store-bought Frenchie's not gon na work. For me, this stuff not gon na work. For me, this is the only type of hair type that works in my hair. So does that mean I can't wear scrunchies? Of course not. It just means that when I make my scrunchie, I have to make it on this. Am I gon na cut this? No, I'm not gon na cut this. I'M gon na show you how to attach this fabric and flip it all on the hair tie. I know it's crazy so before we get started, let me remind you to subscribe down below. If you haven't done so already, every single Monday, we come out with a brand new tutorial. So if you're, a subscriber you're gon na know right away what we're coming out with, there's also bail down there. I guess if you tap that bail you'll get a notification when a new video comes out, my videos aren't going anywhere, but if you want to see them right away, go ahead and tap that Bell give this video a like. If it any point you like the video and any questions or comments, you have make sure you write them down below the first comment. The pin comment will have time stamps for every step of this video. This is gon na, be a short one, guys cuz. It'S very very easy, but it's gon na be a fun one. Let'S started so today, I'm gon na be walking you through how to make three different scrunchies using three different materials. I'M gon na be using a minke, a cotton lycra which is like a jersey, stretchy and then just a quilt cotton. This scrunchie was actually made out of Liberty fabric, which is like a lawn material, and it's one of my favorite scrunchies. I use cotton thread for these scrunchies because the stretch comes from the elastic inside and you have so much bunched up fabric that you don't really need the fabric to actually stretch too much. So cotton thread is fine for this. You can see that if you have a piece of fabric, that's not quite long enough, you can stitch it together. That'S what I do with this as well. Liberty can be expensive to get yardage of so I just had some scraps and I sewed them together. I don't even think you can see the seam where I connect to them, which is great, it's what's great about a scrunchie pattern. This scrunchie is a great scrap, busting pattern. Besides your fabric and your thread, you're gon na need an elastic band. I suggest, if you have elastic bands that you like to wear, normally use those for this project. You can get coordinating colors you don't have to, though the fabric is gon na cover it up. Besides that, you're gon na need some sewing needles. I'M just gon na be using Universal 8012 schmitz needles for this project and you're, so gon na need a safety pin which is going to help us turn the fabric right side out. So first we're gon na step through the process of making the cotton lycra scrunchie. In detail, and then I'm just gon na kind of fast-forward and show you how to make the other two as well, so we're actually gon na do most of this at the sewing machine. So, let's head to the sewing machine, alright, so this might feel challenging at first, but I want to encourage you to slowly give it a chance. So what we're gon na do is we have our hair tie and we're gon na wrap our fabric with the short end, so that it's right sides together and what we're gon na end up doing is just sewing along this entire edge around the hair tie. So I'll show you how we do that first, I'm just gon na clip this top together, just like that and I'm gon na give it under my sewing machine. Alright. So I'm just gon na be sewing at 1/4 inch seam allowance and you can go nice and slow for this, make sure you a back stitch in the beginning, so you just go a little bit and then stop and pull up some fabric meet. It up. Make sure you don't sew the elastic in so keep the elastic out of the way while you slowly pull your fabric together now, the trick to this is not focusing on things that are not directly under your presser foot. If, if you start noticing all the junk going on over here and the flat brick down here, flailing around, it's gon na stress you out, but if you just focus on what's on your face plate right in front of your needle you're gon na be good. So that's all I do is I just go a little bit readjust fold it over just keep going. Eventually, it's gon na start bunching up on us and we'll have to push it back. So now you see the fabric is starting to get bunched up over. Here. I just squish it back, because I want to have lots of room on my elastic to add more fabric all right now we have our scrunchie just like this, so this is what we have so far. What we want to do now is we want to flip the whole thing right side out, so we're going to find one of the ends and then pull one side of one end: grab your safety pin and stick it in there close it up. So now we're going to do is we're going to take the safety pin and we're just going to shove it into so. You can see, we took it, we just shove it into the tube and we're just going to work it through that tube. Just like that and then pull it once we can't really push it any more and then just push push just trying to get that safety pin to the end. We did it, I'm just gon na gently tug around it. There we go and there's the end of our fabric, we can take our fabric and just gently pull it. Then there we go see, look at that. That'S a rewarding feeling. You'Re gon na have to push this back a little bit while you're trying to unravel it, but no comes out there. You have it it's crunchy right so cute. So let's close up these ends. This is the part I actually find a little bit difficult. So what I'm gon na do is I'm going to take this end and what we want is we want it to be as flat as possible. So I'm gon na take this end and push it out of the way grab a Wonder clip and I'm just going to clip it just like that see so now it's just pushed out of the way anymore: wonderful edge. Okay! So now I'm gon na. Take this end and take the opposite, and it's not clipped and I'm going to fold it under it. Now, if you want to be precise, you can be precise fold it under enough right, a quarter inch or more just fold it under alright. So I have it all folded under see so I'll fold it in there now to keep it in place. I'M actually gon na take some clips and I'm just going to clip that fold so that it's not going all over the place. So now what we have to do is we have to take this end and put it a bit in here and then sew it shut. So I'll show you do that so now we have this end over here. Once again, I just want this to be as flat as possible and if you have a preference, you see how I have the seam up on the side, and then I twist it so that the same was up as well. So that way, they kind of match up no one's gon na notice, if they don't. But if that's important to you, then take the time to do that now. So now I'm going to flatten this piece, which is the raw edge side out just a little bit and again, I'm going to pin I'm gon na clip this fabric to the elastic that's inside, so I'm not working with scrunch right, I'm working with the flattest piece. I can get okay so now you're going to take the raw edge side and you're just going to kind of work it in to the folded edge side. Okay, all right! So now we have it inside of there. So I'm again just going to kind of pin it and you can even use metal pins right here. It might be easier, actually still want to keep this fabric pinned out of the way, listen pin it. So here we go so now. I have a somewhat flat piece of fabric here with the raw edge inside of the folded over edge. Now, I'm just gon na sew at about an eighth of an inch of a seam allowance right along this edge, obviously on the folded side to close this up. So, let's do that, since cotton lycra is a bit slippery and we have bigger seams here, I'm actually going to start stitching a quarter inch or a little bit more into the fabric and then I'll back stitch a bit and then go back so I'll show you So I'll go in back stitch a bit and then back in and that's just gon na make it so I'm not fighting my machine to get over that slippery thick scene all right. So here's our scrunchie and see we have the scene here which is gon na. Be noticeable to you right now: okay, you made it just you made it. It'S gon na be noticeable to you right now, but watch this. Let'S trim those those edges where we can okay. So now you just scrunch it all up. Where do you go where's the scene? Where is it? Okay? It'S good and adorable right. Look at this so cute! So now we're gon na kind of run through the other two scrunchies we're gon na make or making a Mickey spreadsheet and we're making a cotton woven. Scrunchie and I'm just gon na show you real quick how we do that. I'M not a fast forward through motion just so you can see that it can be done and you can see if it's any more difficult than this. But these things are quick sews and they are extremely satisfying and they are adorable. I mean if you like, scrunchies make them for yourself if you've got young ones in your life. If you've got teenagers, if you've got teenagers in your life, my heart goes out to you: okay, make them a scrunchie, maybe it'll make them happy for like half of a second. I don't know so, let's run through the other ones. That'S it that's it! It'S so easy to make these, and then you end up making like dozens and dozens of them, and then you have to like find people to give them to. These are super quick, so they're, very rewarding, they're, very simple. You can see we used all different types of substrates and they all came out great the minke because it is a thicker fabric. It was a little bit more difficult to pull through. But if you take your time, it's fine and who knew scrunchies, I'm making a comeback. I got it I'll, be honest when I first heard it, I was like no. No, I don't like scrunchies because again for somebody who has very thin fine, hair scrunchies were always made for girls with big big big poofy curly hair, and I didn't have that so I would twirl it twirl it and twirl and twirl it until I had like A like a cone, you know like this big on the back of my head, that was all scrunchie with a piece of my thin little strand of hair. Just sticking out you know, and it was not a good luck for me. So I was not happy when I heard the scrunchies are coming back, but once I realize I can make my own scrunchies using hair ties that are actually flattering for my hair. I got pretty excited so you can see. I mean it's a cute. Look right! That'S a cute messy, I got ta go out, I got ta, take care of stuff, but I got my scrunchie in that's a cute look. So thanks so much for stopping by today. I hope this tutorial helped you. If you want to make your own scrunchies. Don'T forget that if you are a shop that sells these scrunchies that are custom made, make sure you link your shop down below so that anybody come into the video can just reach out to you directly. If you liked this video make sure you give a thumbs up, if you haven't already subscribed, please consider doing so. It means the world to me and also you will get first notice on all videos coming out. I encourage you, if you're on Instagram, to come, find me and follow me. I post a lot of this stuff on Instagram and I post a lot of things that I'm working on for future videos on Instagram. So if you want to get a little sneak peek of what's to come, make sure you follow me over there. My Instagram handle is at oaklands. That'S anything you make that you want me to see, make sure you use the hashtag Oakley roots, toots and I'll, be looking for you every single day, thanks again for stopping by get out there and make something bye.

Comments
Jess OklaRoots: Here are your Time Stamps! Materials - 3:10 Sewing the fabric tube - 4:43 Turning the fabric tube - 6:53 Close the final seam - 8:14 Fast scrunchy using quilt cotton - 12:21 Fast scrunchy using minky - 13:07
Jimandmissy Lima: I make tons of scrunchies like this. I actually fold the raw edge in on the top right at the beginning so I don't have to fight with it at the end.
crazeekiwi1: So I attempted my very first sewing project, a scrunchie. The last time I sewed was in middle school for home ec class. The pacing, your clear instructions and visuals were super helpful. The hardest part for me was turning the tube right side out. But after five minutes of struggling i did it! I was so excited, I put it in my hair and then on my wrist and a third of the stitches broke :( I'm not sure if it was due to my material or stitch length. I'm going to give it another go, hopefully it works
Jan Walters: This is great. I volunteer at a teen center and the girls asked me to make scrunchies. I was concerned that the elastic I used would not hold tight enough in their hair. I'll be making these! They want velvet ones.
Michele Little: Question: when sewing it closed at the end are you sewing over the elastic as well?
Jacqueline Campbell: BEST tutorial on this method I have seen. Thank you!
Michele Perez: I was making scrunches with the roll of elastic, and then saw your video… your idea was so easy, I loved it, but I did sew one of the ends over before I started sewing on it. Thank you so much for a great video
Tracey Gray: Brilliant and clearly instructed video- I love scrunchies but always struggled with the elastic- I never thought of using an elastic hair band- FANTASTIC! Well done xx
Noralle Harper: Thankyou Jess for showing me how to do this. I've made several. You explain everything so good.
Pat Coxen: Being a grandmother of girls who are 6 & 8, I am out of the loop on fashion. However, when asked to make some by someone in the loop, I was able to go directly to your channel and find out how to make them. Thank you for your tutorials. Please keep them coming!!
Hummer Klein: Love the sound of your sewing machine thank you for sharing this with me your a great teacher Be safe and God bless you
Rylee Lewis: I am 17 and taught myself to hand sew I was 8, and I was gifted my first sewing machine when I was 13. Videos like yours are what inspire people like me!
Rachel Cundy: Thank you so much for this video!! Right now we've used all the 1/4 inch elastic for masks so finding out I can use hair ties is amazing!!
Brett Denman: I'm a sewing beginner and I could never figure out the elastic size. This video helped me so much. Thank you!
small footprint: Hey, Jess. If I haven't said it before, I'll say it now... Thanks for showing us this alternative way of making a scrunchie. I bought some regular rubber bands, and am going to try them for my daughter with the thick hair. Good video.
MRR: Thank you so much for making this video! I didn't want to spend money on those elastic bands when I already have many of the hair ties. This video is exactly what I was looking for.
Tess Christensen: Thank you!!! I needed this to make scrunchie's for my daughter's boyfriend for Christmas! Best tutorial!
Cowgirl Janey: I love making these scrunchies. My daughter says they are the best and is asking for more. I like being able to start and finish a project in less than an hour. Thank you.
A Crafty Composition: As a fellow fine-haired gal, I'm sooo excited to find your scrunchie tutorial using a regular hair elastic!! Your brilliant. Thank you!!
Robin Gould: I love all of your tutorials! You are fun and easy to follow.
It's Sew Angy: Thank you for this idea! This was a great sew for me and my 13 year old!!!
Estrella Herrera: Brilliant! Thank you! I love your videos, so clear, helpful, no stress. Bless you for sharing your wonderful talent!!!
Denise Hoegen: Thanks so much! You always have the best “hacks” to make a project better.
Brittany Fouts: I love this. Thank you so much for sharing!!! Would you recommend polyester thread for scrunchies or would cotton work fine?
Hilary Larson: Thanks for the tutorial! My daughter and I are going to make some scrunchies now! We are wondering, though, what is that colorful thing you use next to the presser foot to help keep the fabric aligned? We need one of those in our life!
Kathy King: Love this! Looks pretty easy! Could you tell me what size I cut the material? Thank You
Jenny Gill: Morning Jesse from Australia. Just finished 10 Scrunchies for my grand children wish I had have found this several months ago. So so easy thank you Love you you are a great teacher and just a delight to listen too under all the stress the world is going through at the moment. Take care and stay safe ❤️❤️
Mrs.K Necro: This is so helpful! I also have very fine hair it’s super long but fine. My sister growing up always wore scrunches cause she had SUPER THICK HAIR and I have like 1/4th of that thickness my hair is always back and those elastics pull my hair so I’m gunna try making some of these and see if it helps
Vikki Davey: Great tut . I’ve always wondered how to make one . Other than how I made it up myself . My 2 year old niece wears them on her wrist , copying my 7 yr old neighbour , who turns 8 tomorrow ~ that’s why I’m here , to make some for her birthday !! Thank you !! I have fine hair too , always wish I had think hair . scrunchies look great in your hair !! They are great to bulk up thin hair in a bun .
patricia alva: Wanted to say I love the videos I have seen. I can’t wait to do some of the bags, wallets etc. I have done this scrunchie as you showed. Love em!!! Thank you for your great details and talent
Bobbie Gallardo: I have been searching for scrunchie hair patterns for about 30 mins and I seen nothing but elastic the moment I seen that you used a rubber band and I stopped searching super simple! l LOVE IT please don't stop making tutorials
God's Amazing Grace: very nice scrunchies you have made! easy to follow tutorial thanks
Sara Raulerson: I have to admit I was nervous at first because it looked intimidating (I’m okay at sewing but not amazing) but it worked out super well. Thanks for the easy to understand tutorial definitely will be watching more of your videos
ToucansWith Hats: “ if you have a teenager, my heart goes out to you” *me a teenager making this Scrunchie because I’m bored and have nothing better to do* “I know right?”
Nga Tran: Thank you I just finish one for myself & I will make more for friends too
Sonia Latham: Thank you for the tutorial, excited to give this a try!
Kirsty Saves: I don’t know how many videos I watched before someone mentioned about starting the finishing stitch in the middle of the binding!! Thank you so much!!!
Caitlin S.: So I have 7, 12, & 13 year old daughters, I too watched the death of scrunchies when I was in school but it’s so fun that my girls are now interested in making their own. Plus your instructions are so clear (thank you) they can almost do it by themselves and the fact you use real hair ties is Amazing!
debjive: Such a simple way of doing it I would never have thought it very good tutorial thankyou
dyeitb1ack: So my long haired fella wanted some scrunchies so of course I came to your channel, after seeing all your great bag videos! Unrelated question, but I love your top! Did you make it or add onto it with fabric? I’d love to see a tutorial for upcycling old T-shirt’s! Thanks for all you do
taleah corbett-rember: Thank you so much, seriously so helpful. I love this video
Paula Sydney: Love it, I'm going to make one, or two or three... NOW :) Thank you!! I hate making scrunchies with the elastic.
Leah Blouin: I love this! Helps alot I have 100% cotton fabric and have nieces so i needed this today thank you!
Elizabeth Vallely: Love the way you make the Scrunchie bfreat video going to give it ago, thank you for sharing!!! Hugs Liz...
Carie Thomas: Thank you for the video. Already made 2. My teenager already asked for a bunch of them
michell g.g.: did this and got it right the first try! thank you!
Jules Brooks - Hand Dyes by Jules: You make the best videos! I can't believe scrunchies are making a come back. But I'm going to make some now and sell them in my Back to School Collection. Thank you for making the best videos ever!
Pat Kinsey Taylor: I love your pattern. I will try it. Thanks.
Carlee Leanna: This is the best tutorial I’ve seen some for using the hair tie I watched these videos for a week and this is the best video wow great job
Francesca Seligman: Oh my goodness - this is life changing! Half the time of any other way... all my kids friends are going to be getting these now!!!
Tracy Heath: I have been watching many scrunchie videos and this is one of the best... Thank you
Nga Tran: Thank you I jus make it It is pretty & easy to follow
BobCaterpillar: Thank you! You are very good at explaining things.
TheMelanieGrace: I too was very excited when I saw that scrunchies came back into fashion! I sleep in them every night now! I feel like my younger self. :) I will most definitely jazz up my basic hair ties. Thank you for the tutorial!
emily schwellenbach: I knew scrunchies had to come back, they were way too cute and useful
Sophia Lopez: I watched a butch of videos on how to make scrunchies since I have never sewed before and this one is the only one that helped me my scrunchies came out amazing!
Tricia T: Jess your videos are terrific.This is the BEST tutorial I have seen on scrunchies....can you make your fabric tube wider for an extra flouncy scrunch? Thank you. Tricia in the UK
Jamie Fry: You crack me up!! Love this way of making a scrunchie! Thanks for the giggles and instructions. :)
SimonEmma88: I make my Scunchies with hair toes too. I start and stop sewing about an inch from each end. Once turned right way out I sew the 2 ends together then sew up the gap with the smallest stitch my machine does.
Ragamuffin !: I absolutely LOVE you!!!! Thank you for the BEST tutorial!!!
Ann: That is so awesome. Thank you so much. Your amazing
retro knits: These are so cool and totally work!
Nancy Ingram: Thanks for another way to make them!
Kiwi Puffs: This really helped me thank you!
s n: This is ingenious ❤️
do je: Thx for the video. Your is the 3rd one I’ve watched using a hair tie and 1st one that makes it easy!
kimberlific: This makes me so happy. My goddaughters don't wear scrunchies but I think would wear them if they were tighter (i.e., they like them, it sounds like, but they aren't tight enough, so they don't wear them). So I'm going to try making them a few using this method. Thanks so much!!!
Nancy Ingram: I have made scrunchies for 30 years, off and on. I make them on my serger. Cut your strip and sew the ends together, right sides together. Now, gather it all up and stick inside the the elastic (or size #64 rubberband). Match up the raw edges and start sewing on the serger. Yes, your server thread is on the outside, but you can either using matching or contrasting thread. Sew all around, then off, when you reach the starting place. Thread large eyed needle with the tail and weave it into the serged stitching. No turning! Honestly, the rubberband lasts long enough, they'll be tied of it before it gives way. Or use your elastic pony, but no need to sew over it. You can leave it with the serged edge on the outside, or rotate it to the center. FAST!!
Lupe Ibarra: ❤ that this tut uses bands and not elastic. Thank you!
B l o om: You make it much easirer! Thank you!
Ivette GeeLop: I love this tutorial, lol. I'm one of the big poofy curly hair gals...But I have a question I have started only using satin or silk fabric easier on my curl hair can I follow the same method or should I change something up? Thanks in advance!!
Juice 3.14: Bless. You answered my question in the first 2 minutes
MIZO ELEMENTO: I just made it with the help of You thanka alot
Sew Libra: Hi Jess, have you found that using the rubberband inside causes and issue when the scrunchie has had some wear/tear? Because when I use them rubberbands they seem to wear out after a few uses and stretch out e.g the treads/rubberband doesn't hold up I have tried several brands. Thanks
sweetesthoneybee: When you close your seam, do you sew over the elastic too?
Wendy Shepard: I'm 58 yrs old and have NEVER stopped using scrunchies, I've got a jar full of them!!!
kala shrestha: You have natural talent. I have been trying to sew up crunchie too but it does not come out perfectly
Linda Mesa: " you made it your the only one who can see it" that is the hardest part for me?! If none stitch looks a little off i cant stand it Im such a perfectionist its pathetic! Thanks your great love it!!
Lang Lang Mei: I was wondering if the hair tie base will support thick hair well? or do I have to use garter base to address that concern? I'm planning on selling some scrunchies and I honestly prefer a hair tie base but I worry about buyers with thick hair.
Allyson Mast: What foot, stitch, width, etc are you using? I’m new to sewing I can do everything up to closing... I always get stuck there as the thread seems very visible even once I scrunch it up.
Nancy Chandler: Loved your method the best!
Rachel Brown: I'm gonna try this in 5 minutes hope I will be able to do it I'll keep you updated
isabel stotz 🌷: Loved the project but I found them a little small so I added 2 inches to have more scrunch
Laura McKenna: Hey Jess -- when you close up the seam, do you sew OVER the elastic? Thx!
Sandi Newton: Great tutorial. Easy to follow instructions. Is it even necessary to join the ends?
God's Child: Thanks Jess i have fine thin hair like u and the only elastic band i can use is the same!! I was yelling at u I'm the same jess now i can make some and be fashionable
Mog-Gyver O'Neill: You are blowing my mind..sooo many fantastic ideas for Christmas presents, and I want to make them ALL! I definitely am going to make these, as my, and my little niece's, hair is very fine! Genius!!
Rosemarie Lewis: If you iron over the end before sewing it is easier to insert end
Helena: Ok..11 seconds in and I scrolled out. Didn't have time to watch your antics..just get down to sewing already! I went to check another site and came back to you thinking "well, let's just check to see what she's got". I'm so glad I came back! Your sewing and explanatory comments are the best and easiest to follow. I've gotten used to your lighthearted personality and you have beautiful eyes! Thanks for the tutorial and I subscribed
Diana Bauer: This is so cool!
Alison Hingston: Jess, lightbulb moment. Instead of folding one end after the scrunchie is turned I do it at the beginning, before starting to sew the fabric tothe hair tie. Much easier. love your tutorials. Thank you.
Jess Milne: I'm loving the top floor wearing also... Did you make it?
joann polk: What was the size of the fabric you use when making scrunchies?
Rena Goss: Can u use glue, instead of sewing?
Joshua Caudell: My favorite way to wear a scrunchie is wearing a scrunchie as a bracelet on my wrist. Is the process the same when making a scrunchie to wear as a bracelet on the wrist?
Nepeta Leijon: you could probably use a safety pin to keep the fabric bunched back as you sew so you continue having room on the elastic
Jubilee Dueck Thiessen: How long and wide were your fabric pieces?
Mikaela Stevenson: Do you sew over the elastic band when you close the last seam?
M0TH: I’m having trouble turning the scrunchie inside out - I’ve been trying for 10 minutes but no matter what I do it won’t go all the way through . I’m not sure how you managed to push the clip all the way through to the other end,. Could you help me please?
Himekaji: What is a good sewing machine for beginners? Also do you sew the fabric into the hair tie piece?