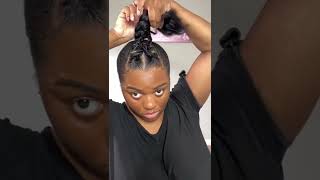
Braidless Crochet Feat. Sams Beauty (Italian Perm Yaki Crochet Hair)
- Posted on 21 June, 2017
- Ponytail Hairstyles
- By Anonymous
Would you believe me if I said this was crocheted? Well believe me! This easy crochet style was achieved without the long "braid down" process. I added some hair jewelry for an "Afropunk vibe" && I love it! I found this to be one of the easiest crochet styles I have achieved to date. This is another great low maintenance protective style for my girls who are still holding strong to their workout regimen. #BlackNoSugarNoCream
Link to the hair:
Authentic Synthetic Crochet Pre Looped Italian Perm Yaki- 18"
http://samsbeauty.com/service/Authenti...
My Amazon StoreFront : https://www.amazon.com/shop/astoldbylo...
——
C O N N E C T W I T H M E:
INSTAGRAM: @iamlouisemobley
FACEBOOK: Louise Mobley
TWITTER: @iamlouisemobley
B U S I N E S S:
For business inquiries please contact : [email protected]
*Some affiliate links are used, which means I may receive a commission should you decide to click that link and make a purchase. My content is 100% not influenced by brands, PR products received, usage of affiliate links, or brand partnerships.
Hey you, sis, I'm back with another video, and this video is going to be on a quick, easy, crochet style. Crochet is one of those timeless hairstyles, and so, if you would like to see how I achieve this, bracelet crochet style stay tuned. Okay, so I'm starting off on freshly washed hair, so I've been natural a little over a year now, and I wanted to straighten my hair just to see the length and to see how straight I can actually get it. So here are the result, so I'm starting off with that braid down the middle and I'm just going to part my hair and such okay. So the braiding hair that I'm using is just some regular Kanekalon hair that I got from my local beauty supply store. So I'm just going to take a small piece of that, so that I can braid it into my natural hair, okay, so some what ladies, who are non breeders, you could actually omit this portion of video and the portion of the video where I'm going to be Doing the side braids and just do the two top knot: okay, so I'm not going to go into full detail on how to cornrow hair. There are plenty of videos on YouTube for that, but basically I'm just cornrowing my hair straight to the deck and then I'm going to do the same to this side. Okay, so I decided that I wanted to funk up this style, so I added some of these chains that I got from Michaels and all I did was open the chain with a pair of scissors and then slide it into my hair and close it. And then it stays fully secured. So now I'm just going to, like I said, do the cornrows coming from the back of my head to the front of my hair on both sides of my head? Okay. So now that I have the cornrows completed, I'm going to take and part my hair into a smaller sections and the one that I have right here. The section is going to be a smaller square section inside of the larger square section, and then I want to take anything to make a small bun in that small section that I have okay. So once you have your bun, your section should look something like this. Okay, so the hair that I'll be using in this tutorial was sent to me by Sam's Beauty. Sam'S Beauty is an online beauty, supply store that sells wig, hair products, skin and nail care products, hair accessories and fashion jewelry. This particular hair is by the brand authentic and is their Italian perm, Jackie, DIY style hair. So the hair comes in two lengths, 18 and 22 and in this video i'll be using 18 and share. So this hair comes pre luke and i'm going to show you what it looks like to do. The crochet, without the loop and wit salute the loop actually makes it a lot easier, but i'm going to show you both methods. Okay, so basically we're going to be crocheting, the hair around the bun and basically, like any other crochet tutorial i've done in the past. You just want to stick the needle in loop, the hair, pull the hair through and tie a knot. So now i'm going to show you how to do it with the loop. You just want to stick the needle underneath the hair. Take the pre looped, hair and loop it onto the hook of the crochet needle close the latch on the needle pull the hair through and then speed. The other side of the hair through the loop tie it in the nut and then you're good to go. And you want to do the same thing: if you don't have the loop, you just want to hook the hair into it, close the latch, pull the hair through and then once again beat the hair through tie it in the night and there you have it. Okay. So once you're done crocheting the hair, it should look something like this okay. So now I'm just going to gather all of the hair and pull it into a high ponytail. So my hair is a little shorter on the sides and in the back, because if you saw in my previous videos, I am still growing out of a tapered undercut look, and so I'm going to do the same exact thing that I did on my other side. On this side, okay, so now that we have both of the ponytails I'm just going to take both of the ponytails and grade them all the way to the end, because it's hair is a lot sophiar than a kinky texture. You want to secure the ends with a rubber band, okay, so to lay down my hair in the back as well as my edges, I'm going to be using the blueberry blitz, curl control, paste and olive oil eco styler gel. I'M sure that every natural girl is very familiar with the toothbrush for the edges. Yes, I feel like the brushes, don't give it as good as a toothbrush. So, yes, I have a dedicated to the press for my edges and it works perfectly. So now I'm just going to put my hair back into the ponytail and then create my button. Look at how undetectable that crochet is it's nice and flat and it actually looks like it's. Your hair want to use a couple of bobby pins to secure the bun. So that your braid just doesn't come falling apart yeah, please don't mind me when I'm making my YouTube videos. I really think that I'm a singer, slash actress. I do it all, so I'm going to do the same thing that I did on the other side, I'm going to braid it all the way to the end and then I'm going to create the bun okay. So here is what the hairstyle is looking like. So far, okay, so I'm a little OCD about my edges, so I'm just going to take a little bit more eco, styler, gel and then brush them down again with my handy two fresh and no style is perfected without a headscarf. So I'm going to add my headscarf so that the style and my edges can lay flat while I'm doing the rest of the style. So I didn't want these side braids to be too long. So I measured them at the length that I want it, and then I just took a lighter and burnt the end. All of the beats that I'll be using, I also picked up from Michaels, so the beating portion is probably the easiest portion of this tutorial and I simply just put the beads on the braid and then secure the braid with an elastic band. At the end. Good luck, just love with your kinda girly when go missing anyway; no just Randy! Okay! So here is the final product. Yes, you see those edges laid. That'S all about it, honest! No! No friends! No! No! No! You know how to go. You got your fair share of admirers, they call your phone, you try to add. Thank you all so much for watching. If you thought this was easy to follow along tutorial. Let me know that in the comment section I look forward to seeing you all in my next video bye

Comments
Chimdi Ihezie: Super cute!
Forever Dianna: ur so beautiful and funny i will be tring this soon !!