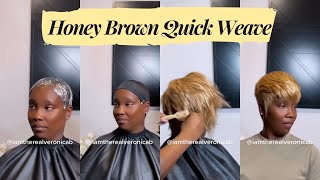
How To: Versatile Quickweave W/ Leave Out | Beginner Friendly
- Posted on 12 July, 2022
- Ponytail Hairstyles
- By Anonymous
#quickweave #unicehair #beginnerfriendly
For all business inquires & collabs:
Hey bougie babes, welcome back to my channel! Today I will be showing you guys how I got this super sleek, super easy, super versatile quick weave install. If yall want to see more like this or a more detailed version definitely leave me a comment below.
*this video is not sponsored*
hair from @unice
LIKE | COMMENT | SUBSCRIBE
XOXO, Chantler Tiara
♡ F O L L O W M Y S O C I A L S ♡
IG: https://www.instagram.com/chantler_ti...
Hair IG: https://www.instagram.com/soaddictive......
Twitter: https://twitter.com/Chantler_Tiara
TikTok: @chantler_tiara
.
.
.
.
For all business inquires contact me at:
—————————————————————————————
♡ FAQ♡
Age: 28
Camera: CANON g7x Mark ii
Editing software: Final Cut Pro
I do not own the rights to any of the music used in this video. all rights belong to those respected owners
You need to give it up: hey guys, welcome back to my channel and welcome to my channel. If you are new, my name is chala tiara over here on my channel. We focus on everything, lifestyle, fashion and beauty all while trying to stay on a budget. So that is something that you guys are interested in. Make sure you subscribe down to the channel and also give this video a big thumbs up, because i know you're gon na, like it already. And if you have read the title of the video, then you already know what we're getting into today and, as you can see, we did a bomb install okay and we didn't do no funnels. We do no closures. This is leave our honey yeah. I grew this overnight period, mm-hmm yeah, so in today's video i'll be showing you guys how i got this versatile, quick weave using some old bundles from you, nice hair. So if you guys are interested in that make sure you keep on watching also um watch this video till the end, because i will be showing you guys a few different hairstyles that you can do um with a install like this. So yeah. Let'S just get straight into the video, because ain't no need for an introduction girl. This in style introduces itself yeah. Let'S go all right y'all, so i'm starting off with freshly washed and blow-dried hair and when you blow dry, your hair make sure that, like you blow dry, it real real good because your blow dry, it does a lot for your leave out. So you want to make sure that it's blow dry really good, so i try to get it as straight as possible with the blow dryer. So that way, all i have to do is pass like the flat eye over once and don't mind my tan line. That'S why i'm doing it quickly today, because i'm trying to get rid of my tan line, because i've been wearing prontos for so long. So just don't don't mind that okay, so yeah. The first thing that i'm going to do is i'm going to do like a um like a versatile quickly, so i'm going to go ahead and part out my perimeter and part out like where i'm going to do a middle part. Well, well part of this part, because i'm going to do a little one, so you guys can go ahead and watch me while i part my hair out and then i'll be back whenever it's time to start it up. Tell me don't major, tell me okay, so i tried to do this without a mirror and it didn't work. So i just went part it off camera. Let me show you okay, so that's like my parting pattern. Leaving the size out in the back is optional, but because i want a person to quickly look or whatever that's what i decided to do. So. What i'm about to do is i'm about to braid this away and then i'm going to break the center, i'm just going to do some straight bags. It does have to be perfect because you are going to glue hair on top of it, so yeah yeah. This is actually my first time doing a quick weave on myself. So, let's see how it turns out, tell me dell major washing machine going but anyways i got my hair completely flat. Let me show you all the back, so this is the back of my hair. Just to show you guys - and i did on the tail end - i did go ahead and sew it down just so i could be flat, so the only three things that i'm going to use today hold on. Let me show you so i got a black cap because that's what i'm going to be gluing my track onto, i have um some protective mold, so i'm gon na put this on top of my cap to make like an extra barrier so that way, the actual Glue doesn't get on my head and then i'm using this um brand of hair glue, and then i just also bought some um, some lace braid and that's going to be the initial um. That'S going to be the initial adhesive that i'm going to use to attach the black cap. So that way, i know where to put the bonding like the the bond and stuff: that's basically what i'm about to do. I'M going to go ahead and like spray it with the red spray, put my cap on and then start applying this, because this is probably going to take the longest to like to dry. It says 30 seconds but we'll see my cap is done so, like i said i have some old hair that i took apart a wig. So that's what i'm going to be doing if you can refrain from cutting your bundles as much as possible. Do that. But i'm reusing some old hair, so it is what it is. You found me so yeah, so these gon na be my first two pieces or whatever, and what i'm gon na do is i'm gon na curve it and i'm gon na go up underneath it first. You know you want to start with a u-shape, so i'm gon na do that and then i'm gon na come back with the second piece and go right on top of it to go to this side. So i'm gon na do the back and then i'm gon na come back and show you guys what it looks like halfway through okay, all right y'all. So it's been about 10 minutes, and this is where we at so far i feel like. I have so much luck to go, i'm about to start making them like bigger apart in the back, because i still have. I don't have that much hair. I thought i had like three bundles, but i guess i've only used two. So i'm about to keep going and i'll be back, but i just want to show you guys the progress after about 10 minutes and what i'm doing is i'm putting the glue on the track, laying it making sure that i'm laying them on like on top of Each other, but the closer i go up the more i want to layer it like that. So that way, when i lift it like this, it all covers up and then i'm blowing it with the blow dryer in between. So that way it dries faster because, like i said i have somewhere to go so i'll, be back when i get to the top okay, my so that is the end of today's video. All i did was flat iron, my hair, i added some baby hairs. You know what i'm saying i love and had to go. Do what i want to do, which was go, get my makeup done, but anyway, so yeah. This is the final look. I want to show you guys a few different um, don't mind my bra, but i want to show you guys a few different like hairstyles, that you can do with this. So of course you can do a low ponytail. It does go behind my ears, so you can always do a little ponytail like that um. You can also. Let me turn around yeah. You can also do a high bun like this. As you guys can see, the back is completely covered. You can't see any tracks. Um, this is what it looks like in the front. If you want to let some of your hair down and wear like a clock clip - oh my god, since that is in style, that'll, be so cute y'all. You can also do like a um, a half up. Half down look yeah get into it real, quick, so yeah, and then you could probably also do like um like a flip over method like that like if you comb it really well, you can wear a flip over method like that y'all. This quick weave is so versatile, y'all and i'm so excited that i did it. I think it'll be the perfect break that i need from frontal. So that way i can get my tan line order. I will probably be wearing quick ways for some time now, because i just think that you know this is so cute, but i want to test it out and see how it'll work in the gym being that i have leave out in um. So i am going to go work out tomorrow morning and i'll. Let you guys know either on my story or on tick tock or something like that, and let you guys know um how it holds up in the gym or if you guys want like a two week update because i'll probably try to keep this in. For a good two weeks and if you guys want a two-week update, let me know in the comments down below and i'll be sure to do that for you guys but yeah this is it guys? I can't wait to curl her and you know: wear her out and things like that. It'S giving very much natural, i think, all in all, i may have used two and a half bundles and it's giving like a natural like if it was growing out of my scalp. That'S what is giving. I did layer the front so that way it can all like fall and blend to the longer length. So i have layers in the front and yeah that is pretty much it. So thank you guys so much for watching today's video. If you enjoyed it or learned something or didn't, learn anything make sure you guys give it a big thumbs up, don't forget to subscribe to the channel and hit that bell notification so that you don't miss out any of my uploads and leave me some comments down Below of what you liked about today's video and if you made it to the end, leave me some black hearts, because i love you guys so much and yeah. That is it for today. I will see you all in my next video bye is. I
Comments
Dana Thomas: Omg !! You did an awesome job!!
Dana Thomas: 2 week update please !!