Black Ponytail Hairstyles 2021 | Diy Green Box Braid Drawstring Ponytail Styled | Missuniquebeautii
- Posted on 12 October, 2020
- Ponytail Hairstyles
- By Anonymous
#drawstringponytail #boxbraidponytail #boxbraids
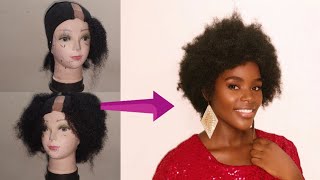
Black Ponytail Hairstyles 2021 | DIY Green Box Braid Drawstring Ponytail Styled | MissUniqueBeautii
In this video, I was able to show you guys how I styled the green box braid drawstring ponytail I created in one of my previous videos. This style was very quick to achieve and came out very beautiful. This hairstyle is Halloween festive and can be worn with any costume idea in mind. You can switch it up by using different colored braiding hair to make it match whatever costume you decide to wear. Like this video, share it with your friends and family, and don't forget to subscribe to my channel to be notified of my future uploads.
Follow Me On Instagram@: https://www.instagram.com/missuniquebe...
Follow My Business Instagram@: https://www.instagram.com/missuniquebe...
Shop My Website https://pressedbymissuniquebeautii.com...
Discount Code: YouTube25 for 25% off the Entire Website!
Shop for your favorite beauty essentials! Press-on Nails, Lip Gloss, Mink Eyelashes & MORE!
I also make and sell Headband Wigs, Half Wigs (without the headband) Lace Closure Wigs, Frontal Wigs, & Drawstring Ponytails. If you are interested in having me make a wig or drawstring ponytail for you, please send me an email at [email protected]. SERIOUS INQUIRIES ONLY!
Products Used:
One More Easy Braid Hair 26 inches 1b/Green https://www.amazon.com/stretched-Kanek...
How To: Box Braid Drawstring Ponytail
https://www.youtube.com/watch?v=wqL-aY...
How to DIY Drawstring Ponytail: Beginner Friendly https://www.youtube.com/watch?v=MbG9B_...
Equipment Used
Cannon SL2 https://www.amazon.com/gp/product/B071...
Neewer Back Drop Kit https://www.amazon.com/gp/product/B07P...
Ring Light https://www.amazon.com/gp/product/B08D...
Rose Gold Backdrop https://www.amazon.com/gp/product/B01C...
Instagram: @pressedbymissuniquebeautii, @missuniquebeautiiyt
Facebook: @pressedbymissuniquebeautii
Website: pressedbymissuniquebeautii.com
E-mail: [email protected]
Hey my beauties, it's miss unique beauty in the built-in and i'm back with another video. If you are new to my channel tap that subscribe button, so that you won't miss out on any of my new uploads and if you have already subscribed, what's good, what's poppin welcome back to my channel the hair that i'll be using today is this 1b green Hair that i received from a company called one more hair on amazon, and i previously made a box braid drawstring ponytail with this hair, and i will leave the link to that video in the description box below so that you guys can go check that out. The first thing that i'm going to begin doing is part her hair into two sections, separate the back section from the front section, so that it would be easier for us to complete this style. Once i completed parting it into two, i used two clips to separate and hold the back together and then hold the front together so that we can begin braiding her hair. Now i'm going to begin parting, each section that i want to cornrow in the front of her hair. Now the style that we are doing today is cornrows, going all the way up into one ponytail, so that we could be able to put this drawstring ponytail at the top, and the cornrows at the front is going to kind of be in like a curved design. In the front and the back section is just going to be cornrowed straight up now. These cornrows are not feed in cornrows they're, just regular cornrows, with braided hair added right into it, just so that she can have that highlighted effect in her cornrows to match the color. That'S in the drawstring ponytail now i'm just adding some style factor edge, booster to her edges and to the beginning of the braid. Just so, i could be able to make sure that the part is really precise, that her edges are laid really precisely and that i'll be able to get a nice grip on the beginning of her braid. Now i'm going to begin adding this green hair to this cornrow and just continue to cornrow this along the front side of her hair. I'M going to be showing you guys exactly how i do the first three cornrows and then i'll be right back for the back section of her hair. Now i do want to let you guys know that we did hit 000 subscribers yay and that i will be having a giveaway on my channel and i will be posting the giveaway rules and exactly what needs to be done in order for you guys to be Able to participate in winning the grand prize and this giveaway now. Are you guys ready to hear what you guys are going to win comment down below in the comments section? If you think that you know exactly what the grand prize will be, i'm not sure if you guys do, but if you think you know what that grand prize will be comment down below exactly what you think it will be. And my next video, i will be posting - will have the giveaway rules and exactly what you guys will be winning and exactly what you guys have to do in order to win and participate in this giveaway that i will be having on my channel. I do want to say thank you to everyone that is supporting my channel that are watching my videos and that are actually learning something from my videos. I see the comments. I read every last comment and i comment back to every last comment. So if you guys do want or have any questions that you want to ask me, you can just comment them down below and i will be answering your questions and i try to answer everyone's questions within the same day. So any questions that you have just comment down below and i will answer them and thank you guys so much for supporting me. This giveaway is just to show my appreciation for you guys actually supporting my channel. Thank you so much once again. This is what the first three cornrows is looking like once i've completed them and now i'm going to finish the entire front section and then i'll be back for the back section of her hair. Now that i've completed the front section of her hair, i'm going to begin with cornrowing the back section of her hair and the back section of her hair. I'M just going to be cornrowing going straight up to the center of her head. Now, when i'm separating and dividing this green hair to add it onto her hair, i'm not using too thick of a strand, because when i finish this entire style, i don't want that bun that i'm going to be making underneath the drawstring ponytail to be too big. So i'm only adding a little bit of hair and the only reason why i'm adding hair at all is just so that she can have that green going throughout her cornrows so that it can match the color in her drawstring ponytail, so that it just doesn't. Look like her cornrows are black and then the ponytail is green. So adding this hair gives that green highlighted effect throughout her cornrows so that it would the whole style would just look cohesive. Now, i'm just going to continue with cornrowing the next three cornrows in this back section and then i'll be right back once i've completed cornrowing her entire head. This hairstyle is a very quick cornrow hairstyle, very simple, very quick, very easy to execute. If you guys do know how to cornrow it's very easy to do, and then all you have to do is add your drawstring ponytail at the top, and it just brings the entire look together. Adding that drawstring ponytail at the top provides the fullness that you want and the length of your ponytail right here, i'm just showing you guys what the cornrows look like in the back, the two cornrows that i made in the back and the entire front section. This is what it's looking like. Now, i'm going to continue finishing off the rest of the back section and i'll be right back. This is what her cornrows is looking like once i completely finish, cornrowing the front section and the back section of her hair. I also went ahead and rubber band her hair up into a ponytail so that we can begin wrapping this around and making it into a bun at the top so that we can place our drawstring ponytail on top of that bun and complete this style. Now all i'm doing next is i'm wrapping her hair around to make it a bun, a really really tight small bun at the top. You do not want your bun to be too big, or else your drawstring ponytail will not fit correctly at the top of your bun. This is exactly what your bun should look like, not too big, not too small, and it's just the right size to fit your dressing ponytail. On top of now, i'm showing you guys that i'm taking one extra long bobby pin and i'm sticking it right into the top of the drawstring ponytail. Then i'm going to stick that right into the top of her bun section and then i'm going to wrap the net around the bun and pull tightly onto the drawstring of this net. Once you pulled it very tightly and you feel like your ponytail is secure. You want to take your string and wrap it around the base of your ponytail and then secure it down with another bobby pin or if you can tuck it, underneath your bun. That will work as well. Now i'm going to take three of these box braid strands and i'm going to wrap it around the base of the drawstring ponytail, and this gives your ponytail more of a natural look now. This is what her hair is looking like once i've completely finished this entire style. This drawstring ponytail is beautiful. I love it. Her hair came out gorgeous. I love the cornrows very simple, very halloween festive and very just gorgeous. I really hope that you guys enjoyed this video comment down below any questions that you may have like this video and don't forget to subscribe bye. My beauties


Comments
Yesenia Ramos: Great jobs absolutelyyyyy loveee itt
KianaVision: Nice video! I hope you'd enjoy my videos too. Keep up the fantastic work!
Everyday Life with Aisha: Omg I love this video great job. Where did you get the edge brush with the red & black zebra print? I want one
Jamaica Nice: Congrats on 1k subz
TTV YTbrezzy_: Hi mommy and hi Christina