How To Do Crochet Braids For Beginners|Cheap*2022*Thinning|Alopecia
- Posted on 20 August, 2022
- Short Hair
- By Anonymous
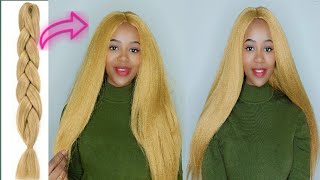
This video is a crochet braid tutorial on how to crochet hair to look natural especially for people with thinning hair or alopecia. This beginner friendly video gives a step-by-step how to crochet bohemian hair with simple easy detailed steps. This style took 2 hours to complete. The cost was $4.99 a bag and I only used 2 bags of hair. This is a soft natural hair look with a little color of brown and blonde. This style is easy and there is no need for a , wig, lace closure, leave out, hair glue, braids, etc…..#crochethair #crochetbraids #crocheting #crochet tutorial #naturallooking #natural look #bohemian #hairtutorial #curlyhair #shortvideo #suggestedvideo #viralvideo #noleaveout #diywig #diy #wigs #braids #thinninghair #alopecia#crochetwig #braids #cornrows #natural #alopeciahairtransformation
Products used:
Bohemian curl hair color 30 two bags
Crochet needle
Suave mousse
Hello, everyone, if you want to see how i got this beautiful, crochet braid, look then just stay tuned. I have you covered and we're just going to jump right into this video. So the first thing you're going to do is grab some hair and your crochet needle. This is bohemian curl hair in the color 30.. You want to grab some scissors and you just want to cut it in half like so now. You want to separate each strand by two okay, so i already have my hair braided, i'm showing you a picture of how short my hair was. I also have a video if you want to go out and check that out, but yeah. That'S how my braid pattern is, and now it's time to crochet, so you just want to grab your crochet needle and you want to take it underneath your braid. You want to grab that crochet hair, bring it through grab the loop and then bring that hair through, and you just want to do this process about four times or three to four times, just to make sure that it is secure, because you do not want the Crochet braid to come out of your hair, so that is all you have to do and then just pull it to tighten it up. I did another one just so you can see. Okay, i'm just crocheting, i'm gon na do about four rows and then i will show you how the four rows are. Looking i start on one side and then i go to the other side. I'Ll show you that so there's one there's two there's three and four rows, so i'm just gon na start on the other side and i'm gon na do four more rows and i'm gon na show you how that look after i get through with that. Okay - and these are the other four rows - one two, three and four - and now it's time to do the back. So i'm just gon na kind of speed. This up and i'll show you how that look once it's completed and it looks something like that and it's full and it's fluffy and the hair feels so good and so natural. So this is the front and how it's looking and i'm just gon na start crocheting. The top of the head, like so okay i'll pause it just for a second just to let you know, i threw a piece of blunt streak in there and i think i took about four pieces of hair four to five pieces of hair that i crocheted in To give it some highlight, so just stay tuned: okay, now it's only two braids left and i'm gon na show you how to do like the invisible part of crocheting. So you just want to grab your crochet hair, bring it through and you want to just grab one string of hair and you just want to loop that about three to four times and then you just want to tighten it up. And then you just want to repeat that process, so i will let you see that and see when i lay the hair down it kind of comes over like that, giving you like a invisible part, so you just want to repeat the process. Okay, this is how it should be looking once completed and you see how you don't see any knot. It is just like an invisible part, so you what you do to one side you have to do to the other side and i'm just showing you that at this time, okay once completed, it should look something like that and now it's time to trim the hair And shape it, as you see, i am doing i'm just cutting starting at like the top and then cutting downward to kind of give it that shape that i want now, i'm just framing my face, and next you want to grab some mousse and you just want To put that all over your head, saturate your hair, pretty good and get the curls of to popping. So this is the finished look, and if you like this video, please give it a thumbs up and subscribe to my youtube channel. I greatly appreciate it. Thank you.
Comments
Chioma Onuoha: Love the color sis. You did a nice job