Amazing Beauty Hair Diy Tape Extensions | Do'S And Don'Ts | Tape Ins On Short Hair
- Posted on 01 September, 2022
- Short Hair
- By Anonymous
#HairExtensions #AmazingBeautyHair #tapeins
For best video quality, click settings in the top right corner, then quality, then advanced and select 1080p60
Hey all my Beautiful People, Welcome back to my channel! This review is of Tape In Extensions from Amazong Beauty Hair ! Link to hair listed below. Like, Comment and SUBSCRIBE! ♥️
Let’s connect
Instagram:
https://www.instagram.com/stephnicole_...
Follow me on Tik Tok
https://vm.tiktok.com/TTPd2nYE1p/
Business Email:
Amazon Storefront:
https://www.amazon.com/shop/stephanien...
Products Mentioned: https://bit.ly/3AEqIW9
More Color Tape in Hair: https://bit.ly/3q0vqJe
Home page: https://bit.ly/3wKVtru
Coupon Code: "ABHSH" 20% off for Hair Extensions
-------------------------------------------------------------
Contact us:
Instagram: https://www.instagram.com/amazingbeaut...
Facebook: https://www.facebook.com/amazingbeauty...
Email: [email protected]
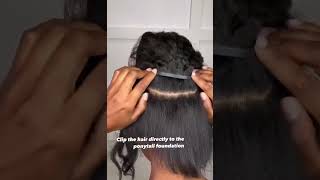
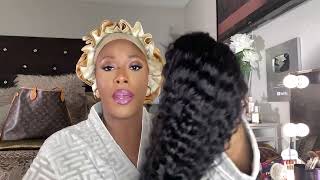
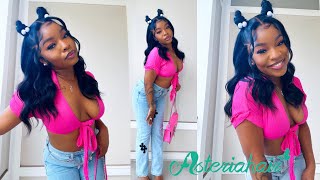
Hey guys to see how i went from a blunt kabob to these long, luxurious curls, using tape ends from amazing beauty, hair make sure to keep watching. This is the diy process of how i achieved this. Look on myself, including the do's and don'ts, to start off. Let me show you the unboxing and everything that came with the hair and also all of the specs alright guys. So here are the amazing beauty, hair boxes. I got four boxes of the color number one jet black tape. Extensions each box for 22 inches is 117 dollars. That'S a hundred percent premium, remy hair in the straight texture. Each box comes with a clip, a comb of course, the hair extra replacement tape and a brochure. Each box comes with 20 pieces of the tape, extensions and each tape is about an inch and a half tape. Bands can last up to six months with proper maintenance. If you're, just looking to add, highlights a one pack is recommended two packs for volume, three packs for length and volume. But since my hair is super thick, i got four packs of hair and each pack of hair is 50 grams, so make sure to check out my description box. I'M gon na put a link to amazing beauty's website. They have a wide selection of colors and textures to choose from also if i have a promo code i'll put that down in the description box as well. So let's go ahead and install so i have my four bundles of hair. My clips a couple of different combs and to start i'm going to part my hair from ear to ear and clip the front part away, i'm parting ear to ear just in case. I want to do a half up half down, look down the line now that i have the front portion of my hair clipped away. Next, i am going to part out my leave out, so the sides, as well as the very back of my hair, is where i'm parting. So when i pull the hair up into a ponytail, you will not be able to detect the extensions. The back of my hair was super hard to navigate, since i am working off of only one mirror. So if you're like me and you're only working on one mirror, you have to just feel your way around. That'S why my parts are not perfect in the back. So now it's time for me to install my first tape extension and, to be honest, i am learning as i go here. So first things. First, i remove the white piece of paper. That'S attached to this tape in so that the tape is exposed, and now i am just taping, the extension upward making sure not to put the extension too close to my scalp so that it's easy to move up and down. Next, i brought the hair down which left a sliver of hair in between, so that i can install the tape in on top of it, and i sealed it together by just pinching together. So the back of my hair is completely done. I do apologize that i didn't film the whole thing. However, it was struggle city over here, but i'm going to get more in depth with the front part of my hair. So right now, i'm just putting a part where i want my part to fall. I'M a left side, part girl, so that's where i parted my hair. So now let's go ahead and install these tape. Ins in the front of my hair. So right now, i'm just parting closest to my ear, clipping the hair away and notice that the part is angled towards the back. So it's slanted backwards again. This is for when you pull the hair up, the tracks will not be detected so again, i'm installing the tape in upward, which is the method that worked for me. So now. I can just part the hair again only leaving a slight sliver of hair in between you should still be able to see the extension through your hair. Now i'm putting the other tape in right on top and then sealing it together with my fingers, you do have the option to use your flat iron to seal. Those tape ends together kind of melts the glue into your hair. However, i just used my fingers so now i'm just parting, the hair that i want to leave out away. I left a little sliver of hair in between each tape extension, so i just parted off a little bit of hair and now i'm going to take another tape in and tape that upwards, then bringing that tape in back down and, as you can see, there's already A sliver of hair, that's attached to the tape in so now, i'm just going to put another tape in on top and seal it together with my fingers. The key to tape in extensions is to only leave a small sliver of hair in between those tape. Extensions. So, where you're sealing those tape ends together, you should be able to see the tracks through your hair. You only want a small sliver of hair so that those tape ends can seal together. So again, i parted my hair down a little sliver of hair in between my tape ends, and now i am putting that tape in angled up bringing down that hair and parting. It making sure it's only a sliver of hair in between there and taking another tape in taping it right on top of that tape in and sealing it together by pinching it with my fingers, be mindful of how much hair you leave out around the perimeter. You want to leave out enough so that if you do decide to pull the hair up into a ponytail or a half of half down look, you will not be able to see the extensions. So i parted my hair again leaving another sliver in between the tape. Extensions now i'm using another extension and taping it upwards, then bringing it down, leaving a small slither of hair in between the extensions and then putting one more on top to seal it in so, let's revisit the do's and don'ts i should have stopped here, but for Some reason i've made another part and put another extension right there. On top again, you want to leave enough leave out out so that you cannot detect the tape ends. Since i put this tape in too close to my parting line, i had to be very mindful of where it was and how to cover it. Also, another don't don't use a comb or a metal bristle brush towards the top, where the tape extensions are attached to your hair use a bristle brush instead, but you can use a comb or a metal brush at the bottom of the hair. We are not trying to cause any kind of damage to your natural hair, so now i made it to the other side of my hair and again i am making the part angled towards the back and again taking that tape. Extension taping it upward and then bringing that hair down parting it. So it's only a small, tiny, tiny sliver of hair and sealing it by putting an extension on top and pressing it with my fingers to secure it. Can you spot where i messed up? I did not leave enough hair out around my edges to pull the hair up if i decided to do a ponytail, so i parted a little sliver of hair down. So now it's time to install another extension and i'm on my last pack of hair now so again putting that extension taping. It upward bringing the hair down parting to make sure it's only a sliver of hair and then putting an extension right on top sealing it together with my fingers. So i did use a little over two packs of hair in the back of my head. A little less than a whole pack on the left side of my hair and the rest of the extensions on the right side. So i did end up using the entire four packs of hair. So, as you can see, i'm making my way up and for this portion i am putting two extensions right next to each other and then parting, the hair down making sure again it's only a small sliver of amount of hair and then putting an extension right on Top and sealing it together with my fingers. I really hope that all of this makes sense, because it is super hard to explain and also this is the process that works for me. It'S not necessarily the process that will work for the next person, but the best pointers that i can provide is to take your time with this. It took me about an hour to do. My entire head also make sure you leave enough hair out all around the perimeter of your hair and your parting line, and also to only leave a tiny amount of hair in between your tape and extensions so that they can seal together and will not be loose. And not slip out. Let me stop talking so you can watch the process, i'm almost finished installing the tape ends and, as you can see again, i'm putting a tape in way too close to my parting line. Please do not do that because you will have to be mindful and make sure that those extensions are covered at all times. So now i'm just combing through and, as you can see, everything is looking full and luxurious. So i'm going to go ahead and brush everything up all of the extensions to see if i am able to achieve a high ponytail without the extensions being exposed. The only place where i was able to see an extension was right there in the front, which was to be expected because my edges are thin in that area. But overall i think i did a great job with this install with it being my very first time and i'm doing it on myself. So i'm just making sure that that part is defined and combing through the hair again and i'm going to turn around. So i can show you all angles. I went ahead and put on some makeup because this is my birthday weekend and i have plans tonight so as you can see that swing action, the hair is super lengthy right now, i'm just going to make some layers in the front so a face frame and Just cutting down in an angled motion and i'm going to do that on both sides. So just sectioning out the front portion of my hair and then cutting down in an angled motion for a face frame. And now i'm throwing all of the hair to the top of my head. So i can make some quick layers in this hair so pulling all of the hair frontward and then cutting just straight across and now, let's throw in some curls. So with my conair curling iron, i'm taking small sections of hair and curling towards the back. If you have seen my videos in the past and how i curl my hair, you know i curl towards the back and when the curl is complete, i release it from the curling iron pinching it together to seal in that heat, before releasing always curling towards the Back and that's on both sides, i want that fair faucet curl look overall, i will say that installing tape extensions is not necessarily beginner friendly. However, if you do have someone who is nice and willing to install the back portion of your hair installing the front part of your hair is a lot easier but again remember to take your time, it's okay, to make mistakes. You are doing this on yourself. This is diy, make sure to leave enough hair out around the perimeter, as well as around your parting line and make sure to only leave a small sliver of amount of hair in between your tape, extensions so that they can seal together. If you want your tape, extensions to be long lasting, i would suggest to use some heat to seal. Those tape ends together, so a flat iron would come in handy, just hold it on, for a few seconds, make sure that that tape seals together between those tape, extensions and you're good to go, however, with just me using my fingers to press the tape ends together. I had no slippage whatsoever. My hair is relaxed, so the texture of these tape ends match fairly well with my hair texture. However, amazing beauty, hair has so many other textures and colors on their website, so make sure you check it out. So one side of my hair is curled and i'm going to do the other side off camera. As you can see, both sides of my hair are curled and i'm just finger combing through no snacks, no tangles. Nothing is absolutely gorgeous for this. To be my first time installing tape ends, i think i accomplished the look that i was going for so long luscious, loose curls with a swoop bang so again make sure to check out my description box where you can find a link to amazing beauty, hair. Like comment subscribe and as always i'll see you all next time,

Comments
StephanieNicoleH: For best video quality click the settings icon in the top right corner, then quality, then advanced, and select 1080p60
Sophie Chanelle: The final look looks amazing! Loving the curls and of course #leftpartgang
Sophie Chanelle: I’ve been wondering how these work! You are the perfect person to try them. They look great on you!
Alicia Jones: So when I saw your pictures I thought you had a sew in. You slayed this. It looks so good!
DeAnna Monet TV: I wished you lived closer so you could do mine You did a great job! & I’m loving your relaxer once again
Sammy Da Goat: Lovely Hair Stunning Curls
Remilane Style: Do they take your hair out at all when removing?
DeAnna Monet TV: Yesss left side part gang!
WOW Yummyyy: ❤❤❤❤ ❤